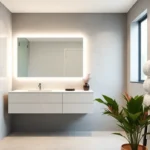
We’ve all been there – staring at our cramped bathroom wondering how to create a luxurious shower experience without the square footage to match. Small walk-in showers don’t have to feel claustrophobic or compromise on style. With the right design choices we can transform even the tiniest spaces into spa-like retreats that rival those grand master bathrooms we see in magazines.
The secret lies in smart planning and creative answers that maximize every inch. From clever storage tricks to visual illusions that make spaces feel larger we’ve discovered countless ways to make small walk-in showers both functional and stunning. Whether you’re working with a powder room conversion or squeezing a shower into an awkward corner there’s always a solution that fits.
Ready to turn your compact bathroom into a showstopper? We’re sharing our favorite small walk-in shower ideas that prove size doesn’t limit style or comfort.
Maximize Your Space With Corner Walk-In Showers
Corner walk-in showers transform awkward bathroom angles into functional showering spaces. We’ve discovered that these smart designs can add up to 30% more usable floor space compared to traditional rectangular installations.
Triangle Glass Enclosures
Triangle glass enclosures fit perfectly into bathroom corners while creating an elegant geometric focal point. We recommend frameless glass panels that extend from floor to ceiling, as they visually expand the space by allowing light to flow freely throughout the room.
These enclosures typically measure 36 inches on each side, providing adequate showering room for most adults. Custom sizing options allow homeowners to maximize their exact corner dimensions. The sleek glass walls reflect natural light, making even the smallest bathrooms feel brighter and more spacious.
Installation costs for triangle enclosures range from $800 to $2,500 depending on glass thickness and hardware quality. We suggest choosing tempered glass with a thickness of at least 3/8 inch for optimal safety and durability.
Curved Glass Doors
Curved glass doors create a spa-like atmosphere while efficiently using corner space in compact bathrooms. We’ve found that these rounded designs eliminate sharp angles that can make small spaces feel cramped and confined.
The curved profile adds approximately 6 to 8 inches of interior shower space compared to standard corner installations. Modern curved doors swing outward on pivot hinges, preventing water from pooling on the bathroom floor. This design works particularly well in bathrooms with limited clearance space.
Popular curved door styles include quarter-round and semi-circular configurations. Quarter-round doors work best in tight corners, while semi-circular options suit bathrooms with more available space. We recommend choosing doors that complement your bathroom’s existing design elements.
Neo-Angle Designs
Neo-angle designs feature five-sided shower enclosures that maximize corner space while creating an attractive diamond-like shape. We love how these installations provide more elbow room than traditional corner showers without requiring additional square footage.
The angled entry door eliminates the need for a wide door swing, making neo-angle designs perfect for narrow bathrooms. Standard dimensions include 38×38 inch and 42×42 inch base sizes, with the angled front adding visual interest to otherwise plain bathroom corners.
These designs typically include three glass panels forming the angled walls, with the fourth panel serving as the hinged door. We recommend choosing neo-angle enclosures with low-profile thresholds to create seamless transitions between the shower and bathroom floor. The unique shape also allows for creative tile patterns that enhance the overall design aesthetic.
Create Visual Space With Frameless Glass Doors

Frameless glass doors transform small walk-in showers by creating seamless transitions that make your bathroom feel significantly more spacious. We’ve found these transparent barriers work like magic to visually expand your shower area without adding square footage.
Clear Glass Benefits
Clear glass doors allow natural light to penetrate throughout your shower space, instantly making the area appear larger and more airy. We recommend choosing completely transparent glass over frosted or textured options to maximize this light-improving effect. Natural illumination bounces off wet surfaces and creates depth perception that tricks the eye into seeing more space than actually exists. Light reflection from clear glass surfaces eliminates visual barriers between your shower and the rest of your bathroom. Brightness extends beyond the shower enclosure when unobstructed glass permits light to flow freely throughout the entire space.
Minimal Hardware Options
Using minimal hardware maintains a clean and uncluttered appearance that’s especially beneficial in compact bathroom designs. We suggest selecting slim-profile hinges and handles to reduce visual weight while maintaining functionality. Fewer hardware pieces mean fewer surfaces to collect soap scum and water spots. Streamlined brackets and supports create modern aesthetics without overwhelming your small space. Simple mounting systems require less maintenance while delivering the sleek appearance you want.
Easy Maintenance Tips
Waterproofing all joints and surfaces prevents water damage while making your cleaning routine much simpler. We recommend regularly cleaning glass doors to maintain crystal-clear transparency that maximizes your visual space benefits. Material selection plays a crucial role in long-term maintenance, so choose glass and tile combinations that resist buildup. Weekly squeegee sessions prevent water spots from forming on your frameless surfaces. Proper sealing around door frames eliminates moisture problems that could compromise your bathroom’s structural integrity.
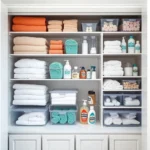
Incorporate Built-In Storage Solutions

Maximizing storage in compact walk-in showers requires strategic integration of built-in elements that maintain clean lines while providing essential functionality. Smart storage answers keep shower essentials organized without sacrificing precious floor space.
Recessed Shower Niches
Built-in shower niches transform unused wall space into practical storage areas for shampoo bottles, conditioner containers, and soap dispensers. These wall-mounted compartments blend seamlessly with your shower design when constructed from matching tile or sleek glass materials. We recommend customizing niche dimensions to accommodate your exact product sizes, ensuring bottles don’t topple over during daily use.
Creating multiple niches at varying heights maximizes vertical storage potential while keeping frequently used items within easy reach. Proper waterproofing during installation prevents moisture damage behind walls, maintaining structural integrity for years to come.
Corner Shelving Units
Corner caddies use often-wasted angular spaces by fitting snugly into shower corners, providing multi-level storage for various bath products. These specialized units accommodate everything from razor holders to body wash bottles without encroaching on standing room.
Wall-mounted corner shelves offer permanent storage answers that won’t shift or fall during shower use. Installing shelves at different elevations creates designated zones for different family members’ products, reducing clutter and improving organization efficiency.
Floating Shower Caddies
Magnetic shower caddies attach securely to tile surfaces or metal fixtures using powerful magnets, offering repositionable storage that adapts to changing needs. These innovative organizers hold substantial weight while maintaining their grip on smooth bathroom surfaces.
Adhesive-backed caddies provide non-invasive installation options that won’t damage existing tile work or require drilling holes. Strong adhesive strips create reliable mounting systems for lightweight items like soap dispensers, loofahs, and small bottles. Regular cleaning of both the caddy base and wall surface ensures optimal adhesion performance over time.
Choose Light Colors and Reflective Surfaces

We’ve found that selecting the right colors and surfaces makes all the difference in small walk-in showers. Light tones and reflective materials work together to create an illusion of spaciousness that transforms even the tiniest bathroom spaces.
White and Neutral Tile Options
White tile selections remain our top recommendation for small walk-in showers because they reflect more light and help spaces feel brighter and larger. Classic subway tiles in crisp white create timeless appeal while maximizing light reflection throughout the shower area. Neutral ceramic options in soft beige, light gray, or cream tones provide subtle warmth without overwhelming compact spaces.
Large format tiles work exceptionally well in small showers since fewer grout lines create cleaner sightlines. We prefer 12×24 inch white porcelain tiles that stretch walls visually and reduce visual clutter. Light travertine and marble-look porcelain offer natural stone appeal while maintaining the brightness benefits of neutral palettes.
Color zoning techniques allow us to use light tiles in shower areas while incorporating contrasting colors elsewhere to define spaces. This approach maintains an open feel while creating visual interest and functional boundaries within compact bathroom layouts.
Glossy Finish Benefits
Glossy finishes on tiles and shower walls enhance light reflection by bouncing illumination around the room. This effect proves particularly beneficial in bathrooms with limited natural light sources. High-gloss ceramic tiles create mirror-like surfaces that double the impact of existing lighting fixtures.
Polished porcelain tiles offer superior light-bouncing properties compared to matte alternatives. We recommend glossy white subway tiles or large-format polished tiles that create seamless reflective surfaces across shower walls. Glazed ceramic options provide easy maintenance while maximizing brightness in tight quarters.
Reflective surfaces work best when paired with adequate lighting to create dramatic visual expansion effects. LED strip lighting combined with glossy tile surfaces can make 5×5 foot shower spaces feel significantly larger than their actual dimensions.
Mirror Placement Strategies
Placing mirrors opposite windows or light sources maximizes brightness and creates depth illusions in small walk-in showers. Strategic mirror positioning doubles natural light penetration while expanding perceived space dimensions. Full-height mirrors on shower enclosure walls reflect both light and surrounding areas.
Slimline mirrors integrated with bathroom cabinets save space without sacrificing functionality. We install medicine cabinets with mirrored fronts that serve dual purposes in compact layouts. Wall-mounted mirrors directly on shower enclosures eliminate need for separate wall space while maintaining reflective benefits.
Frameless mirror installations create seamless integration with glass shower enclosures. These mirrors allow sightlines to continue uninterrupted, visually enlarging spaces beyond their physical boundaries. Corner-mounted mirrors capture and reflect light from multiple angles, amplifying brightness throughout small shower areas.
Install Space-Saving Shower Fixtures

Strategic fixture selection makes the difference between cramped quarters and a comfortable shower experience. We’ll explore three essential fixtures that maximize functionality while minimizing space requirements.
Wall-Mounted Shower Heads
Wall-mounted shower heads eliminate bulky shower arms and create a cleaner visual line from floor to ceiling. These fixtures reduce visual clutter by mounting directly to the wall surface, allowing water to flow freely without obstructing movement in tight spaces.
Modern wall-mounted models offer adjustable angles up to 25 degrees, providing customizable water direction without requiring additional space for positioning. We recommend choosing units with slim profiles that extend no more than 4 inches from the wall to prevent interference with glass doors or curtains.
Installation becomes simpler since these fixtures connect directly to existing plumbing behind the wall. Rain shower heads in wall-mounted configurations create a spa-like experience while maintaining the space-saving benefits that small walk-in showers demand.
Compact Faucet Systems
Compact faucet systems feature minimalist designs that keep visual space open and uncluttered throughout your shower area. Single-handle mixing valves eliminate the need for separate hot and cold controls, reducing wall penetrations and creating a streamlined appearance.
Digital shower controls offer the ultimate space-saving solution by replacing traditional valve handles with sleek touchpad interfaces. These systems typically measure just 6 inches square and can control multiple shower functions from one compact panel.
Thermostatic mixing valves in compact housings provide precise temperature control while occupying 40% less wall space than conventional three-handle systems. We’ve found that chrome and brushed nickel finishes work best with glass enclosures to maintain the open, airy feeling that small showers require.
Fold-Down Shower Seats
Fold-down shower seats provide comfortable seating without permanently occupying valuable floor space in your compact shower area. These innovative fixtures mount securely to reinforced wall areas and fold completely flat when not in use, adding just 2 inches to your wall profile.
Weight capacity ranges from 250 to 400 pounds depending on the mounting system and materials used. Teak wood models resist moisture naturally while maintaining an elegant appearance, whereas powder-coated aluminum options offer durability at lower price points.
Installation requires proper wall reinforcement with blocking between studs to support the seat’s weight capacity safely. We recommend positioning fold-down seats 17 to 19 inches from the floor for optimal comfort and accessibility in most small walk-in shower configurations.
Use Vertical Design Elements

We can transform your small walk-in shower into a visually taller space by implementing strategic vertical design elements that draw the eye upward and create an illusion of height.
Floor-to-Ceiling Tiles
Floor-to-ceiling tiles create a seamless vertical line that instantly makes small walk-in showers appear larger and more spacious. We recommend choosing light-colored tiles such as white or light gray to maximize the height-improving effect while reflecting available light throughout the space. Large format tiles work exceptionally well for this technique since they reduce grout lines and create cleaner vertical surfaces. Installing tiles from floor to ceiling eliminates visual breaks that can make the space feel choppy or confined.
Vertical Subway Patterns
Vertical subway tile patterns enhance the feeling of height in small bathrooms by directing the eye upward rather than across horizontal surfaces. We suggest arranging traditional subway tiles in a running bond pattern oriented vertically to amplify the sense of spaciousness. This classic design element helps draw attention toward the ceiling while maintaining timeless appeal that won’t go out of style. Consider using lighter grout colors with vertical subway patterns to maintain the uninterrupted visual flow that makes your shower feel taller.
Tall Storage Answers
Tall storage units emphasize verticality while maintaining a clutter-free environment that’s essential for small walk-in showers. We recommend incorporating floor-to-ceiling cabinets or shelving systems that maximize your available wall height for storage purposes. Built-in tall niches positioned vertically along shower walls provide practical storage without protruding into the limited floor space. These vertical storage elements serve dual purposes by keeping shower essentials organized while reinforcing the upward visual flow that makes your compact shower feel more spacious.
Optimize Lighting for Small Spaces

Proper lighting transforms small walk-in showers from cramped spaces into bright, inviting retreats. Strategic illumination choices can make your compact shower feel significantly larger while improving both functionality and ambiance.
LED Recessed Lighting
Focused illumination from LED recessed fixtures eliminates shadows that make small spaces feel even smaller. We recommend installing these energy-efficient lights in low-ceiling areas where traditional fixtures won’t fit.
Positioning multiple recessed lights around the shower perimeter creates even light distribution without creating harsh shadows. Install them at least 3 feet apart for optimal coverage in most small shower configurations.
Dimming capabilities allow you to adjust brightness levels for different activities, from energizing morning routines to relaxing evening showers. Choose LED fixtures with warm white temperatures (3000K-4000K) to create a comfortable atmosphere while maintaining excellent visibility.
Natural Light Enhancement
Mirrors strategically placed reflect natural light into darker corners of your shower space, effectively doubling the available illumination. Position large mirrors opposite windows or adjacent to glass shower doors to maximize light reflection.
Skylights can transform windowless shower areas by introducing overhead natural light that doesn’t compromise privacy. Consider tubular skylights for spaces where traditional skylights aren’t feasible due to structural limitations.
Window treatments like frosted films or cellular shades maintain privacy while allowing maximum light penetration. Choose treatments that can be adjusted throughout the day to control both light levels and privacy needs.
Accent Lighting Ideas
LED strip lighting placed under shower floors or around shower niches creates a modern, spa-like atmosphere while adding functional illumination. These flexible strips can follow curved surfaces and highlight architectural details in your compact space.
Ambient lighting from dimmable wall sconces provides soft, indirect illumination that enhances relaxation during evening showers. Install these fixtures outside the direct water spray area to ensure safety and longevity.
Waterproof accent fixtures like illuminated shower heads or color-changing LED panels add visual interest while serving practical purposes. Choose fixtures rated for wet locations (IP65 or higher) to ensure safe operation in shower environments.
Select Appropriate Flooring Options

Choosing the right flooring transforms our small walk-in shower from functional to fabulous. Smart flooring decisions can visually expand our space while ensuring safety and durability.
Large Format Tiles
Large format tiles create visual continuity that makes our small shower feel more spacious. We recommend using tiles measuring 12×24 inches or larger to minimize grout lines and reduce visual clutter. These oversized tiles work especially well on both walls and floors, creating a seamless look that tricks the eye into perceiving more space.
Modern porcelain tiles in large formats offer excellent water resistance and come in many finishes that mimic natural stone or wood. We’ve found that light-colored large format tiles reflect more light, further improving the sense of openness in compact shower areas. Installing these tiles with minimal grout joints creates clean lines that contribute to the streamlined aesthetic we want in small spaces.
Continuous Flooring Designs
Continuous flooring extends the same material from our shower area into the rest of the bathroom for maximum visual impact. This design technique eliminates visual breaks that can make small spaces feel choppy and disconnected. We achieve this seamless look by using identical tiles or waterproof luxury vinyl throughout the entire bathroom floor.
Wet room style installations work particularly well with continuous flooring, where we create a gentle slope toward the drain without traditional shower barriers. This approach requires proper waterproofing but results in an ultra-modern, spa-like appearance that maximizes our perceived floor space. Professional installation ensures proper drainage and prevents water damage in adjacent areas.
Non-Slip Safety Features
Non-slip surfaces become essential in our small walk-in showers where every step counts. We prioritize textured tiles or anti-slip coatings that provide traction without compromising style. Porcelain tiles with slight texture or natural stone options like honed granite offer both safety and sophistication.
Slip-resistant ratings help us choose appropriate materials, with higher ratings providing better traction in wet conditions. We can also add non-slip strips in strategic locations or opt for smaller mosaic tiles that naturally provide more grout lines for grip. These safety features prove especially important in floor-level entry showers where water can spread across walking surfaces.
Implement Smart Layout Strategies

Smart layout strategies can transform your small walk-in shower from cramped to spacious. We’ll help you optimize every square inch with strategic placement and design decisions.
Door Placement Considerations
Doorless designs offer the most space-saving solution for small walk-in showers. We recommend creating an open entry that eliminates swing space requirements and maintains visual continuity throughout your bathroom. This approach works best when your shower measures at least 36 inches wide and features proper water containment.
Glass enclosures provide excellent water protection while preserving the open feel. Sliding glass doors require no swing space and work perfectly in tight quarters. Fixed glass panels combined with a small entry gap can reduce costs while maintaining functionality.
Pivot door installations suit narrow spaces when you position them to swing outward into the bathroom. We suggest measuring your available floor space carefully to ensure the door doesn’t interfere with other fixtures or traffic patterns.
Traffic Flow Optimization
Layout planning requires positioning your shower away from high-traffic areas near toilets and vanities. We recommend maintaining at least 24 inches of clear walkway space between your shower entrance and other bathroom fixtures to prevent bottlenecks.
Entry positioning works best when placed at an angle or to the side rather than directly opposite the bathroom door. This creates natural movement patterns and prevents the shower from dominating your bathroom’s visual flow.
Color zoning helps define your shower area without physical barriers. We suggest using light-colored tiles in the shower space to create visual expansion while incorporating different colors or patterns to establish distinct zones within your compact layout.
Multi-Functional Design Elements
Integrated storage maximizes functionality by incorporating niches and shelves directly into your shower walls. We recommend installing recessed storage at shoulder height for easy access to shampoo, soap, and other essentials without cluttering your shower floor.
Accessible features enhance both safety and convenience in small spaces. Installing grab bars that double as towel holders or soap dispensers provides support while serving multiple purposes. Wall-mounted fold-down seats offer comfort during longer showers without permanently reducing your standing space.
Corner utilization transforms unused angular spaces into valuable storage or functional areas. We suggest installing corner shelving units or curved shower caddies that follow your shower’s contours while keeping essentials within easy reach.
Budget-Friendly Small Walk-In Shower Ideas

Creating a stunning small walk-in shower doesn’t require very costly. We’ll share proven strategies that deliver maximum impact while keeping costs manageable.
DIY Installation Tips
Measure accurately before starting any installation to ensure your shower fits perfectly into available corners or alcoves. Precise measurements minimize waste and prevent costly adjustments during construction.
Position your shower near existing plumbing whenever possible to reduce labor and material expenses significantly. We’ve found this single decision can save hundreds of dollars on professional installation costs.
Choose shower kits with preformed bases and panels for straightforward assembly that most homeowners can handle. These complete systems are readily available at home improvement stores and eliminate guesswork.
Apply waterproof membranes or liners properly before any tile installation to prevent expensive water damage repairs later. This crucial step protects your investment and ensures long-term durability.
Cost-Effective Material Choices
Prefabricated shower bases eliminate the need for custom tilework while reducing both installation time and labor costs. These ready-made options provide reliable waterproofing at a fraction of custom installation expenses.
Select affordable tile alternatives like vinyl, laminate, or large-format tiles that minimize grout lines for easier cleaning and installation. These materials offer modern aesthetics without premium price tags.
Opt for standard fixtures including basic shower heads, valves, and drains with chrome finishes for a contemporary yet economical appearance. We recommend avoiding specialty finishes that dramatically increase costs.
Consider glass alternatives such as clear shower curtains or semi-frameless glass panels instead of full glass enclosures. These options provide water protection while maintaining visual openness at lower costs.
Money-Saving Design Tricks
Use corner or alcove locations to transform underused areas into functional shower spaces while freeing up central bathroom floor area. This strategic placement reduces construction complexity and associated costs.
Carry out color zoning with light-colored tiles in the shower area to create spaciousness without structural modifications. This visual trick expands the perceived room size using paint and tile selection rather than expensive renovations.
Design open layouts with doorless configurations or half-glass partitions to reduce hardware expenses while improving accessibility. These approaches eliminate door mechanisms and associated installation costs.
Install multi-function features like built-in niches or integrated shelving within the shower walls for storage answers. This eliminates the need for additional cabinetry while maximizing functionality in compact spaces.
Conclusion
Creating the perfect small walk-in shower doesn’t require a massive budget or extensive renovation. We’ve shown you how smart design choices can transform even the tiniest spaces into luxurious retreats that rival larger bathrooms.
The key lies in maximizing every square inch through strategic planning. From corner installations to vertical elements and clever storage answers we’ve covered the essential techniques that make small spaces feel surprisingly spacious.
Remember that lighting and color choices play crucial roles in your shower’s success. Combine these elements with the right fixtures and materials and you’ll create a functional beautiful space that enhances your daily routine without very costly.
Frequently Asked Questions
What is the maximum space savings with corner walk-in showers?
Corner walk-in showers can add up to 30% more usable floor space compared to traditional rectangular installations. These designs efficiently utilize corner areas that might otherwise be wasted, making them ideal for small bathrooms where every square inch counts.
Are frameless glass doors better for small showers?
Yes, frameless glass doors are excellent for small showers because they allow natural light to flow freely throughout the space. Clear glass maximizes light penetration better than frosted options, while minimal hardware maintains a clean, uncluttered appearance that visually expands the area.
What storage solutions work best in compact walk-in showers?
Recessed shower niches, corner shelving units, and floating shower caddies are the most effective storage solutions. These options transform unused wall space into practical storage areas while maintaining clean lines and keeping shower essentials organized without cluttering the limited floor space.
How do light colors affect small shower spaces?
Light tones and reflective materials create an illusion of spaciousness in small showers. Large format tiles reduce visual clutter, while glossy finishes enhance light reflection. This combination makes compact shower areas appear brighter and more open than they actually are.
Can I install a small walk-in shower on a budget?
Yes, budget-friendly options include DIY installation with prefabricated shower kits, using affordable tile alternatives, and positioning near existing plumbing to reduce costs. Corner spaces and doorless configurations can enhance functionality while keeping expenses low without sacrificing style.
What lighting works best in small walk-in showers?
LED recessed lighting provides even light distribution, while dimmable options offer adjustable brightness. Strategic mirror placement enhances natural light, and accent lighting like LED strips creates a spa-like atmosphere. Proper illumination can transform cramped spaces into bright, inviting retreats.
How do vertical design elements help small showers?
Floor-to-ceiling tiles in light colors and vertical subway tile patterns direct the eye upward, creating an illusion of height. Tall storage solutions like built-in niches maintain a clutter-free environment while reinforcing the upward visual flow, making the space feel larger.