Small bathrooms don’t have to feel cramped or claustrophobic when you know the right mirror tricks. We’ve discovered that strategic mirror placement can instantly double your space’s visual appeal while adding functionality that makes your morning routine smoother.
The secret lies in choosing mirrors that work harder than traditional options. From wall-to-wall installations that create infinite reflections to cleverly positioned corner mirrors that capture every angle, we’ll show you how to transform your compact bathroom into a bright and spacious sanctuary.
Whether you’re dealing with a powder room that’s barely bigger than a closet or a narrow bathroom with limited natural light, the right mirror strategy can revolutionize your space. We’ve compiled the most effective mirror ideas that maximize both style and function without breaking your renovation budget.
Oversized Statement Mirrors That Create Depth
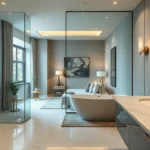
Large mirrors transform cramped bathrooms into surprisingly spacious retreats. We’ve discovered that strategic oversized mirror placement can visually double your bathroom’s perceived square footage.
Floor-to-Ceiling Mirror Installations
Vertical mirrors maximize your bathroom’s height potential by drawing the eye upward and creating an illusion of soaring ceilings. Installing a floor-to-ceiling mirror along one complete wall makes even 5×7 foot bathrooms feel dramatically larger.
Custom mirror panels work best when they extend from baseboard to ceiling without interruption. We recommend securing these large installations with heavy-duty mirror clips every 18-24 inches to ensure safety and prevent warping.
Narrow bathroom layouts benefit most from floor-to-ceiling installations on the longest wall. This placement strategy creates a sense of endless depth while reflecting natural light throughout the entire vertical space.
Professional installation becomes essential for mirrors exceeding 6 feet in height due to weight distribution and safety concerns. Most floor-to-ceiling mirrors weigh between 40-80 pounds and require specialized mounting hardware.
Wall-to-Wall Mirror Placement Strategies
Continuous mirror coverage across an entire wall eliminates visual boundaries and creates seamless depth perception. We’ve seen 8×10 foot bathrooms appear nearly twice their actual size using this comprehensive mirroring approach.
Strategic positioning works best when you place wall-to-wall mirrors opposite windows or light sources. This placement doubles the available natural light while creating infinite visual depth through reflection multiplication.
Frameless installations maintain clean lines and prevent visual interruption that framed mirrors create. Polished edge mirrors provide the most seamless appearance when covering entire walls from corner to corner.
Electrical considerations require careful planning when installing wall-to-wall mirrors around outlets, switches, or lighting fixtures. We recommend consulting electricians before mirror installation to relocate fixtures if necessary for optimal visual impact.
Multi-Functional Mirror Storage Solutions

We can dramatically increase storage capacity while maintaining the spacious feel created by our oversized mirror installations. Smart storage integration transforms ordinary mirrors into hardworking organizational systems that eliminate clutter without sacrificing visual space.
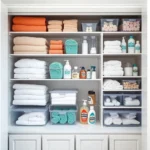
Medicine Cabinet Mirrors with Hidden Storage
Recessed medicine cabinets installed above the sink provide hidden storage space for medications and bathroom essentials while doubling as functional mirrors. We recommend these units because they keep toiletries completely out of sight yet easily accessible for daily routines.
Over-the-sink cabinets offer another excellent solution for storing cotton balls, lotions, and small bathroom necessities behind mirrored doors. Installation requires careful planning around existing plumbing, but the payoff includes substantial storage without any visual bulk.
Built-in medicine cabinets create the most seamless look since they sit flush with the wall surface. We suggest choosing models with adjustable shelving to accommodate bottles and containers of varying heights.
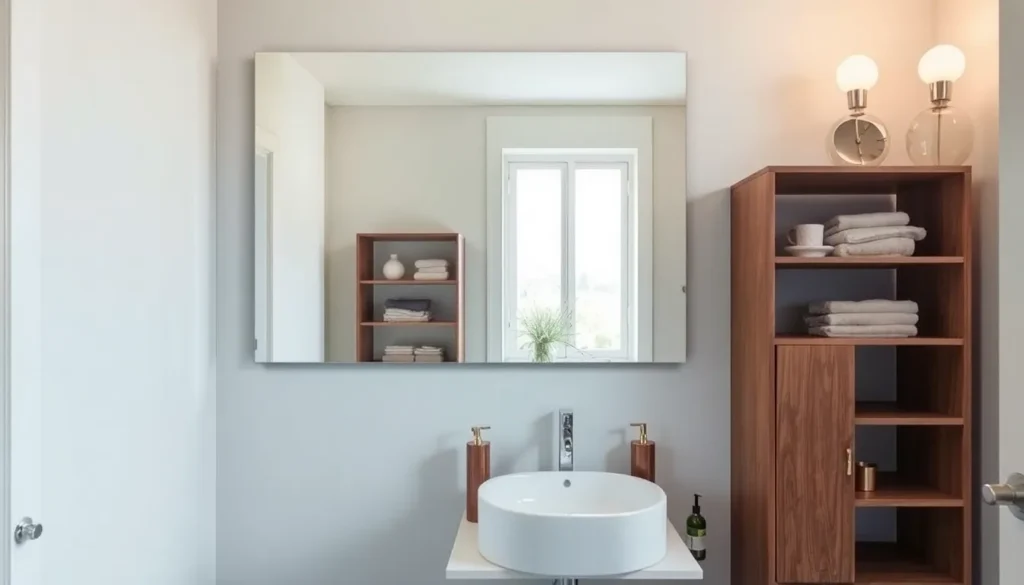
Mirror Shelving Combinations
Shelf and mirror combinations extend surface area significantly while providing convenient storage for jewelry and spare bathroom essentials. These integrated designs work particularly well in powder rooms where counter space is limited.
Freestanding mirrors with shelves above them maximize vertical storage without consuming valuable wall space. We’ve found this approach especially effective in rental properties where permanent installation isn’t possible.
Side-mounted shelves attached directly to mirror frames offer additional storage without requiring separate wall anchors. Installation becomes simpler since the mirror frame supports the shelf weight rather than relying solely on drywall anchors.
Mirrored Vanity Drawers and Compartments
Mirrored vanity units often include drawers or compartments that feature reflective surfaces, providing both storage and enhanced light reflection throughout the bathroom. We appreciate how these units maintain visual continuity while hiding everyday clutter.
Mirrored compartments added to existing bathroom vanities help maximize storage capacity while maintaining a sleek appearance that doesn’t break up sight lines. Custom installations can incorporate these features into virtually any vanity configuration.
Drawer fronts with mirrored panels create storage answers that practically disappear into the overall design scheme. We recommend soft-close hinges for these installations to prevent damage from repeated opening and closing.
Strategic Mirror Placement Techniques for Maximum Impact

Now that we’ve covered oversized mirrors and storage answers, let’s explore exact positioning strategies that’ll amplify your small bathroom’s visual impact. These strategic placement techniques work together with larger mirrors to create layered depth and maximize light distribution.
Corner Mirror Positioning
Corner mirrors fit into tight areas that’d otherwise remain unused, transforming dead space into functional design elements. We recommend installing corner mirrors at eye level to create a seamless reflective surface that enhances your bathroom’s perceived size. These space-saving answers work particularly well in powder rooms and guest bathrooms where every square inch counts.
Strategic corner placement eliminates the visual boundaries that typically make small spaces feel cramped. We’ve found that corner mirrors create unique angles of reflection that bounce light throughout the room, making even the most compact bathrooms feel brighter and more open.
Across-From-Window Mirror Placement
Positioning mirrors directly opposite windows doubles the natural light entering your bathroom space. We suggest installing these mirrors at the same height as your window to capture and reflect the maximum amount of sunlight throughout the day. This technique works especially well in bathrooms with single windows or limited natural light sources.
Sunlight reflection from properly positioned mirrors can eliminate the need for additional lighting during daytime hours. We recommend measuring the window’s dimensions and installing a mirror that’s at least 75% of the window’s size to maximize light bounce and visual impact.
Multiple Mirror Arrangements
Combining different mirror shapes and sizes creates visual depth that makes small bathrooms appear significantly larger. We recommend pairing a round mirror above a rectangular sink with smaller decorative mirrors on adjacent walls to establish visual rhythm and movement. This layered approach prevents the monotony that single mirror installations can create.
Varied mirror arrangements work best when we maintain consistent spacing between each piece. We suggest keeping 6-12 inches between mirrors to allow each reflective surface to function independently while contributing to the overall spacious effect. Different heights and orientations add visual interest without overwhelming the limited wall space in compact bathrooms.
Space-Saving Compact Mirror Designs

When working with limited square footage, we need mirrors that maximize functionality while minimizing their physical footprint. These innovative compact designs offer versatile answers that adapt to your exact bathroom needs.
Pivoting and Swing-Arm Mirrors
Pivoting mirrors deliver exceptional versatility by adjusting to different angles, providing better visibility for multiple users. We recommend installing these mirrors at standard eye level to accommodate various heights throughout the day. Swing-arm mirrors extend outward when needed for close-up tasks like shaving or applying makeup, then fold back against the wall to reclaim precious space.
These adjustable designs work particularly well in narrow bathrooms where traditional fixed mirrors might obstruct movement. We’ve found that swing-arm models with 12 to 18-inch extensions provide optimal reach without overwhelming small spaces. Mounting these mirrors beside vanities rather than directly above them creates more flexible viewing angles while keeping countertops clear.
Fold-Down Makeup Mirrors
Wall-mounted makeup mirrors on articulating arms offer magnified views when pulled closer, then fold away completely when not in use. We prefer models with 5x to 10x magnification that mount directly to wall studs for stability. These mirrors typically measure 6 to 8 inches in diameter, providing sufficient magnification without consuming excessive wall space.
Installing fold-down mirrors at 54 to 60 inches from the floor ensures comfortable use for most adults. We recommend positioning these mirrors slightly to one side of the main vanity mirror to avoid blocking primary reflection while maintaining easy access. Spring-loaded hinges help these mirrors stay securely folded against the wall when not needed.
Magnetic and Adhesive Mirror Options
Strong magnetic mirrors attach to metal medicine cabinet doors or magnetic strips, creating instant additional reflection points without permanent installation. We suggest using these compact mirrors for detail work like eyebrow tweezing or contact lens insertion. High-quality adhesive mirrors with removable mounting strips work well on smooth tile or glass surfaces.
These portable answers typically range from 4 to 8 inches in diameter, making them perfect for temporary arrangements or rental properties. We recommend testing adhesive strength on small areas first to ensure proper bonding without surface damage. Magnetic options offer the flexibility to reposition mirrors as needed while maintaining a clean, uncluttered appearance.
Specialty Mirrors That Enhance Natural Light

We’ve discovered that certain mirror technologies can dramatically amplify natural light in small bathrooms. These innovative answers combine strategic design with advanced lighting features to create brighter, more spacious environments.
Convex Mirrors for Wide-Angle Views
Convex mirrors provide a wider field of view that makes small bathrooms appear significantly more spacious. We recommend mounting these curved mirrors above sinks or in corners to maximize visibility and create an expansive feeling. The outward curve captures light from multiple angles and distributes it throughout the space more effectively than flat mirrors.
Positioning convex mirrors in corners transforms unused spaces into functional reflection points. We’ve found that these mirrors work particularly well in powder rooms where every inch of space matters. The wide angle view helps eliminate blind spots and creates a panoramic effect that visually expands cramped quarters.
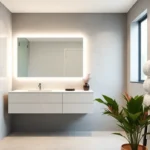
LED-Integrated Mirror Systems
LED-integrated mirror systems enhance natural light by illuminating the space with bright, even lighting. We recommend these mirrors for bathrooms with limited window access or north-facing orientations. The integrated LED lights create a brighter and more expansive feel by supplementing existing natural light sources.
Modern LED mirror systems offer adjustable brightness settings that complement changing daylight conditions throughout the day. We’ve observed that these mirrors work best when positioned to reflect both artificial and natural light sources. The energy-efficient LED technology provides consistent illumination without generating excessive heat in small spaces.
Backlit and Edge-Lit Mirror Designs
Backlit and edge-lit mirror designs use LED lights around the edges or behind the mirror surface to create a sleek, modern appearance. We recommend these designs for their ability to amplify the illusion of light while providing ambient illumination. The soft glow eliminates harsh shadows and creates a spa-like atmosphere in compact bathrooms.
Edge-lit mirrors distribute light evenly across the mirror surface, creating a floating effect that adds visual depth. We’ve found that backlit designs work particularly well when mounted against darker wall colors, as the contrast enhances the lighting effect. These mirrors provide functional task lighting while serving as decorative focal points that draw the eye upward, creating height in low-ceiling spaces.
Creative Mirror Shapes and Styles for Small Spaces

Moving beyond traditional rectangular mirrors opens up exciting possibilities for improving your compact bathroom’s visual appeal. Shape selection plays a crucial role in determining how spacious and inviting your small bathroom feels.
Round Mirrors for Soft Visual Appeal
Round mirrors create a cozy and inviting atmosphere that perfectly complements the intimate nature of small bathrooms. We recommend positioning circular mirrors above rectangular sinks to establish a ever-changing visual contrast that draws the eye upward and outward. The soft curves naturally counterbalance angular fixtures like square vanities and straight-edged tile work.
Circular designs eliminate sharp corners that can make tight spaces feel even more cramped. They work exceptionally well in powder rooms where creating a welcoming ambiance takes priority over maximizing storage. We’ve found that 24 to 30-inch diameter mirrors provide optimal impact without overwhelming compact wall spaces.
Geometric and Angular Mirror Designs
Geometric mirrors transform functional bathroom elements into striking pieces of art that enhance your space’s aesthetic appeal. Hexagonal shapes add sophisticated visual interest while their six-sided design creates multiple reflection angles that amplify light throughout the room. Triangular mirrors offer bold contemporary styling that works particularly well in modern minimalist bathrooms.
Angular designs serve dual purposes by reflecting light efficiently and acting as focal points that distract from your bathroom’s compact dimensions. We suggest selecting geometric mirrors with dimensions between 18 to 24 inches to maintain proper scale in small spaces. Octagonal and diamond-shaped options provide additional variety while maintaining the space-improving benefits of unconventional mirror shapes.
Vintage and Antique Mirror Styles
Decorative frames bring elegance and personality to small bathrooms through carefully chosen vintage-inspired designs. Ornate frames in weathered finishes create visual depth that makes walls appear to recede, effectively expanding your perceived space. We recommend selecting frames with dimensions that don’t exceed 60% of your vanity width to maintain proper proportions.
Antique style mirrors blend tradition with sophistication while serving as stunning focal points in compact bathrooms. Beveled edges on vintage designs catch and scatter light in multiple directions, brightening dark corners naturally. Patinated bronze, aged gold, and distressed white frames complement various design themes from farmhouse to transitional styles. These distinctive pieces add character that transforms ordinary small bathrooms into memorable spaces with unique charm.
Budget-Friendly DIY Mirror Solutions

Transforming your small bathroom doesn’t require expensive renovations when you explore creative DIY mirror answers. We’ll show you cost-effective approaches that maximize visual impact while staying within your budget.
Adhesive Mirror Tiles and Sheets
Adhesive mirror tiles create stunning mosaic effects around existing fixtures, allowing you to design custom patterns that reflect light throughout your space. We recommend starting with a small accent wall behind your vanity to test the visual impact before committing to larger installations.
Positioning tiles strategically around light sources multiplies illumination and creates depth in cramped quarters. You can arrange different sized tiles in geometric patterns or create flowing designs that guide the eye upward, making ceilings appear higher.
Adhesive mirror sheets offer seamless coverage for entire wall sections, reflecting maximum light while creating the illusion of expanded square footage. We suggest measuring carefully and using a squeegee during installation to avoid air bubbles that could compromise the sleek appearance.
Installation becomes simple with high-quality adhesive backing that doesn’t require drilling or permanent mounting hardware. These answers work perfectly for renters who want dramatic visual improvements without losing security deposits.
Repurposed Mirror Projects
Upcycled picture frames transform into unique mirror borders when you replace artwork with reflective glass, adding personality while saving money on expensive custom frames. We often find ornate vintage frames at estate sales that create stunning focal points above pedestal sinks.
Reclaimed wood mirrors bring rustic charm while maintaining the light-improving benefits of strategic mirror placement we’ve discussed. You can source weathered barn wood or repurpose old furniture pieces to create frames that complement farmhouse or industrial bathroom designs.
DIY chain hanging systems add visual interest while saving valuable wall space in narrow layouts. We recommend using decorative chains or rope to suspend mirrors from ceiling hooks, creating floating effects that draw attention upward and enhance perceived height.
Creative mounting answers include using old shutters, window frames, or cabinet doors as mirror backing, providing storage hooks or small shelves while maximizing reflective surface area.
Thrift Store Mirror Makeovers
Refurbishing old mirrors from thrift stores offers incredible value when you invest time in repainting frames or updating hardware to match your bathroom’s aesthetic. We’ve seen plain mirrors transform into statement pieces with metallic spray paint or distressing techniques.
Mix and match approaches combine different thrift store finds to create eclectic gallery walls that reflect light from multiple angles. You can pair ornate antique frames with sleek modern glass to achieve the visual depth we discussed in earlier sections.
Updating mirror frames with peel and stick materials provides renter friendly answers that enhance existing thrift store pieces without permanent alterations. We recommend testing different frame styles against your wall color to ensure optimal light reflection.
Vintage mirror restoration involves simple cleaning techniques and minor repairs that restore reflective quality while preserving character details that add charm to compact spaces.
Professional Installation Tips for Small Bathroom Mirrors

We’ll guide you through the essential installation steps to ensure your mirror enhances your small bathroom’s functionality and safety. Proper installation techniques can make the difference between a mirror that transforms your space and one that becomes a safety hazard.
Measuring and Sizing Guidelines
Measure your wall space carefully before selecting any mirror to avoid costly mistakes and ensure optimal fit. We recommend accounting for at least 2-3 inches of clearance around fixtures like light switches, outlets, and towel bars when determining mirror dimensions.
Consider the frame dimensions when calculating total mirror size, as decorative frames can add 4-6 inches to overall measurements. Mirrors with built-in hanger brackets require additional space behind the frame for proper wall clearance during installation.
Position mirrors at eye level for optimal functionality, typically 57-65 inches from floor to center point for most adults. We suggest measuring from the tallest household member’s eye level and adjusting downward by 2-3 inches to accommodate everyone comfortably.
Account for vanity height when installing mirrors above sinks, leaving 6-8 inches between the countertop and bottom mirror edge. This spacing prevents water splashing while maintaining proper proportions in compact bathroom layouts.
Mounting Hardware Considerations
Use appropriate wall anchors based on your wall material, as drywall alone cannot support mirrors over 10 pounds safely. We recommend heavy-duty toggle bolts for hollow walls and masonry anchors for tile or concrete surfaces to ensure secure mounting.
Select drill bits that match your wall surface exactly – ceramic tile requires carbide-tipped bits while concrete needs masonry bits to prevent cracking. Drilling at slow speeds with steady pressure prevents damage to delicate bathroom surfaces.
Apply silicone sealant around mounting brackets after installation to enhance stability and create moisture barriers. This additional step prevents water infiltration behind mounting hardware that could weaken connections over time.
Check weight capacity of all mounting hardware before installation, ensuring brackets can support 150% of the mirror’s actual weight for safety margins. We always verify manufacturer specifications and choose hardware rated for bathroom environments with high humidity levels.
Safety and Moisture Resistance Factors
Hire licensed electricians for any mirrors requiring electrical connections, including LED backlit or demister mirrors that enhance lighting in small spaces. Electrical work in bathrooms must meet exact safety codes to prevent dangerous shock hazards.
Seal gaps completely between mirror edges and walls using bathroom-grade silicon to prevent moisture accumulation behind mirrors. Water infiltration can cause mirror backing deterioration and create mold growth in humid bathroom environments.
Install mirrors away from direct shower spray zones to prevent constant moisture exposure that degrades mirror quality over time. We recommend maintaining at least 24 inches between shower areas and mirror installations for optimal longevity.
Use spirit levels during installation to ensure mirrors hang perfectly straight, as crooked mirrors appear more noticeable in small bathroom spaces. Having an assistant hold large mirrors while marking mounting points prevents accidents and ensures accurate positioning.
Conclusion
We’ve explored many ways mirrors can completely transform your small bathroom from cramped to spacious without very costly. From oversized statement pieces to clever storage answers these strategic design choices work together to maximize both functionality and visual appeal.
The key lies in understanding how different mirror types angles and placements work with your exact layout. Whether you choose professional installation or tackle DIY projects the impact on your bathroom’s perceived size and brightness will be immediately noticeable.
Remember that the best mirror solution combines your personal style with practical needs. Start with one focal mirror and gradually add complementary pieces to create the perfect balance of form and function in your compact space.
Frequently Asked Questions
What size mirror works best for a small bathroom?
Oversized mirrors work best in small bathrooms as they can visually double the perceived space. Choose mirrors that are at least 75% of your window’s dimensions when placed opposite natural light sources. Wall-to-wall installations eliminate visual boundaries, while floor-to-ceiling mirrors maximize height and create an illusion of soaring ceilings.
Where should I position mirrors to make my bathroom look bigger?
Position mirrors directly across from windows to double natural light and enhance spaciousness. Install corner mirrors at eye level to transform unused spaces, and consider multiple mirror arrangements with consistent spacing. Strategic placement opposite light sources maximizes reflection and creates the greatest visual impact.
What are the best mirror storage solutions for small bathrooms?
Recessed medicine cabinet mirrors provide hidden storage while maintaining a spacious feel. Over-the-sink cabinets keep essentials out of sight, while mirrored vanity units with drawers enhance light reflection. Shelf and mirror combinations, freestanding mirrors with integrated shelves, and side-mounted shelves offer practical storage without consuming additional wall space.
Can I install large mirrors myself in a small bathroom?
While possible, large mirror installation requires careful planning and proper mounting hardware. Consider moisture resistance, electrical considerations around outlets, and use appropriate anchors for wall type. For safety and optimal results, especially with floor-to-ceiling installations, professional installation is recommended to ensure proper support and sealing.
What mirror shapes work best in compact bathrooms?
Round mirrors provide soft visual appeal and work well above rectangular sinks for contrast. Geometric and angular designs serve as striking focal points while reflecting light efficiently. The key is maintaining proper scale – choose mirrors proportionate to your space to enhance rather than overwhelm the bathroom’s aesthetic.
Are there budget-friendly mirror options for small bathrooms?
Yes, adhesive mirror tiles create custom mosaic effects, while mirror sheets provide seamless wall coverage at lower costs. Repurposed picture frames, reclaimed wood projects, and thrift store mirror makeovers offer unique character while saving money. DIY solutions can achieve dramatic transformations without expensive renovations.
What special mirror features help brighten dark small bathrooms?
LED-integrated mirror systems with adjustable brightness settings work well for limited natural light conditions. Backlit and edge-lit designs eliminate harsh shadows while creating spa-like atmospheres. Convex mirrors provide wider fields of view and can be mounted in corners to maximize visibility and light distribution throughout the space.
How do I choose the right mounting hardware for bathroom mirrors?
Select moisture-resistant anchors appropriate for your wall type (drywall, tile, or concrete). Use at least 2-3 inches clearance around fixtures and position mirrors at eye level. For heavy mirrors, use multiple mounting points and consider professional-grade sealants to prevent moisture damage behind the installation.