Transforming your bathroom doesn’t have to expensive or require a complete renovation. We’ve discovered that painting bathroom cabinets is one of the most cost-effective ways to breathe new life into your space while dramatically boosting your home’s value.
Whether you’re dealing with outdated wood cabinets or builder-grade vanities that lack personality, the right paint color and technique can create a stunning focal point that rivals expensive custom cabinetry. We’ll show you how to achieve professional-looking results that withstand humidity and daily wear.
From bold navy blues that create spa-like serenity to crisp whites that maximize natural light, we’ve compiled creative ideas that work with any bathroom size or style. You’ll learn which paint finishes perform best in moisture-rich environments and discover color combinations that make your bathroom feel larger and more luxurious than ever before.
Choose The Right Paint Type For Your Bathroom Environment
Selecting the appropriate paint type for your bathroom cabinets ensures long lasting results that withstand moisture and daily use. We’ll explore three main paint categories that work best in humid bathroom environments.
Oil-Based Paint for Durability
Oil-based paints deliver superior durability and create a hard, protective finish that resists moisture damage. These paints form an exceptionally smooth surface that’s easy to clean and maintain over time. We recommend oil-based options for high traffic bathrooms where cabinets face frequent opening and closing.
Benefits of oil-based cabinet paint:
- Excellent adhesion to previously painted or bare wood surfaces
- Superior leveling properties that minimize brush marks and create professional results
- Outstanding moisture resistance perfect for steamy bathroom conditions
- Extended durability lasting 8-10 years with proper preparation
Consider the longer drying time when choosing oil-based paint, as these formulas typically require 6-8 hours between coats. Ventilation becomes crucial during application due to stronger fumes compared to water-based alternatives.
Latex Paint for Easy Cleanup
Latex paints offer convenient cleanup with soap and water while providing good performance in bathroom environments. These water-based formulas dry quickly and emit fewer odors during application. We find latex paint particularly suitable for DIY projects where easy maintenance and quick turnaround matter most.
Key advantages of latex cabinet paint:
- Fast drying time allowing multiple coats in one day
- Low odor formula making indoor application more comfortable
- Simple cleanup requiring only water and soap for brushes and spills
- Good adhesion when proper primer is used beforehand
Modern latex paints include advanced moisture resistant properties that perform well in bathroom settings. Choose high quality latex paint with built in primer for optimal coverage and adhesion to cabinet surfaces.
Specialty Cabinet Paint Options
Specialty cabinet paints combine the best features of traditional formulas with enhanced bathroom exact properties. These premium options include alkyd enamels, hybrid paints, and epoxy based coatings designed specifically for cabinetry. We recommend specialty paints for homeowners seeking professional grade results with simplified application.
| Paint Type | Dry Time | Durability Rating | Best For |
|---|---|---|---|
| Alkyd Enamel | 4-6 hours | Excellent | High moisture areas |
| Hybrid Paint | 2-4 hours | Very Good | Quick projects |
| Epoxy Coating | 8-12 hours | Superior | Maximum durability |
Popular specialty cabinet paint features:
- Self leveling formulas that minimize brush strokes automatically
- Built in primer eliminating separate priming steps
- Advanced moisture protection exceeding standard paint performance
- Stain resistant properties keeping cabinets looking fresh longer
Cabinet exact paints typically cost more than standard wall paint but deliver superior results that justify the investment. These formulas often include additives that improve flow, reduce brush marks, and enhance the final finish quality.
Prepare Your Bathroom Cabinets Properly Before Painting

Proper preparation determines the success of your bathroom cabinet painting project. We’ll walk you through the essential steps that professional painters follow to achieve lasting results.
Remove All Hardware and Doors
Start by removing all drawers, doors, and hardware components from your bathroom cabinets. We recommend taking off hinges, knobs, and pulls completely to create a clean workspace. Label each component with masking tape to ensure easy reassembly later during your project.
Store all hardware pieces in labeled bags or containers. This organization method prevents losing small screws and helps you remember which hardware belongs to each door or drawer. We suggest photographing the cabinet layout before disassembly for additional reference.
Number each door and its corresponding cabinet opening. This simple step saves time during reassembly and ensures doors return to their original positions for proper alignment.
Clean and Degrease Surfaces Thoroughly
Use a damp cloth and commercial degreaser to clean all cabinet surfaces. Bathroom cabinets accumulate soap residue, hair products, and moisture over time that can prevent paint adhesion. We recommend focusing extra attention on areas around handles and frequently touched surfaces.
Rinse with fresh water after degreasing to prevent contamination. Any remaining cleaning product residue can interfere with paint bonding and cause peeling later. Allow surfaces to dry completely before proceeding to the next preparation step.
Clean the surrounding area including walls and countertops. This comprehensive cleaning approach prevents dust and debris from settling on freshly painted surfaces during your project.
Sand for Better Paint Adhesion
Lightly sand all surfaces using 120 grit sandpaper to create texture for paint bonding. We don’t need to remove the existing finish completely, just rough up the surface enough for the new paint to grip properly. Focus on glossy areas that tend to repel paint.
Sand with the grain on wood cabinets to avoid visible scratch marks. For laminate or previously painted surfaces, sand in circular motions to create an even texture across the entire surface.
Wipe down all sanded surfaces with a tack cloth to remove dust particles. Any remaining dust will create bumps and imperfections in your final paint finish, so thorough cleaning after sanding is essential for professional results.
Select Colors That Transform Your Bathroom Space

We’ll explore four designer-approved color options that can completely transform your bathroom’s atmosphere and visual appeal.
Classic White for Timeless Appeal
White cabinets create the foundation for timeless bathroom design that never goes out of style. Soft white and bright white remain top choices among homeowners because they make bathrooms feel larger and more inviting while reflecting light to enhance overall brightness. This versatile color pairs seamlessly with any decor style, complementing both light and dark fixtures with equal elegance.
We recommend white for smaller bathrooms where maximizing the sense of space is crucial. The clean, airy appearance creates an open feeling that works particularly well in traditional and contemporary settings alike.
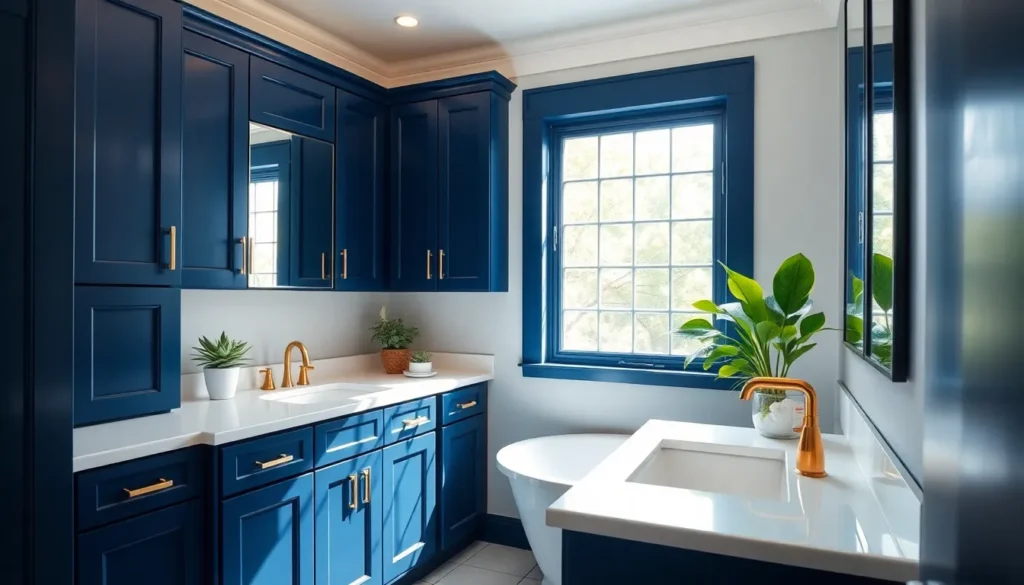
Bold Navy Blue for Drama
Navy blue delivers dramatic impact that adds depth and sophisticated character to bathroom spaces. This bold choice creates striking contrast when paired with white tiles or walls, evoking elegance and confidence throughout the room. Navy cabinets work beautifully in both classic and contemporary bathroom designs, making them a versatile statement option.
We’ve found that navy blue particularly excels in larger bathrooms where the rich color won’t overwhelm the space. The deep tone serves as an elegant backdrop for metallic fixtures and creates a luxurious, hotel-like atmosphere.
Soft Gray for Modern Sophistication
Pale gray offers the perfect balance of modern sophistication and calming tranquility for today’s bathroom designs. This contemporary color works effectively in bathrooms of all sizes, pairing beautifully with various fixtures and finishes without overwhelming the space. Gray provides subtle visual impact while maintaining a minimalist aesthetic that appeals to modern sensibilities.
We particularly appreciate how gray cabinets complement both warm and cool color schemes. The neutral tone creates a sophisticated foundation that allows other design elements like hardware and countertops to shine.
Warm Sage Green for Spa-Like Vibes
Sage green transforms ordinary bathrooms into relaxing, spa-like retreats with its soothing, muted tone. This trendy color works exceptionally well with natural wood accents and metallic fixtures, creating a tranquil atmosphere that promotes relaxation. Sage green has become especially popular in modern and rustic bathroom designs where creating a connection to nature is desired.
We recommend sage green for bathrooms where you want to establish a calming, wellness-focused environment. The soft green tone pairs beautifully with white trim and natural materials, creating a harmonious space that feels both fresh and serene.
Create Visual Interest With Two-Tone Cabinet Designs

Two-tone cabinet designs offer an exciting way to elevate your bathroom’s style beyond traditional single-color approaches. These sophisticated color combinations can transform an ordinary bathroom into a designer-worthy space while creating visual depth and architectural interest.
Upper and Lower Cabinet Color Combinations
White and navy combinations create a timeless yet contemporary aesthetic that works beautifully in both small and large bathrooms. We recommend painting upper cabinets in crisp white to maximize the feeling of height and openness while using navy blue on lower cabinets to ground the space with sophisticated depth.
Gray and cream pairings deliver a soothing atmosphere that complements virtually any bathroom fixture or tile selection. Upper cabinets in soft gray tones provide modern appeal while cream-colored lower cabinets add warmth and versatility to the overall design scheme.
Contrasting trim accents amplify the two-tone effect by highlighting architectural details with bold color choices. Paint cabinet trim or molding in colors that pop against your main cabinet hues to emphasize the intentional design contrast and create visual definition.
Island or Vanity Accent Colors
Bold focal points emerge when we paint bathroom vanities or islands in vibrant colors like red or coral while keeping surrounding cabinets neutral. This approach draws attention to key functional areas and creates an eye-catching centerpiece that defines the room’s personality.
Natural wood combinations blend beautifully with neutral cabinet colors to achieve a harmonious balance between modern and organic elements. Pairing painted cabinets with natural wood tones on accent pieces creates depth while maintaining a cohesive design flow throughout the space.
Strategic color placement on vanities allows you to experiment with trending colors without overwhelming the entire bathroom. Consider using colors from popular palettes including white, black, beige, gray, navy, and various shades of blue for maximum impact.
Interior Cabinet Color Contrasts
Surprise interior elements create delightful discoveries when cabinet doors open to reveal contrasting colors inside. Paint cabinet interiors in bold hues that complement your exterior color scheme while adding an unexpected design detail that showcases your attention to style.
Monochromatic variations use different shades of the same color family to create subtle contrast without jarring transitions. This technique works particularly well with blue tones or gray variations where lighter and darker shades create depth while maintaining visual harmony.
Hidden color moments transform practical storage spaces into design opportunities by incorporating soft pastels or bold accent colors on interior surfaces. These thoughtful touches demonstrate sophisticated design sensibility while keeping dramatic colors contained to functional areas.
Apply Professional Painting Techniques For Smooth Results

Mastering the right techniques makes the difference between amateur and professional looking bathroom cabinet finishes. These proven methods ensure your painted cabinets achieve that flawless appearance you’re aiming for.
Use High-Quality Brushes and Rollers
Quality tools create smooth results without brush strokes or roller marks on your bathroom cabinets. We recommend investing in high-quality synthetic brushes for cutting in edges and detailed work around hinges or raised panel designs. Small foam rollers work best for large flat surfaces like cabinet doors and drawer fronts.
Professional painters typically use 2-inch angled brushes for precision work and 4-inch mini rollers with fine nap covers for smooth finishes. Premium brushes hold more paint and release it evenly, reducing the number of passes needed to achieve full coverage. Cheap brushes often leave bristle marks and require more coats to hide imperfections.
Apply Thin, Even Coats
Thin coats prevent drips and ensure smoothness across all cabinet surfaces. We apply paint in long, steady strokes rather than short choppy movements that create texture variations. Each coat should be barely visible when wet, building up coverage gradually through multiple applications.
Start with light pressure and increase slightly as the brush or roller begins to run dry. Cross-hatching techniques work well on larger surfaces, where you apply paint in one direction then lightly brush perpendicular to smooth out any lines. Maintain a wet edge while painting to avoid lap marks where dried paint meets fresh application.
Allow Proper Drying Time Between Coats
Proper drying time prevents paint adhesion problems and ensures durability in humid bathroom environments. Most primers require 2-4 hours of drying time before applying the first paint coat, while subsequent coats need 4-6 hours between applications depending on humidity levels.
Temperature and ventilation significantly affect drying times in bathroom spaces. We recommend using fans to improve air circulation and keeping bathroom doors open during the painting process. Touch testing isn’t reliable since paint may feel dry on the surface while remaining soft underneath, leading to marks or pulling when the next coat is applied.
Add Decorative Finishes To Enhance Your Cabinet Style

Decorative finishes transform ordinary painted cabinets into stunning focal points that reflect your personal style. We’ll explore three popular techniques that add character and visual interest to your bathroom cabinetry.
Distressed Look for Farmhouse Charm
Distressed finishes create authentic farmhouse appeal by mimicking years of natural wear and character. We achieve this timeless look by lightly sanding exact areas of the painted surface to expose the original material underneath, focusing on edges and corners where natural wear would occur.
Using a fine-grit sandpaper, we carefully sand high-traffic areas like cabinet handles and door frames to create realistic wear patterns. A glaze application over the sanded areas enhances the aged appearance, while a scrub brush technique adds subtle scratches and imperfections that complete the weathered aesthetic.
This technique works exceptionally well with neutral colors like cream, sage green, or soft gray, creating a cozy atmosphere that pairs beautifully with modern farmhouse fixtures and natural wood accents.
Glazed Finish for Vintage Appeal
Glazed finishes add sophisticated depth and vintage charm to bathroom cabinets through layered color application. We apply either clear or tinted glaze over the base paint color, creating rich dimension that catches light beautifully and highlights cabinet details.
The glazing process involves brushing the product over painted surfaces, then strategically removing excess glaze from flat areas while leaving more in recessed panel details and corners. This creates natural-looking shadows and highlights that emphasize the cabinet’s architectural features.
Amber or brown-tinted glazes work particularly well over white or cream base colors, while clear glazes enhance any paint color by adding subtle depth perfect for traditional or vintage-themed bathroom designs.
Stenciled Patterns for Unique Character
Stenciled patterns offer endless creative possibilities for personalizing cabinet doors with geometric designs or floral motifs. We position stencils carefully on cabinet surfaces, using painter’s tape to secure them and prevent paint bleeding underneath the template.
Geometric patterns like chevrons, hexagons, or Greek key designs create modern visual interest, while floral and botanical stencils complement spa-like bathroom atmospheres. The key to professional results lies in using a stencil brush with minimal paint, building up coverage gradually through light, dabbing motions.
Pattern placement requires careful planning – we recommend stenciling only select cabinet doors or focusing on upper cabinets to avoid overwhelming the space. This technique adapts beautifully to any bathroom style, from contemporary to bohemian, depending on your chosen design and color combination.
Update Hardware To Complete Your Cabinet Makeover

New hardware acts as jewelry for your freshly painted bathroom cabinets. We recommend selecting hardware that complements your paint color while adding visual interest to complete the transformation.
Modern Brushed Gold Handles
Brushed gold handles bring warmth and contemporary elegance to your bathroom cabinet makeover. These luxurious accents pair beautifully with white, navy, or sage green painted cabinets, creating a sophisticated spa like atmosphere. We suggest choosing handles with clean lines and minimal ornamentation to maintain a modern aesthetic.
Installation typically requires standard drilling techniques, and the brushed finish helps hide fingerprints and water spots common in bathroom environments. Consider matching your faucet and light fixtures to create a cohesive design scheme throughout the space.
Classic Oil-Rubbed Bronze Pulls
Oil-rubbed bronze pulls deliver timeless sophistication that works with both traditional and transitional bathroom styles. This versatile finish complements gray, white, and two tone cabinet combinations while adding depth and character to your painted surfaces. We find these pulls particularly effective when paired with natural stone countertops or subway tile backsplashes.
The dark bronze finish provides excellent durability against moisture and daily wear, making it ideal for high traffic bathroom areas. Choose pulls with substantial weight and quality construction to ensure they withstand frequent use while maintaining their rich appearance.
Sleek Matte Black Knobs
Matte black knobs create striking contrast against light colored cabinets while maintaining a minimalist design approach. These contemporary accents work especially well with white, soft gray, or cream painted cabinets to define clean lines and modern styling. We recommend selecting knobs with geometric shapes or subtle texture to add visual interest without overwhelming the space.
The matte finish resists water spots and fingerprints better than glossy alternatives, making maintenance simple in humid bathroom conditions. Consider using larger diameter knobs on lower cabinets and smaller ones on upper cabinets to create balanced proportions throughout your cabinet layout.
Maintain Your Newly Painted Bathroom Cabinets

We know that proper maintenance is crucial for preserving your beautiful paint job and ensuring it withstands the humid bathroom environment for years to come.
Regular Cleaning Tips
Clean frequently with a damp cloth to prevent grime buildup and maintain the fresh appearance of your painted cabinets. Microfiber cloths work exceptionally well because they capture dirt without scratching the paint surface.
Wipe down surfaces weekly using gentle, pH neutral cleaners specifically designed for painted wood. Harsh chemicals can damage the paint finish and cause premature wear.
Dry all surfaces immediately after cleaning to prevent water damage and maintain the integrity of your paint job. Moisture that sits on painted surfaces can lead to bubbling or peeling over time.
Address spills promptly by blotting rather than wiping to avoid spreading stains across the cabinet surface. Quick action prevents permanent staining and reduces the need for intensive cleaning later.
Touch-Up Strategies
Use a small brush to touch up any chips or scratches as soon as they appear to prevent further damage and maintain the cabinet’s pristine appearance. Keep leftover paint in a sealed container for easy access during touch up sessions.
Sand lightly around damaged areas with fine grit sandpaper before applying touch up paint to ensure proper adhesion. This step creates a smooth surface that blends seamlessly with the existing finish.
Apply thin coats of matching paint using the same technique you used for the original paint job. Multiple thin applications create a more durable and professional looking repair than one thick coat.
Blend the edges carefully by feathering the new paint into the surrounding area to create an invisible repair. Allow each touch up coat to dry completely before assessing whether additional applications are needed.
Long-Term Care Guidelines
Avoid harsh chemicals and use gentle cleaners to maintain the paint finish and prevent premature deterioration. Ammonia based products and abrasive cleaners can strip the protective coating and dull the paint surface.
Inspect cabinet hinges and hardware regularly to ensure they’re functioning properly and not causing wear spots on the painted surface. Loose hardware can create friction that damages the paint over time.
Maintain proper ventilation in your bathroom to reduce humidity levels that can affect paint durability. Exhaust fans help circulate air and prevent moisture buildup that could compromise your paint job.
Schedule annual assessments of your painted cabinets to identify any areas that need attention before they become major problems. Early intervention saves time and money while preserving the overall appearance of your bathroom renovation.
Conclusion
Painting your bathroom cabinets offers an incredible opportunity to transform your space without very costly. We’ve covered everything from selecting the right paint type and colors to mastering professional techniques that’ll ensure your project stands the test of time.
Remember that success lies in the details – proper preparation sets the foundation while quality materials and careful application create that professional finish you’re after. Whether you choose classic white for timeless appeal or experiment with bold navy for dramatic flair the key is choosing options that reflect your personal style.
Don’t forget that hardware updates and decorative finishes can take your cabinets from ordinary to extraordinary. With regular maintenance and the techniques we’ve shared your newly painted bathroom cabinets will continue looking fresh and beautiful for years to come.
Frequently Asked Questions
What type of paint is best for bathroom cabinets?
Oil-based paint is ideal for bathroom cabinets due to its superior moisture resistance and durability in humid environments. However, latex paint offers easier cleanup and faster drying times, while specialty cabinet paints combine the best features of both. Choose based on your bathroom’s humidity levels, desired finish, and application preferences.
How do I prepare bathroom cabinets for painting?
Remove all hardware and doors first, then clean and degrease all surfaces thoroughly. Lightly sand the cabinet surfaces to improve paint adhesion. Organize hardware for easy reassembly and ensure all surfaces are completely clean and dry before applying primer or paint to prevent issues later.
What are the best color choices for bathroom cabinets?
Classic white creates a timeless, spacious feel perfect for any bathroom size. Bold navy blue adds sophistication to larger bathrooms, while soft gray offers modern elegance. Warm sage green creates spa-like vibes and promotes relaxation. Consider your bathroom’s size, lighting, and overall style when choosing colors.
Can I create a two-tone cabinet design in my bathroom?
Yes, two-tone designs add visual depth and architectural interest. Popular combinations include white upper cabinets with navy lowers, or gray and cream pairings. You can also use contrasting trim accents or create bold focal points on vanities while maintaining a cohesive overall look throughout the space.
How do I achieve professional-looking results when painting cabinets?
Use high-quality brushes and rollers, apply thin even coats to prevent drips, and allow proper drying time between coats. Employ cross-hatching techniques and maintain a wet edge while painting. Take your time with preparation and use the right paint type for your bathroom’s humidity conditions.
What decorative finishes can I add to my painted cabinets?
Three popular options include distressed finishes for farmhouse charm, glazed finishes for vintage appeal, and stenciled patterns for unique character. Distressed looks involve strategic sanding and glazing, while glazed finishes add depth through layered colors. Stencils allow for personalized geometric or floral designs.
Should I update cabinet hardware after painting?
Yes, updating hardware completes the transformation. Modern brushed gold handles offer warmth, classic oil-rubbed bronze pulls provide timeless appeal, and sleek matte black knobs create contemporary contrast. Choose hardware that complements your paint color while adding visual interest and ensuring proper functionality.
How do I maintain painted bathroom cabinets?
Clean regularly with a damp microfiber cloth and gentle, pH-neutral cleaners. Avoid harsh chemicals that can damage the finish. For touch-ups, use fine grit sandpaper on damaged areas and apply thin coats of matching paint. Ensure proper ventilation and inspect hardware annually for optimal longevity.