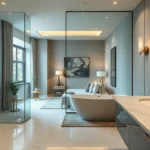
Small bathrooms don’t have to feel cramped or uninspiring. When we embrace the power of full tiling we can transform even the tiniest spaces into stunning retreats that feel larger brighter and more luxurious than ever before.
We’ve discovered that covering every surface with carefully chosen tiles creates an incredible sense of continuity that makes walls seem to disappear. The right tile selection can trick the eye into perceiving more space while adding texture depth and personality to your bathroom. Whether you’re drawn to sleek subway tiles bold patterns or natural stone finishes full tiling offers endless possibilities for creating your dream bathroom.
Ready to maximize your small bathroom’s potential? We’ll share our favorite fully tiled design strategies that’ll help you create a space that’s both functional and absolutely gorgeous. From clever color choices to space-improving layouts these ideas will inspire your next bathroom renovation project.
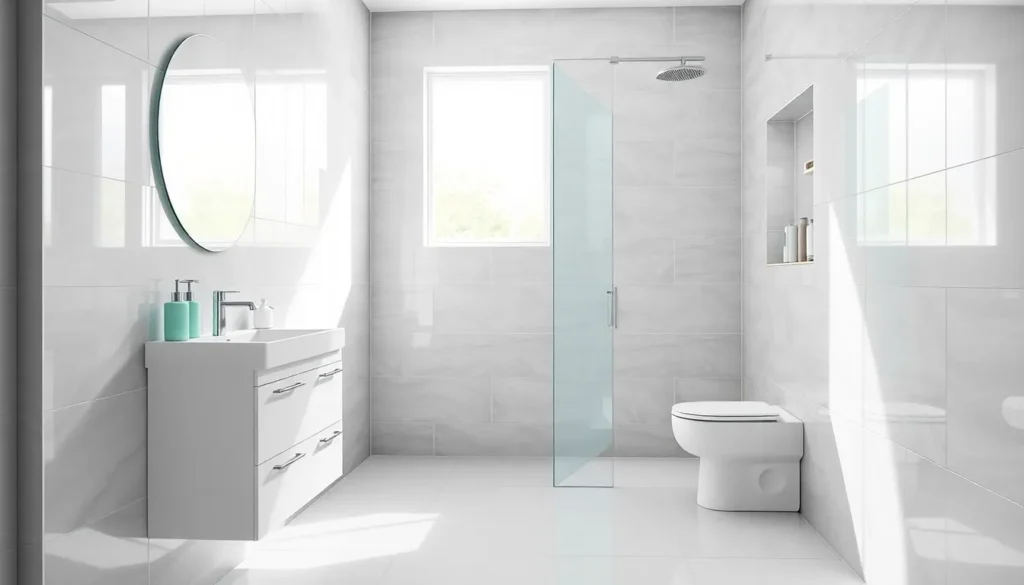
Maximize Visual Space With Light-Colored Tile Schemes
Light colored tiles create the illusion of expanded space by reflecting more light throughout our small bathroom. We can transform cramped quarters into airy retreats through strategic color selection.
Choose White or Cream Subway Tiles for Timeless Appeal
White subway tiles remain our top choice for maximizing visual space in fully tiled small bathrooms. These classic 3×6 inch rectangles reflect maximum light while creating clean horizontal lines that stretch the eye across walls. Cream variations like ivory or off white add warmth without sacrificing the space improving benefits of lighter tones.
Installing subway tiles in a traditional brick pattern creates subtle texture without overwhelming our compact space. We recommend extending these tiles from floor to ceiling on all walls to eliminate visual breaks that can make rooms feel choppy. Glossy finishes amplify light reflection more than matte surfaces, making our bathroom appear significantly larger.
Opt for Pale Gray or Beige Large Format Tiles
Large format tiles in pale gray or beige minimize grout lines that can visually fragment our small bathroom walls. We achieve maximum impact with 12×24 inch or 24×24 inch tiles that create fewer interruptions across surfaces. Light gray shades like dove gray or silver mist provide contemporary appeal while maintaining the space expanding qualities we need.
Beige options such as champagne or linen create sophisticated warmth without darkening our bathroom. These neutral tones pair beautifully with white fixtures and chrome hardware while reflecting ample natural and artificial light. Installing large tiles horizontally emphasizes width, while vertical installation draws the eye upward to create height illusions.
Consider Soft Pastels for a Spa-Like Atmosphere
Soft pastel tiles in mint green, powder blue, or blush pink introduce gentle color while preserving our space improving goals. These delicate hues reflect light almost as effectively as pure white while adding personality to our fully tiled bathroom. Mint green creates fresh, natural vibes reminiscent of luxury spas.
Powder blue evokes tranquil ocean feelings that promote relaxation during our daily routines. Blush pink offers subtle warmth and femininity without overwhelming our compact space. We recommend limiting pastels to accent walls or shower areas while keeping remaining surfaces in white or cream to maintain optimal light reflection throughout our small bathroom.
Create Vertical Drama With Floor-to-Ceiling Tile Installation

Transforming your small bathroom’s vertical space creates an instant luxurious upgrade that maximizes visual impact. This approach eliminates horizontal breaks that can make ceilings feel lower and rooms appear cramped.
Extend Tiles From Floor to Ceiling for Height Illusion
Installing the same tile from floor to ceiling creates a seamless visual flow that makes ceilings appear significantly higher. We recommend using large format tiles in this application since fewer grout lines produce a cleaner, more expansive appearance. Single color schemes work exceptionally well here, as subtle patterns help blur the boundaries between walls and ceilings without overwhelming the space.
This technique proves especially effective for bathrooms with standard height ceilings where every inch of perceived height matters. Light colored tiles amplify this effect by reflecting more natural and artificial light throughout the space. We’ve found that continuing the same tile material eliminates visual clutter and creates that coveted spa like atmosphere many homeowners desire.
Use Vertical Tile Patterns to Draw the Eye Upward
Vertical tile arrangements naturally guide the eye toward the ceiling, reinforcing the illusion of extra height in compact spaces. Stack bonded layouts, where tiles align vertically without offset, create clean lines that emphasize upward movement. Subway tiles installed in vertical orientations offer a contemporary twist on the classic horizontal pattern.
Herringbone and chevron patterns also work beautifully when oriented vertically, adding sophisticated texture while maintaining the height improving benefits. We suggest using these ever-changing patterns as feature walls behind vanities or in shower areas to create focal points. The key lies in choosing patterns that complement your overall design scheme while supporting the vertical emphasis.
Install Continuous Tiling Behind Fixtures for Seamless Look
Planning tile installation to flow continuously behind sinks, toilets, and cabinets eliminates surface divisions that can fragment the visual space. This approach requires careful coordination with plumbing and electrical work before tile installation begins. We recommend working with experienced contractors who understand how to navigate around fixtures while maintaining clean tile lines.
Continuous tiling behind wall mounted vanities creates particularly striking results, as the uninterrupted tile surface extends the perceived depth of the room. This technique works equally well with pedestal sinks, where the full wall treatment adds drama and sophistication. The investment in detailed planning pays dividends in creating that high end, custom look that makes small bathrooms feel anything but small.
Incorporate Bold Accent Walls for Design Interest

Bold accent walls transform fully tiled small bathrooms by creating ever-changing focal points that draw attention away from limited square footage. We strategically use contrasting colors, patterns, or textures on a single wall to add visual depth without overwhelming the compact space.
Feature Statement Tiles on One Wall Only
Statement tiles work best when concentrated on one focal wall rather than scattered throughout the bathroom. We recommend choosing the wall behind the vanity or the shower area as your primary accent surface, allowing bold patterns or unique materials like glass or natural stone to shine. This approach prevents visual chaos while still delivering maximum impact in your fully tiled design.
Focusing your statement tiles creates a designated feature that becomes the room’s conversation piece. We’ve found that walls with architectural elements like niches or alcoves make excellent candidates for this treatment. The key lies in balancing your statement wall with simpler tile choices on surrounding surfaces to maintain visual harmony.
Choose Geometric Patterns for Modern Appeal
Geometric patterns bring contemporary sophistication to small bathroom spaces through their clean lines and structured designs. We particularly favor hexagon tiles and chevron layouts because they create movement and visual interest while maintaining the sleek aesthetic of modern design. These patterns work exceptionally well on accent walls where their ever-changing nature can be fully appreciated.
Modern geometric tiles offer endless possibilities for customization in fully tiled bathrooms. We often combine different sizes of the same geometric shape to create depth, such as mixing large and small hexagons for a honeycomb effect. Chevron patterns installed vertically can also enhance the perception of height in compact spaces.
Add Textured Tiles for Tactile Contrast
Textured tiles introduce dimensional elements that make fully tiled small bathrooms feel more captivating and luxurious. We recommend incorporating raised patterns, rippled surfaces, or three dimensional designs on accent walls to create tactile interest that complements smooth surrounding tiles. This contrast adds depth perception that helps small spaces feel more expansive.
Textural variety prevents the monotony that can occur in fully tiled environments while adding sophistication to your design. We’ve seen excellent results with subway tiles featuring beveled edges, wood grain ceramic planks, and stone look porcelain with natural texture variations. The interplay between smooth and textured surfaces creates visual layers that enhance the overall bathroom experience.
Optimize Layout With Strategic Tile Size Selection

Strategic tile size selection forms the foundation of successful small bathroom design. We’ll explore how different tile dimensions can transform cramped quarters into visually expansive retreats.
Use Large Format Tiles to Minimize Grout Lines
Large format tiles create the most important visual impact in small bathrooms by reducing grout line visibility. We recommend tiles measuring 12×24 inches or larger to achieve a seamless, uninterrupted surface that tricks the eye into perceiving expanded space.
Fewer grout lines mean less visual clutter throughout your bathroom design. This streamlined approach allows the tile material itself to become the star, whether you choose natural stone, porcelain, or ceramic options.
Maintenance becomes significantly easier with large format installations since there’s less grout to clean and seal. We’ve found that this practical benefit makes large tiles particularly appealing for busy homeowners who want luxury without extensive upkeep.
Choose Rectangular Tiles for Horizontal Space Enhancement
Rectangular tiles installed horizontally can dramatically widen the appearance of narrow bathrooms. We suggest using tiles in a 2:1 or 3:1 ratio, such as 12×6 inch or 18×6 inch formats, to maximize this space improving effect.
Horizontal layouts work exceptionally well on accent walls behind vanities or along shower surrounds. This technique draws the eye across the room rather than focusing on its compact dimensions.
Subway tiles represent the most popular rectangular option, measuring 3×6 inches traditionally. Modern interpretations include larger subway formats like 4×12 inches or 6×18 inches that provide contemporary appeal while maintaining classic proportions.
Consider Hexagonal or Mosaic Tiles for Unique Character
Hexagonal tiles introduce ever-changing visual interest that can distract from limited square footage. We recommend using 2 inch or 3 inch hexagon tiles on floors or accent walls to create geometric appeal without overwhelming the space.
These six sided tiles work particularly well when combined with rectangular formats to establish visual zones within your bathroom. Transition areas between hexagon floors and subway walls create sophisticated design layers.
Mosaic tiles offer versatility through their small scale and endless pattern possibilities. We suggest limiting mosaic applications to single accent areas, such as shower niches or backsplashes, to prevent visual overload in compact bathrooms.
Glass mosaics reflect light beautifully, improving the brightness throughout your tiled surfaces. Natural stone mosaics add texture and organic appeal that can make small bathrooms feel more spa like and luxurious.
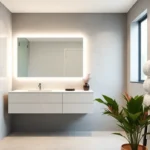
Enhance Lighting With Reflective Tile Finishes

Reflective tile finishes transform small bathrooms by maximizing available light sources and creating brighter, more spacious environments. We’ll explore exact tile options that enhance illumination while maintaining style and functionality.
Select Glossy Tiles to Bounce Light Around the Room
Glossy tiles create dramatic lighting improvements by reflecting natural and artificial light throughout your fully tiled small bathroom. These polished surfaces act like mirrors, bouncing illumination from windows, overhead fixtures, and vanity lights to eliminate dark corners and shadows.
Porcelain tiles with high-gloss finishes work exceptionally well for this purpose, offering durability alongside their light-improving properties. Ceramic options provide similar benefits at more budget-friendly price points, making them accessible for various renovation budgets.
Consider installing glossy tiles on walls opposite windows to maximize daylight reflection and amplify brightness during daytime hours. Position these reflective surfaces strategically near light fixtures to create a multiplying effect that spreads illumination more evenly throughout the space.
Install Mirror Tiles as Accent Features
Mirror tiles serve dual purposes in fully tiled small bathrooms, functioning as both decorative elements and powerful light amplifiers. We recommend using them sparingly as accent features rather than covering entire walls to avoid overwhelming the space with too much reflection.
Install mirror tile strips along the upper portions of walls to create horizontal bands that reflect ceiling lights downward. Position these reflective accents behind floating shelves or above the toilet area to add depth and visual interest while improving overall brightness.
Beveled mirror tiles offer additional design appeal through their dimensional edges, which catch and scatter light in multiple directions. These specialty tiles work particularly well as backsplash elements behind vanities, where they’ll reflect both overhead lighting and the illumination from vanity fixtures.
Choose Metallic Tiles for Subtle Shimmer Effects
Metallic tiles introduce sophisticated shimmer effects that enhance lighting without creating harsh reflections like traditional mirrors. These finishes catch and diffuse light gently, adding warmth and luxury to your fully tiled small bathroom design.
Bronze and copper-toned tiles complement warm lighting schemes while providing subtle reflective qualities that brighten spaces naturally. Gold metallic finishes work beautifully with both modern and traditional design styles, offering timeless appeal alongside their light-improving properties.
Silver and pewter metallic tiles pair perfectly with cool-toned lighting and contemporary fixtures, creating cohesive design schemes that feel both modern and spacious. These finishes reflect light while maintaining understated elegance that won’t compete with other bathroom elements.
Use metallic tiles as border accents or feature strips to introduce reflective elements without overwhelming your design palette. Strategic placement around shower niches, along vanity backsplashes, or as decorative bands creates visual interest while maximizing the light-improving benefits these special finishes provide.
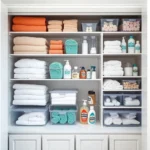
Design Functional Niches With Coordinating Tiles

Maximizing storage in small bathrooms requires strategic placement of functional niches that blend seamlessly with your tiling scheme. We’ll show you how to create integrated storage answers that enhance both organization and aesthetic appeal.
Create Built-In Shower Storage With Matching Tiles
Seamless integration becomes the foundation of effective shower storage when you use tiles that match your bathroom’s existing scheme. Built-in niches eliminate visual clutter while maintaining the cohesive environment that makes small spaces feel larger.
Storage answers work best when they appear invisible within your tile design. Recessed areas blend seamlessly into the wall surface, keeping essential items like shampoo, soap, and razors accessible without creating visual breaks in your tile pattern.
Planning the placement of these storage elements during your renovation ensures proper waterproofing and structural support. We recommend installing niches between wall studs to maintain the integrity of your tile installation while providing adequate depth for toiletries.
Add Recessed Shelving With Contrasting Tile Colors
Visual interest develops naturally when you use contrasting tile colors to highlight recessed shelving areas. This technique breaks up the uniformity of fully tiled surfaces while creating functional focal points that draw attention to organized storage.
Accent colors transform basic storage into design features that enhance your bathroom’s personality. Choose tiles in complementary shades or bold contrasts to make your niches stand out as intentional design elements rather than afterthoughts.
Color coordination ensures balance throughout your space when you limit contrasting tiles to exact areas. We suggest using no more than two accent colors to maintain visual harmony while creating enough contrast to highlight your storage answers effectively.
Install Corner Niches for Space-Saving Answers
Efficient corner utilization maximizes storage potential in tight quarters where every square inch counts. Corner niches provide essential storage without protruding into your already limited floor space or interfering with daily movements.
Harmonious design continues when you tile corner niches with materials that complement your existing scheme. Using the same tile family or coordinating patterns maintains the cohesive look that makes small bathrooms feel more spacious and intentionally designed.
Strategic placement considerations include positioning niches at comfortable heights for easy access while maintaining proper waterproofing around these recessed areas. We recommend installing them between 36 to 48 inches from the floor for optimal functionality in most bathroom layouts.
Establish Cohesive Flow With Consistent Tile Themes

We believe that creating visual harmony through consistent tile themes transforms cramped spaces into sophisticated sanctuaries. Thoughtful material coordination ensures every surface works together to amplify your bathroom’s design potential.
Match Floor and Wall Tiles for Unified Look
Same tile styles on floors and walls minimize visual breaks, making your small bathroom feel dramatically larger than its actual square footage. Porcelain and ceramic tiles offer exceptional durability while creating that seamless aesthetic we’re aiming for throughout the space.
Large format tiles reduce grout lines significantly, which creates a more expansive feel by eliminating busy visual interruptions. We recommend 12×24 inch or larger tiles to achieve this streamlined appearance that tricks the eye into perceiving greater space.
Pattern continuity from floor to wall maintains uninterrupted visual flow that guides the eye smoothly around the room. This technique works particularly well with subway patterns, hexagonal designs, or geometric motifs that can transition naturally between surfaces.
Coordinate Tile Colors With Fixture Finishes
Color harmony between tiles and bathroom fixtures creates a polished, intentional design that elevates your space beyond basic functionality. Matching your tile selections with sink colors, faucet finishes, and hardware creates a cohesive luxury appearance.
Neutral tones like white, gray, and beige pair beautifully with metallic finishes such as brushed nickel, chrome, or matte black fixtures. These combinations provide timeless appeal while allowing flexibility for future accessory updates.
Strategic color matching extends to towel bars, light fixtures, and cabinet hardware to reinforce your design theme throughout every detail. This comprehensive approach ensures no element feels disconnected from your overall tile scheme.
Maintain Consistent Grout Color Throughout Space
Uniform grout color throughout the bathroom creates visual calmness that prevents the space from feeling chaotic or fragmented. We suggest selecting one grout shade that complements your tile choice and using it consistently across all surfaces.
Matching grout eliminates visual competition between different areas of your bathroom, allowing the tile patterns and colors to take center stage. This consistency is particularly important in fully tiled spaces where grout lines become prominent design elements.
Light colored grout enhances spaciousness while darker grout can provide dramatic contrast when used strategically. Consider your maintenance preferences alongside aesthetic goals, as lighter grout requires more frequent cleaning to maintain its fresh appearance.
Conclusion
We’ve explored how strategic tile selection and thoughtful design can completely transform your small bathroom into a stunning space that feels both larger and more luxurious. From maximizing light with reflective finishes to creating seamless storage answers these proven techniques will help you achieve professional results.
The key lies in understanding how each element works together – from tile size and color to pattern placement and lighting enhancement. When we carry out these strategies cohesively we create bathrooms that don’t just function better but truly inspire.
Your small bathroom renovation journey starts with these foundational principles. We’re confident that applying these tile-focused answers will deliver the spacious sophisticated retreat you’ve been dreaming of.
Frequently Asked Questions
How can full tiling make a small bathroom look bigger?
Full tiling creates visual continuity by covering all surfaces, eliminating visual breaks that can make a space feel choppy. When carefully selected tiles flow seamlessly from floor to ceiling, they trick the eye into perceiving more space. This unified approach, combined with strategic color and pattern choices, creates a cohesive environment that feels more expansive than the actual square footage.
What are the best tile colors for small bathrooms?
Light-colored tiles work best for small bathrooms as they reflect more light and create an airy feel. White, cream, and pale gray are timeless choices that maximize visual space. Soft pastels like mint green, powder blue, or blush pink can add gentle color while maintaining space-enhancing qualities. These lighter tones help bounce light around the room, making cramped quarters feel more open.
Should I use large or small tiles in a small bathroom?
Large format tiles (12×24 inches or larger) are ideal for small bathrooms because they minimize grout lines and create a seamless, uninterrupted look. This reduces visual clutter and makes the space appear larger. Rectangular tiles in a 2:1 or 3:1 ratio work particularly well when installed horizontally to widen narrow bathrooms, while maintaining easy maintenance.
How do floor-to-ceiling tiles help small bathrooms?
Floor-to-ceiling tiling maximizes visual impact by drawing the eye upward, creating the illusion of height. This technique eliminates visual breaks that can make ceilings appear lower. Using large format tiles in a single color scheme or subtle pattern helps blur boundaries between surfaces, making the bathroom feel more spacious and luxurious while achieving a high-end, custom appearance.
Can I use bold patterns in a small bathroom?
Yes, but use them strategically as accent walls rather than covering all surfaces. Focus statement tiles on one focal wall, such as behind the vanity or shower, to create visual interest without overwhelming the space. Geometric patterns like hexagons or chevrons work well for adding movement. This approach draws attention away from limited square footage while maintaining visual harmony.
What tile finishes work best for small bathrooms?
Glossy tile finishes are excellent for small bathrooms because they reflect light and create brighter, more spacious environments. Porcelain and ceramic tiles with glossy finishes are durable and budget-friendly options. Place glossy tiles opposite windows and near light fixtures to maximize brightness. Metallic tiles can add subtle shimmer effects that enhance lighting without harsh reflections.
How can I add storage without cluttering my small bathroom?
Create built-in niches using matching tiles to maintain visual continuity while adding functional storage. Recessed shower shelving and corner niches maximize space utilization without protruding into the room. Plan these storage elements during renovation to ensure proper waterproofing and structural support. This approach eliminates visual clutter while providing organized storage that blends seamlessly with your tiling scheme.
Why is consistent tile theme important in small bathrooms?
Consistent tile themes create cohesive flow that minimizes visual breaks and enhances space perception. Matching floor and wall tiles, coordinating tile colors with fixture finishes, and maintaining consistent grout color throughout promotes visual calmness. This unified approach ensures every element works harmoniously, creating a polished design that makes the small bathroom feel more expansive and luxurious.