Shiplap has transformed from a humble farmhouse staple into one of today’s most coveted design elements and bathrooms are no exception to this trend. We’ve seen countless homeowners elevate their bathroom spaces with the timeless appeal of horizontal wood planking that adds both texture and character to what’s often the smallest room in the house.
Whether you’re dreaming of a spa-like retreat or a cozy cottage-inspired powder room shiplap offers endless possibilities for creating visual interest. From accent walls behind vanities to full room installations the versatility of this classic material makes it perfect for any bathroom style.
We’ll explore creative ways to incorporate shiplap into your bathroom design while addressing practical considerations like moisture resistance and maintenance. Get ready to discover how this simple yet striking wall treatment can completely transform your bathroom into a space that’s both functional and undeniably stylish.
Understanding Shiplap and Its Benefits for Bathroom Design
Building on shiplap’s versatility, we need to explore what makes this material particularly suitable for bathroom environments and how it can enhance your space.
What Makes Shiplap Perfect for Bathrooms
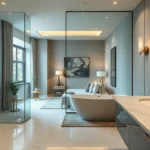
Visual impact transforms ordinary walls into stunning focal points. We’ve seen countless bathrooms where shiplap creates instant character and depth that painted walls simply can’t match. The horizontal lines naturally draw the eye across the space, making smaller bathrooms appear wider and more spacious.
Installation flexibility allows for creative design answers. Shiplap works beautifully as a full wall treatment, wainscoting, or accent feature behind vanities and bathtubs. We can install it vertically to create height illusions or horizontally for width enhancement.
Texture variety adds dimensional interest to bathroom surfaces. Smooth shiplap offers a modern, clean aesthetic while distressed options provide rustic charm. The natural wood grain or painted finish creates visual warmth that complements both contemporary and traditional bathroom styles.
Cost effectiveness delivers high-end looks without premium pricing. Real wood shiplap typically costs $2-6 per square foot, while MDF alternatives range from $1-3 per square foot. We’ve found that shiplap installation often costs 30-50% less than tile work while providing similar visual impact.
Moisture Resistance and Durability Considerations
Proper sealing prevents moisture damage and extends lifespan. We recommend applying marine-grade polyurethane or specialized bathroom paint to create a protective barrier. Cedar and redwood naturally resist moisture better than pine or oak varieties.
Ventilation requirements ensure long-term performance success. Bathrooms with shiplap need exhaust fans rated at 1 CFM per square foot of floor space. We’ve observed that proper ventilation reduces moisture-related issues by up to 85% in shiplap installations.
Material selection impacts durability and maintenance needs. PVC and composite shiplap options offer superior moisture resistance compared to natural wood. These synthetic materials resist warping, cracking, and mold growth while maintaining the authentic shiplap appearance.
Strategic placement maximizes benefits while minimizing risks. We position shiplap in areas with less direct water exposure, such as above wainscoting height or on walls opposite shower enclosures. This approach preserves the design element while reducing moisture exposure.
Choosing the Right Shiplap Material for Your Bathroom

Material selection becomes crucial when designing your bathroom shiplap project. Different materials offer varying levels of moisture resistance and durability for bathroom environments.
Traditional Wood Shiplap Options
Traditional wood remains a popular choice for shiplap installations due to its authentic appearance and natural texture. Pine, cedar, and oak provide beautiful grain patterns that create warm, inviting atmospheres in bathroom spaces. Wood shiplap offers the most authentic farmhouse aesthetic that many homeowners desire.
Moisture protection becomes essential when using traditional wood in bathrooms to prevent warping and rotting. We recommend applying high-quality primer and multiple coats of moisture-resistant paint or polyurethane finish. Proper ventilation helps extend the lifespan of wood shiplap by reducing humidity exposure.
Installation requires careful consideration of placement to minimize direct water contact. Wood shiplap works best on walls away from shower areas or behind vanities where moisture levels stay lower.
Moisture-Resistant MDF and Engineered Wood
Medium-density fiberboard offers better moisture resistance compared to traditional wood while maintaining a similar aesthetic appeal. MDF shiplap costs less than solid wood options making it budget-friendly for larger bathroom projects. Engineered wood combines wood fibers with adhesives to create more stable boards that resist moisture damage.
Manufacturing processes make these materials more uniform in appearance with fewer knots and imperfections. MDF accepts paint finishes exceptionally well creating smooth, professional-looking surfaces. Engineered wood products perform better in humid environments than solid wood alternatives.
Durability increases with proper installation and finishing techniques. These materials require less maintenance than traditional wood while still providing the classic shiplap appearance homeowners love.
PVC and Vinyl Shiplap Alternatives
PVC shiplap provides the highest moisture resistance making it ideal for bathroom installations. Vinyl alternatives offer similar benefits with easy installation processes that many DIY enthusiasts can handle. These synthetic materials resist mold, mildew, and water damage better than any wood-based options.
Cleaning becomes effortless with PVC and vinyl shiplap requiring only basic soap and water maintenance. Installation costs often decrease due to lightweight materials and simplified mounting systems. These alternatives come in various colors and textures that mimic natural wood appearances.
Practical benefits include no need for painting or sealing treatments that wood materials require. PVC and vinyl shiplap maintain their appearance for years without warping, cracking, or rotting in humid bathroom conditions.
Creating a Coastal Bathroom Retreat with White Shiplap

White shiplap transforms ordinary bathrooms into serene coastal retreats that evoke the calming essence of seaside living. This timeless design approach brings light, texture, and nautical charm to any bathroom space.
Floor-to-Ceiling White Shiplap Walls
Floor to ceiling white shiplap walls create the most dramatic coastal impact in your bathroom design. We recommend this approach for spaces where you want maximum visual cohesion and an airy, expansive feeling.
Installing shiplap from floor to ceiling eliminates visual breaks that can make bathrooms feel cramped or choppy. The continuous white surface reflects light throughout the space, making even compact powder rooms appear significantly larger than their actual square footage.
Maintaining consistent board spacing across the entire wall height ensures professional results. We suggest using 1/8 inch gaps between boards to create subtle shadow lines that add depth without overwhelming the clean coastal aesthetic.
Pairing floor to ceiling shiplap with white or light colored fixtures maximizes the bright, beachy atmosphere. Consider adding brass or brushed gold hardware to introduce warmth against the crisp white backdrop.
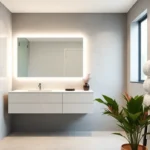
Accent Wall Behind the Vanity
Accent walls behind vanities offer a strategic way to introduce shiplap without committing to full room coverage. This focused approach creates an instant focal point that draws attention to your vanity area while maintaining design balance.
Positioning white shiplap behind floating vanities creates visual separation between the wall treatment and cabinetry. The horizontal lines add visual width to narrow bathroom layouts, making the vanity wall appear more substantial and grounded.
Extending the shiplap accent wall slightly beyond the vanity edges prevents the installation from looking like an afterthought. We recommend adding 6 to 12 inches on each side of the vanity to create proper visual proportions.
Contrasting the white shiplap with darker vanity colors like navy blue or charcoal gray enhances the coastal cottage aesthetic. This combination creates depth while maintaining the fresh, clean feeling essential to coastal design.
Combining White Shiplap with Natural Elements
Combining white shiplap with natural materials creates the perfect balance of coastal charm and organic warmth. Marble countertops paired with shiplap walls bring luxury and natural beauty together in harmonious contrast.
Wood accents like reclaimed timber mirrors or teak bath accessories complement white shiplap by adding texture and earthiness. These natural elements prevent the all white palette from feeling sterile or cold while maintaining the coastal theme.
Incorporating live greenery through potted plants or hanging planters brings life to shiplap installations. Tropical plants like monstera or fiddle leaf figs enhance the coastal retreat atmosphere while adding natural color variation.
Stone elements such as river rock borders or pebble shower floors ground the white shiplap in natural textures. These materials create spa like tranquility while reinforcing the connection to coastal environments where water meets shore.
Embracing Rustic Charm with Natural Wood Shiplap

Natural wood shiplap brings authentic rustic character to bathroom spaces while creating warm, inviting atmospheres. We find that untreated or lightly treated wood offers the most organic appearance when paired with natural materials like woven baskets and plants.
Weathered Wood Finishes for Vintage Appeal
Weathered wood finishes create an aged, vintage appearance that instantly transforms any bathroom into a charming retreat. We recommend applying weathered effects to light-colored shiplap to establish a neutral backdrop for ceramic accents and vintage fixtures.
Vintage mirrors and antique fixtures complement weathered shiplap beautifully, completing the aged aesthetic we’re aiming for. Light weathered tones work particularly well in smaller bathrooms where we want to maintain brightness while adding character.
Distressed elements enhance the vintage appeal when we incorporate items like worn brass hardware or reclaimed wood accessories. The key lies in balancing the weathered finish with clean lines to avoid overwhelming the space.
Stained Shiplap for Warmth and Character
Warm wood stains add depth and richness to bathroom shiplap while creating cozy, inviting environments. We find that earthy tones work exceptionally well with natural materials and complement various design styles.
Contrasting accents become essential when working with stained shiplap to prevent the space from feeling too dark. White fixtures, black hardware, or light-colored countertops provide the perfect balance we need.
Medium to dark stains showcase wood grain beautifully while adding sophisticated warmth to the bathroom environment. These deeper tones work particularly well in larger bathrooms where we have more natural light to work with.
Mixing Wood Tones with Modern Fixtures
Different wood tones create visual interest and dimension when we combine light and dark shiplap elements strategically. This approach allows us to layer textures while maintaining a cohesive design aesthetic.
Modern fixtures like matte black faucets and frameless mirrors provide sleek contrasts against mixed wood tones. We often pair these contemporary elements with traditional shiplap to achieve a perfectly balanced transitional style.
Strategic placement of varying wood tones helps define different areas within the bathroom space. Lighter tones can expand smaller areas while darker accents create focal points where we want to draw attention.
Adding Drama with Dark Shiplap Accent Walls

Dark shiplap transforms ordinary bathrooms into sophisticated retreats that command attention. These rich, moody tones create intimate spaces while adding depth and visual interest to any bathroom design.
Navy Blue Shiplap for Bold Contrast
Navy blue shiplap delivers striking visual impact when paired with crisp white fixtures and natural wood elements. This deep coastal hue works beautifully in both traditional and transitional bathroom styles, creating a balanced look that’s bold yet timeless. We recommend installing navy shiplap on a single accent wall behind the vanity or bathtub to avoid overwhelming smaller spaces.
The rich blue tone pairs exceptionally well with brass or gold hardware, creating warm metallic accents that complement the cool undertones. Natural wood vanities and shelving add warmth while maintaining the coastal aesthetic that navy blue naturally evokes. Marble countertops and white subway tiles provide crisp contrast that keeps the overall design fresh and sophisticated.
Consider vertical installation to visually elongate powder rooms or compact guest bathrooms. The dramatic color choice makes small spaces feel cozy rather than cramped, while larger bathrooms benefit from the intimate atmosphere navy creates.
Charcoal Gray Statement Walls
Charcoal gray shiplap offers sophisticated neutrality that adapts to virtually any design palette or finish selection. This versatile shade serves as an elegant backdrop for both modern minimalist fixtures and traditional vintage elements. We find charcoal particularly effective in primary bathrooms where you want drama without the boldness of darker colors.
The neutral undertones complement stainless steel fixtures, chrome finishes, and contemporary lighting while also working beautifully with warmer brass and copper accents. Stone surfaces like granite or quartz pair naturally with charcoal shiplap, creating cohesive color stories that feel intentional and refined.
Gray shiplap works effectively on feature walls or even bathroom ceilings for unexpected visual interest. The color’s adaptability means it transitions seamlessly between seasons and design trends, making it an excellent long term investment for bathroom renovations.
Black Shiplap for Modern Elegance
Black shiplap creates the ultimate dramatic statement while maintaining sophisticated modern appeal. This bold choice works exceptionally well when balanced with light marble surfaces, crisp white fixtures, and warm metallic accents like gold or brass. We recommend using black shiplap sparingly as an accent wall or ceiling treatment to prevent overwhelming the space.
The intensity of black requires careful lighting consideration to maintain an open, welcoming atmosphere. Natural light from windows or skylights helps balance the darkness, while strategic artificial lighting prevents the space from feeling closed in or cave like.
Contemporary bathrooms benefit most from black shiplap installations, where clean lines and minimal accessories allow the dramatic wall treatment to take center stage. Floating vanities, frameless mirrors, and sleek fixtures complement the modern elegance that black shiplap naturally provides.
Stone surfaces like Carrara marble or white quartz create stunning contrast against black walls, while plants and natural textures add warmth to prevent the space from feeling too stark or cold.
Incorporating Shiplap in Small Bathroom Spaces

Small bathrooms can feel more spacious and welcoming with strategic shiplap placement. This versatile material transforms cramped quarters into cozy retreats while adding texture and warmth to otherwise sterile environments.
Vertical Shiplap to Create Height Illusion
Vertical shiplap installation creates the illusion of taller ceilings and more expansive spaces. We recommend this technique for bathrooms with low ceilings since it visually elongates rooms and draws the eye upward. Installing boards vertically also helps conceal unsightly fixtures like exposed pipes and electrical conduits.
Consider extending vertical shiplap from floor to ceiling for maximum impact. Light-colored vertical boards work best for height enhancement, while darker tones can make ceilings feel lower. We suggest using 1×6 or 1×8 boards spaced with minimal gaps to maintain clean vertical lines.
Half-Wall Shiplap Applications
Half-wall shiplap covers only the lower portion of bathroom walls, typically extending 3 to 4 feet from the floor. This design approach adds visual interest through layering while protecting high-traffic areas from moisture and wear. We often pair half-wall shiplap with complementary paint colors or tile work on upper sections.
Installing half-wall applications requires careful consideration of proportions. Rooms with 8-foot ceilings work well with 36-inch wainscoting height, while taller spaces can accommodate 42 to 48-inch installations. Adding a decorative cap rail or trim piece creates a finished appearance and prevents moisture infiltration.
Shiplap Ceiling Treatments for Cozy Feel
Shiplap ceiling treatments create intimate, cozy atmospheres in small bathroom spaces. This technique works especially well when combined with wall shiplap installations, enveloping the entire room in unified design elements. Darker shiplap colors on ceilings draw the eye upward and make spaces feel less confined.
We recommend using moisture-resistant materials for ceiling applications since steam rises during hot showers. Proper ventilation becomes critical when installing ceiling shiplap to prevent moisture buildup and potential damage. Consider recessed lighting fixtures that complement the linear patterns of ceiling-mounted shiplap boards.
Mixing Shiplap with Other Bathroom Materials

Combining shiplap with complementary materials creates ever-changing visual interest and elevates your bathroom design beyond traditional single-material approaches. These strategic pairings allow you to balance rustic charm with modern sophistication while maintaining cohesive aesthetics throughout your space.
Pairing Shiplap with Subway Tiles
Subway tiles and shiplap create the perfect modern farmhouse combination that we see in countless design magazines today. White vertical shiplap accent walls paired with classic subway tile backsplashes deliver a clean, timeless appearance that works beautifully behind vanities or in shower areas.
Consider installing shiplap on one feature wall while using subway tiles for wet areas like shower surrounds. This approach protects high-moisture zones with durable tile while adding warmth and texture through shiplap placement. The linear patterns of both materials complement each other naturally, creating visual harmony without overwhelming the space.
Mix tile colors strategically to enhance your shiplap’s natural beauty. White subway tiles with light gray grout pair excellently with cream or off-white shiplap, while darker subway tiles create striking contrast against bright white shiplap walls.
Combining Shiplap with Natural Stone
Natural stone materials like marble and quartz provide smooth, luxurious contrast to shiplap’s rustic wooden texture. This combination creates a harmonious blend that enhances your bathroom’s overall aesthetic while balancing different material personalities.
Marble countertops work exceptionally well with white or natural wood shiplap accent walls. The veining in marble adds organic movement that complements shiplap’s horizontal lines, creating sophisticated visual layers throughout your bathroom design.
Quartz surfaces offer durability advantages while maintaining the elegant appearance that pairs beautifully with shiplap installations. Consider using natural stone for vanity tops, shower surrounds, or flooring while incorporating shiplap on accent walls or wainscoting areas.
Stone’s cool temperature and smooth finish create perfect counterpoint to wood’s warm, textured appearance. This material pairing works particularly well in spa-inspired bathrooms where you want to blend natural elements with modern convenience.
Integrating Shiplap with Modern Glass Elements
Glass elements bring sleek contemporary touches to traditional shiplap installations, creating balanced designs that feel both current and timeless. Glass shower doors, mirrors, and shelving add transparency and light reflection that brightens shiplap’s natural wood tones.
Frameless glass shower enclosures work exceptionally well against shiplap accent walls, allowing the wood texture to remain visible while maintaining clean, modern lines. The transparency of glass prevents visual clutter while showcasing your shiplap investment.
Large glass mirrors enhance shiplap’s horizontal lines by reflecting them throughout the space. Consider oversized rectangular mirrors that echo shiplap’s linear geometry, or round mirrors that provide soft contrast to wood’s angular patterns.
Glass shelving mounted on shiplap walls creates functional storage while maintaining the material’s visual impact. Choose clear glass shelves with minimal hardware to preserve your shiplap’s natural beauty while adding practical bathroom storage answers.
Metal accents in matte black or brushed brass finishes enhance these glass and shiplap combinations. Terrazzo elements can also be integrated to bring additional depth and sophistication, balancing shiplap’s rustic character with contemporary design sensibilities.
Installation Tips and Considerations for Bathroom Shiplap

Installing shiplap in our bathroom requires careful planning and attention to moisture management details. We’ll need to address ventilation, waterproofing, and installation approach to ensure our shiplap project succeeds long term.
Proper Ventilation Requirements
Adequate ventilation serves as our first line of defense against moisture damage in shiplap installations. We must ensure our bathroom features a functioning exhaust fan that’s properly rated for the room size to handle humidity levels effectively.
Good airflow protects our shiplap panels from warping and deterioration caused by excess moisture buildup. Installing the exhaust fan on a timer or humidity sensor helps maintain consistent air circulation even after we finish using the bathroom.
We should also consider adding a small gap between shiplap boards and the ceiling to allow natural air movement behind the panels. This ventilation space prevents trapped moisture from causing mold growth or wood rot over time.
Waterproofing and Sealing Techniques
Waterproof sealer application becomes critical before we install any shiplap boards in our bathroom space. We need to apply primer or sealer to all surfaces of each board, including the edges and back sides that won’t be visible after installation.
Water resistant paint or specialized bathroom sealant provides additional surface protection once our shiplap is in place. We should focus extra attention on areas near showers, tubs, and sinks where moisture exposure increases significantly.
Installing a vapor barrier between the shiplap and wall offers another layer of protection, especially on exterior walls or below grade installations. Regular resealing maintenance keeps our waterproofing effective based on bathroom usage patterns and humidity conditions.
| Protection Method | Application Area | Frequency |
|---|---|---|
| Waterproof Sealer | All board surfaces | Before installation |
| Water Resistant Paint | Visible surfaces | Every 2-3 years |
| Vapor Barrier | Behind shiplap panels | Once during install |
Professional vs. DIY Installation
DIY installation offers cost savings and creative control for homeowners with basic carpentry skills and standard tools. We can take advantage of free plywood cutting services at home improvement stores to reduce preparation time and material waste.
Professional installation ensures expert handling of moisture barriers, proper leveling, and quality finishing techniques. Contractors bring experience with complex layouts and can navigate challenging spaces that might frustrate DIY installers.
Both approaches require attention to proper fastening every 16 inches, ensuring joints fall over studs or furring strips for structural support. We must use a level throughout installation and paint the wall behind in matching colors for seamless appearance at board seams.
Measuring wall height and width accurately determines our material needs regardless of installation method. Adding horizontal furring strips no more than 16 inches apart provides secure attachment surfaces when installing shiplap parallel to wall framing.
Maintaining Your Bathroom Shiplap Over Time

Keeping your bathroom shiplap looking beautiful requires consistent care and attention to moisture management. We’ll help you establish routines that protect your investment and extend its lifespan.
Regular Cleaning and Care Routines
Start with gentle dusting using a soft brush or microfiber cloth to remove surface debris before any wet cleaning. We recommend working in one direction rather than circular motions to effectively capture dust without redistributing it across the boards.
Create an effective cleaning solution by mixing 1 cup of white vinegar with 2 cups of warm water for a natural approach. Alternatively, combine gentle dish soap with warm water for everyday cleaning without harsh chemicals that could damage your shiplap finish.
Apply cleaning answers sparingly using a lightly dampened cloth rather than soaking the surface. We suggest testing any new cleaner on an inconspicuous area first to ensure it won’t affect your shiplap’s color or finish.
Consider faux shiplap for easier maintenance if you’re planning future installations, as these surfaces can handle more aggressive cleaning with products like Magic Erasers without surface damage. Traditional wood shiplap requires gentler care to preserve its natural beauty and protective coatings.
Dry surfaces thoroughly after cleaning to prevent water from settling into grooves or joints. We always finish our cleaning routine by wiping down with a clean, dry cloth to eliminate any remaining moisture.
Preventing Moisture Damage
Ensure proper ventilation by running your exhaust fan during and after showers to reduce humidity levels that can cause warping or decay. We recommend keeping the fan running for at least 30 minutes after bathing to fully clear moisture from the air.
Conduct regular inspections monthly to check for early signs of moisture damage, mildew, or discoloration, especially around areas near the shower or tub. Look for any changes in color, texture, or the presence of dark spots that might indicate water infiltration.
Monitor high humidity areas more closely, as these zones face the greatest risk of moisture related problems. We pay special attention to corners, joints, and areas where shiplap meets other surfaces like tile or fixtures.
Address ventilation issues immediately if you notice condensation buildup or persistent humidity even though proper fan usage. Poor air circulation can lead to serious moisture problems that compromise even moisture resistant materials like MDF or PVC shiplap.
Check sealants and finishes annually to ensure they’re still providing adequate protection against water penetration. We recommend reapplying protective coatings as needed to maintain your shiplap’s moisture resistance.
When to Refinish or Replace
Assess the overall condition of your shiplap by examining the surface for minor scratches, fading, or worn finish that would benefit from refinishing rather than full replacement. We typically recommend refinishing when the damage is primarily cosmetic and the underlying material remains structurally sound.
Replace boards showing important moisture damage such as warping, soft spots, or extensive mildew that can’t be cleaned away. These issues indicate that water has compromised the material’s integrity beyond what refinishing can address.
Consider replacement timing based on your shiplap material type, as treated wood and moisture resistant options like PVC typically last longer than untreated natural wood in bathroom environments. We factor in the age of the installation and the severity of any damage when making replacement decisions.
Plan refinishing projects during low humidity seasons when possible to ensure proper drying and curing of new finishes. Fresh protective coatings applied in ideal conditions provide better long term protection against bathroom moisture.
Evaluate cost effectiveness by comparing refinishing expenses against full replacement, especially if multiple boards need attention or if you’re considering upgrading to more moisture resistant materials like PVC or composite options.
Conclusion
Shiplap offers endless possibilities for transforming your bathroom into a stylish and functional space. Whether you’re drawn to coastal charm with crisp white boards or prefer the drama of dark accent walls we’ve shown you how this versatile material can work in any design scheme.
The key to success lies in choosing the right materials for your exact needs and ensuring proper installation with adequate moisture protection. From traditional wood to modern PVC options there’s a shiplap solution that fits both your aesthetic vision and practical requirements.
With proper maintenance and care your bathroom shiplap will continue to provide beauty and character for years to come. We’re confident these ideas will help you create the bathroom of your dreams while adding lasting value to your home.
Frequently Asked Questions
What makes shiplap suitable for bathroom use?
Shiplap creates stunning focal points and makes small bathrooms appear more spacious. Its installation flexibility allows for various applications from full walls to accent features. Modern moisture-resistant options like PVC and composite materials provide superior durability compared to traditional wood, making shiplap both practical and stylish for humid bathroom environments.
Which shiplap material is best for bathrooms?
PVC and vinyl shiplap offer the best moisture resistance, easy installation, and low maintenance for bathrooms. These materials are ideal for humid conditions. Traditional wood options like pine or cedar provide authentic appearance but require proper sealing and ventilation. MDF and engineered wood offer a middle ground with better durability than natural wood.
Can shiplap make a small bathroom look bigger?
Yes, shiplap can make small bathrooms appear more spacious. Vertical installation creates the illusion of height, while horizontal placement can make rooms feel wider. Light-colored shiplap, especially white, reflects light and opens up the space. Strategic placement as accent walls rather than full coverage helps maintain an airy feel.
How do you maintain shiplap in a bathroom?
Regular cleaning with mild solutions and proper ventilation are essential for bathroom shiplap maintenance. Ensure your exhaust fan functions properly to manage humidity. Check protective coatings periodically and refinish when needed. Address any signs of moisture damage immediately to prevent warping, rotting, or mold growth.
Should I hire a professional to install bathroom shiplap?
Professional installation is recommended for complex layouts and proper moisture barrier handling. While DIY installation can save costs, professionals ensure expert waterproofing and ventilation setup. Regardless of your choice, accurate measurements, secure fastening, and proper sealing are crucial for successful bathroom shiplap projects.
What colors work best for bathroom shiplap?
White shiplap creates a classic coastal look and makes spaces feel larger. Dark colors like navy blue, charcoal gray, or black add drama and sophistication but require careful lighting. Natural wood tones provide rustic charm and warmth. Light colors work best in small bathrooms, while bold colors can create striking accent walls.
How do you waterproof shiplap in bathrooms?
Apply high-quality sealers and moisture-resistant paints to protect shiplap boards. Install a vapor barrier behind the shiplap for added protection. Ensure proper ventilation with a functioning exhaust fan. Choose moisture-resistant materials like PVC or properly treated wood. Seal all joints and edges to prevent water infiltration.
Can you install shiplap on bathroom ceilings?
Yes, shiplap ceiling treatments create cozy atmospheres in bathrooms. Use moisture-resistant materials and ensure proper ventilation to prevent humidity damage. Consider the ceiling height and lighting requirements when planning installation. Professional installation may be necessary for complex ceiling layouts and proper moisture protection.