Beadboard transforms ordinary bathrooms into charming coastal retreats and vintage-inspired sanctuaries that feel both timeless and fresh. We’ve seen this classic wall treatment make a stunning comeback as homeowners seek affordable ways to add character and visual interest to their most intimate spaces.
Whether you’re dreaming of a crisp white cottage-style powder room or a bold navy accent wall behind your vanity, beadboard offers endless possibilities that work with any budget. This versatile paneling doesn’t just look gorgeous – it’s also practical for moisture-prone areas when properly sealed and installed.
We’re excited to share our favorite bathroom beadboard ideas that’ll inspire your next renovation project. From traditional wainscoting applications to modern full-wall installations, these design concepts prove that beadboard isn’t just for farmhouses anymore. You’ll discover creative color combinations, innovative layouts, and expert tips that’ll help you achieve that perfect balance of style and functionality in your bathroom.
Classic White Beadboard Wainscoting Ideas for Traditional Bathrooms
White beadboard wainscoting creates the perfect foundation for timeless bathroom design. This classic approach brings elegance and sophistication to traditional spaces while maintaining the charming character that makes beadboard so appealing.
Subway Tile and White Beadboard Combinations
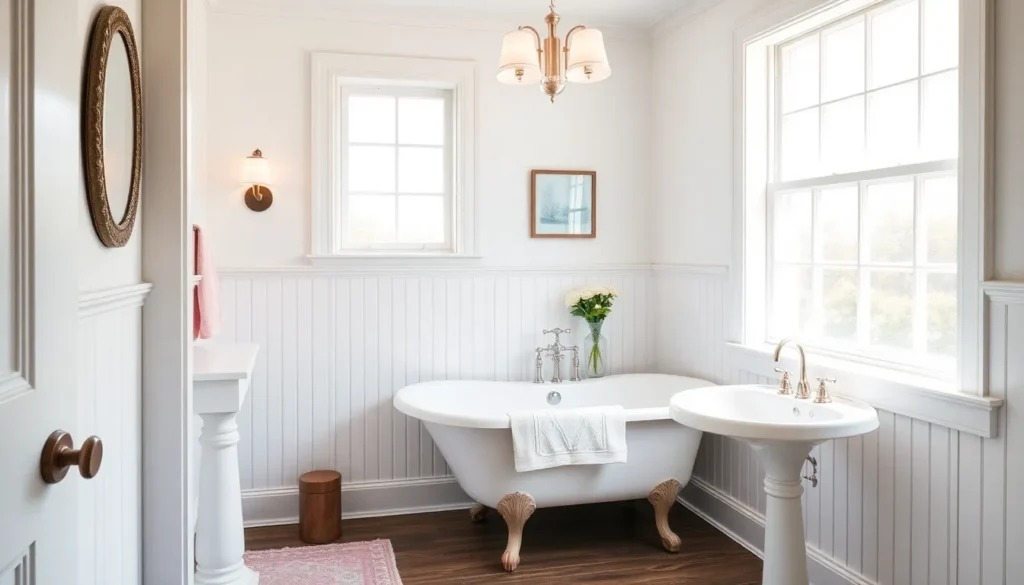
Pairing white subway tiles with beadboard wainscoting creates a sophisticated layered look that’s perfect for traditional bathrooms. We recommend installing beadboard panels up to chair rail height, typically 36 to 42 inches from the floor, then continuing with classic 3×6 inch subway tiles above. This combination works exceptionally well behind pedestal sinks and clawfoot tubs.
Consider using contrasting grout colors like charcoal or navy to make the subway tiles pop against the white beadboard backdrop. The vertical lines of the beadboard complement the horizontal subway tile pattern, creating visual interest without overwhelming the space. This design approach works particularly well in smaller bathrooms where the two textures add depth without cluttering.
Installing a chair rail or decorative molding between the beadboard and subway tiles creates a polished transition that elevates the overall design. We’ve seen homeowners achieve stunning results by extending this combination around the entire bathroom perimeter, creating a cohesive wainscoting treatment that feels both classic and fresh.
Vintage-Inspired Fixtures with White Beadboard Panels
White beadboard panels provide the ideal backdrop for showcasing vintage bathroom fixtures and accessories. Pedestal sinks with ornate details look particularly striking against crisp white beadboard, especially when paired with traditional cross handle faucets in brushed nickel or oil rubbed bronze finishes.
Medicine cabinets with beveled mirrors and vintage apothecary jars create authentic period charm when displayed against white beadboard walls. We suggest incorporating traditional sconce lighting with milk glass shades or Edison bulb fixtures to enhance the vintage aesthetic. These lighting choices cast warm, flattering light that highlights the texture of the beadboard panels.
Clawfoot tubs positioned against white beadboard create dramatic focal points in traditional bathrooms. Adding vintage inspired accessories like rolled towel holders, soap dishes, and towel warmers in matching finishes reinforces the period appropriate design. Consider installing beadboard at full height behind the tub area to create a stunning accent wall that protects against moisture while maintaining the classic look.
Painted Beadboard Color Schemes to Transform Your Bathroom
 1")
Moving beyond traditional white opens up exciting possibilities for creating unique bathroom personalities. Color transforms beadboard from classic to contemporary, allowing you to express your style while maintaining the material’s inherent charm.
Bold Navy Blue Beadboard for Statement Walls
Navy blue beadboard creates dramatic visual impact that transforms ordinary bathrooms into sophisticated retreats. We recommend using this bold choice on accent walls to avoid overwhelming smaller spaces while still achieving maximum effect. Contrasting navy panels with lighter wall colors like crisp white or soft cream creates stunning depth and dimension.
Statement walls featuring navy beadboard work exceptionally well behind vanities or bathtubs where they can serve as striking focal points. Pairing this deep blue with brass fixtures and warm wood accents creates a luxurious atmosphere reminiscent of high end spas. Natural light enhances the navy’s richness while artificial lighting can be used strategically to prevent the space from feeling too dark.
Soft Pastel Beadboard Ideas for Relaxing Spa Vibes
Pastel beadboard colors like pale pink and lavender promote relaxation and create serene bathroom environments perfect for unwinding. These gentle hues work beautifully in powder rooms and master bathrooms where creating a calming atmosphere is essential. Soft colors reflect light naturally, making smaller bathrooms appear more spacious and airy.
Spa inspired designs benefit from pastel beadboard combined with natural materials like bamboo accessories and stone countertops. We suggest using pale mint green or dusty blue for beadboard wainscoting to create subtle color without overwhelming the space. These soothing tones pair excellently with white fixtures and chrome hardware for a fresh, clean aesthetic.
Dark Green Beadboard for Modern Farmhouse Appeal
Dark green beadboard adds modern sophistication to farmhouse style bathrooms while maintaining their cozy, welcoming feel. This earthy tone complements natural materials like reclaimed wood vanities and stone vessel sinks perfectly. Forest green and sage variations create different moods, from dramatic and moody to soft and organic.
Modern farmhouse bathrooms featuring dark green beadboard benefit from contrasting elements like white shiplap ceilings and brass lighting fixtures. We recommend extending green beadboard to chair rail height and painting upper walls in complementary neutral tones. This approach creates visual balance while allowing the rich green to serve as an elegant foundation for the room’s design.
Beadboard Ceiling Applications for Cozy Bathroom Atmospheres
 2")
Taking beadboard beyond wall applications opens up exciting design possibilities that can dramatically transform your bathroom’s ambiance. Ceiling installations create intimate, cottage-inspired spaces that make even the largest bathrooms feel welcoming and cozy.
Tongue and Groove Beadboard Ceiling Installation Tips
Measuring accurately ensures you purchase the right amount of materials while accounting for waste and cutting errors. We recommend ordering 10-15% extra beadboard to accommodate mistakes and future repairs.
Starting from the center of your ceiling helps maintain symmetry and creates professional-looking results. Mark your ceiling’s center point and work outward to ensure equal border pieces on all sides.
Checking for level surfaces prevents installation headaches down the road. Use a laser level or chalk line to identify any ceiling irregularities that need addressing before you begin installing beadboard pieces.
Installing proper ventilation prevents moisture damage that can warp your beautiful new ceiling. Bathroom exhaust fans should move at least 1 CFM per square foot of bathroom space to maintain adequate air circulation.
Sealing joints carefully with paintable caulk creates seamless transitions between beadboard pieces. Focus extra attention on long ceiling runs where visible seams can detract from the overall appearance.
Pre-drilling nail holes prevents splitting in tongue and groove boards, especially near the ends where wood is most vulnerable. Use finishing nails that penetrate at least 1 inch into ceiling joists for secure attachment.
Painted Beadboard Ceilings to Add Visual Interest
Powder blue paired with light pink walls creates whimsical color combinations that work beautifully in guest bathrooms and powder rooms. This playful palette adds personality while maintaining a fresh, airy feeling.
White beadboard ceilings deliver clean, timeless appeal that brightens any bathroom space. The classic white finish reflects light effectively and pairs seamlessly with virtually any wall color or design theme.
Dark navy blue walls with white ceilings create sophisticated contrast that adds depth to your bathroom design. This dramatic color combination works particularly well in larger bathrooms where bold choices won’t overwhelm the space.
Monochromatic color schemes using varying shades of the same hue create cohesive, spa-like environments. Consider painting your beadboard ceiling in a lighter version of your wall color for subtle tonal variation.
High-gloss paint finishes on beadboard ceilings help moisture bead up and roll off rather than absorbing into the wood. Semi-gloss and satin finishes also work well while providing easier maintenance than flat paints in humid environments.
Full Wall Beadboard Installations for Maximum Impact
 3")
Full wall beadboard installations represent the boldest approach to incorporating this classic material into bathroom design. We’ll explore strategic methods that maximize both visual impact and functional benefits.
Floor-to-Ceiling Beadboard Design Strategies
Installing beadboard from floor to ceiling creates an illusion of higher ceilings while adding grandeur to your bathroom space. This technique proves especially effective in traditional bathrooms where you’re seeking a cohesive, unified appearance.
Visual height becomes dramatically enhanced when continuous vertical lines extend from floor to ceiling. We recommend this approach for smaller bathrooms where you want to maximize the perception of space without costly structural changes.
Properly installed and sealed beadboard offers superior moisture resistance, making it an ideal choice for humid bathroom environments. The key lies in ensuring proper sealing at all joints and using appropriate primer and paint products designed for high-moisture areas.
Almost full coverage installations leave a small decorative band between the beadboard and ceiling. This design technique draws the eye upward, further improving height perception while adding an elegant finishing touch to your bathroom walls.
Mixing Beadboard Heights for Visual Balance
Multilevel beadboard installations add visual interest by creating ever-changing movement throughout your bathroom space. We suggest installing panels at varying heights around different fixtures like vanities, under windows, or halfway up accent walls.
Contrasting beadboard areas help define functional zones within larger bathroom spaces. You can use different heights to distinguish a towel storage area from the main vanity section, creating purposeful design divisions.
Strategic height variations work particularly well when you want to highlight exact architectural features or fixtures. Installing beadboard at different elevations around a freestanding tub or walk-in shower creates compelling focal points.
Balanced proportions become achievable when you alternate between full height panels and shorter wainscoting applications. This approach prevents visual monotony while maintaining the classic charm that makes beadboard so appealing in bathroom designs.
Beadboard Backsplash Ideas Behind Bathroom Vanities
 4")
Creating a beadboard backsplash behind your bathroom vanity adds both style and functionality to this high-traffic area. We’ve discovered that this classic design element protects walls from water splashes while maintaining the timeless charm that beadboard brings to any space.
Protecting Beadboard from Water Damage
Sealing becomes your first line of defense when installing beadboard in moisture-prone areas behind vanities. We recommend applying a high-quality primer followed by a semi-gloss or high-gloss paint finish that repels water and allows for easy cleaning. Proper installation techniques include ensuring tight joints between panels and caulking all seams where the beadboard meets countertops or walls.
Waterproof materials should be used around areas that experience direct water exposure, such as the space immediately behind the faucet. We suggest installing a clear protective barrier or using marine-grade sealers in these critical zones. Regular maintenance involves checking for any gaps or cracks in the finish and promptly addressing them to prevent moisture infiltration.
Ventilation plays a crucial role in protecting your beadboard backsplash from humidity damage. Installing an exhaust fan helps circulate air and reduce moisture buildup that could compromise the wood panels over time.
Coordinating Beadboard with Countertop Materials
Neutral colored countertops create the perfect foundation for beadboard backsplashes in bathroom vanities. We find that white granite, marble, or quartz surfaces complement classic white beadboard beautifully, establishing a cohesive and timeless look that works in both traditional and transitional bathroom designs.
Contrasting materials can highlight your beadboard and add visual depth to the vanity area. Dark wood countertops or rich stone surfaces like black granite create stunning contrasts against light-colored beadboard panels. We recommend balancing these bold combinations with neutral wall colors and fixtures to prevent the space from feeling overwhelming.
Mixed material approaches offer exciting design possibilities for modern bathroom vanities. Combining beadboard with glass or tile elements creates unique backsplashes that add visual interest while maintaining the classic appeal of wood paneling. We suggest using these combinations strategically to define different functional zones around your vanity area.
Modern Beadboard Styles for Contemporary Bathroom Designs
 5")
Contemporary beadboard designs move beyond traditional white finishes to embrace bold aesthetics and innovative orientations. We’ll explore cutting-edge approaches that transform classic beadboard into striking modern elements.
Sleek Black Beadboard for Industrial Chic Looks
Black beadboard creates a sophisticated industrial aesthetic that transforms ordinary bathrooms into dramatic design statements. This bold approach works exceptionally well in well-lit spaces where natural light can balance the dark surfaces and prevent the room from feeling closed in.
We recommend using black beadboard as an accent wall behind floating vanities or as wainscoting paired with exposed brick elements. The dark backdrop provides stunning contrast against white fixtures like vessel sinks and modern faucets, creating a gallery-like atmosphere that showcases your bathroom’s architectural details.
Industrial elements like black metal light fixtures and concrete countertops complement sleek black beadboard beautifully. Raw materials such as weathered wood vanities and copper pipes enhance the industrial vibe while maintaining the sophisticated edge that black beadboard delivers.
Horizontal Beadboard Orientation for Clean Lines
Horizontal beadboard installation creates modern visual appeal by emphasizing clean lines and contemporary design principles. This orientation works particularly well in narrow bathrooms where the horizontal pattern makes spaces appear wider and more open.
We suggest pairing horizontal beadboard with floating vanities and wall-mounted toilets to reinforce the sleek, streamlined aesthetic. The continuous horizontal lines create a calming effect that complements minimalist design elements and contemporary fixtures.
Modern bathrooms benefit from horizontal beadboard’s ability to create visual flow throughout the space. Installation techniques require careful attention to level lines and consistent spacing to achieve the clean, professional appearance that makes this orientation so effective in contemporary settings.
DIY Beadboard Installation Tips for Budget-Friendly Bathroom Updates
 6")
Installing beadboard yourself can significantly reduce renovation costs while giving you complete control over the design process. We’ll guide you through the essential steps to achieve professional-looking results without hiring a contractor.
Measuring and Planning Your Beadboard Project
Accurate measurements form the foundation of any successful beadboard installation project. We recommend calculating the total square footage of your wall area by multiplying height by width for each section you plan to cover.
Planning your layout comes next and determines how many panels you’ll need based on your beadboard dimensions. Most standard beadboard panels measure 4 feet by 8 feet, but you can also find smaller pieces for easier handling in tight bathroom spaces.
Accounting for obstacles like outlets, switches, and fixtures requires careful consideration during the planning phase. We suggest creating a simple sketch that marks these features so you can plan your cuts accordingly and avoid waste.
Deciding on your beadboard height is crucial for achieving the desired aesthetic. Traditional wainscoting typically extends between 30 and 48 inches from the floor, while full wall coverage creates a more dramatic rustic appearance.
Essential Tools and Materials for Beadboard Installation
Quality beadboard panels serve as the primary material for your project and come in various styles including tongue and groove, overlay, and flat panels. We recommend choosing moisture-resistant options specifically designed for bathroom environments.
Liquid nails provide strong adhesion between your beadboard and the wall surface. This construction adhesive works particularly well in areas where you can’t nail directly into studs.
Brad nailers make installation faster and more professional-looking than hand nailing. We suggest using 18 gauge brads that are long enough to penetrate your beadboard and reach into the wall studs.
Stud finders help you locate wall framing for secure attachment points. Finding studs ensures your beadboard installation will be stable and long-lasting, especially in high-moisture bathroom environments.
Trim screws like GRK brand fasteners provide additional holding power for securing trim pieces. These specialized screws resist corrosion and create strong connections that won’t loosen over time.
Cordless drills offer versatility for both drilling pilot holes and driving screws during installation. We recommend having both drill bits and screwdriver bits readily available for efficient workflow.
Step-by-Step Installation Process
Wall preparation begins with ensuring your surface is completely clean and dry before starting installation. We recommend removing any loose paint or wallpaper and filling holes or cracks with spackling compound.
Marking studs comes next using your stud finder to identify secure attachment points. Mark each stud location with a pencil so you can easily see where to place nails during installation.
Applying liquid nails requires covering the back of your beadboard panel with construction adhesive in a zigzag pattern. This adhesive provides backup support even in areas where you can’t nail into studs.
Securing panels to studs uses your brad nailer to attach beadboard at each marked stud location. For areas between studs, we recommend using liquid nails combined with angled brads to ensure proper hold.
Installing trim pieces completes your beadboard installation by covering gaps and creating a finished appearance. Cap rail trim goes along the top edge while base trim covers the bottom junction with your flooring.
Beadboard Maintenance and Care in High-Moisture Environments
 7")
Maintaining beadboard in bathroom environments requires consistent attention to moisture protection and regular upkeep. We’ll guide you through essential sealing techniques and cleaning strategies to preserve your beadboard’s beauty and functionality.
Proper Sealing Techniques for Bathroom Beadboard
Start with a high-quality primer designed for moisture resistance before applying your finish coat. Semi-gloss and satin paint finishes offer superior moisture protection compared to flat or eggshell options, creating a barrier that resists water penetration and humidity damage.
Caulk every seam and edge where beadboard meets walls, ceilings, or bathroom fixtures to prevent water infiltration. Apply waterproofing paint or specialized sealant to areas prone to direct water exposure, such as zones near showers and bathtubs.
Focus special attention on corners and joints, as these vulnerable spots require thorough sealing to prevent moisture damage. Regular inspection of these critical points helps identify potential issues before they develop into costly repairs.
Cleaning and Touch-Up Strategies
Clean beadboard surfaces regularly using a soft cloth dampened with mild soap solution to remove surface grime and prevent residue buildup. Avoid abrasive cleaners or excessive water applications that could damage the protective finish or penetrate sealed joints.
Keep matching paint or stain readily available for quick touch-ups of chips, scratches, or worn areas. Address any bubbling, discoloration, or warping immediately to prevent mold and mildew growth in compromised areas.
Inspect painted surfaces periodically and recoat as needed to maintain the protective moisture barrier. Monitor seams and joints for signs of water infiltration, ensuring your beadboard installation remains sealed and intact over time.
Conclusion
Beadboard offers endless possibilities for creating stunning bathroom transformations that perfectly blend style with functionality. From classic white wainscoting to bold navy accent walls we’ve shown you how this versatile material can adapt to any design vision while standing up to bathroom moisture demands.
Whether you’re drawn to traditional cottage charm or sleek contemporary aesthetics beadboard delivers the visual impact your space needs. The key lies in proper installation and maintenance techniques that we’ve outlined to ensure your investment lasts for years to come.
Your bathroom renovation doesn’t have to expensive or require professional contractors. With our DIY guidance and creative inspiration you’re ready to transform your space into the bathroom of your dreams using timeless beadboard design.
Frequently Asked Questions
What is beadboard and why is it popular for bathroom renovations?
Beadboard is a decorative wood paneling featuring vertical grooves that create a classic, cottage-style appearance. It’s popular for bathroom renovations because it transforms ordinary spaces into charming coastal or vintage-inspired retreats. When properly installed and sealed, beadboard is practical for moisture-prone areas while being versatile enough to suit various design styles and budgets.
How high should beadboard wainscoting be installed in bathrooms?
Beadboard wainscoting should typically be installed up to chair rail height, which is usually around 32-36 inches from the floor. This height provides visual balance while protecting walls from moisture and daily wear. The space above can be painted or tiled to create contrast and visual interest in your bathroom design.
Can beadboard be painted in colors other than white?
Yes, beadboard can be painted in various colors beyond traditional white. Popular options include bold navy blue for statement walls, soft pastels like pale pink and lavender for relaxation, and dark green for modern farmhouse aesthetics. The key is balancing bold colors with contrasting elements to avoid overwhelming smaller bathroom spaces.
Is it safe to install beadboard on bathroom ceilings?
Yes, beadboard can be safely installed on bathroom ceilings when properly sealed and ventilated. Use tongue-and-groove installation for tight joints, ensure level surfaces, and install adequate ventilation to prevent moisture damage. High-gloss paint finishes provide better moisture resistance and easier maintenance for ceiling applications.
How do I properly seal beadboard in wet bathroom areas?
Proper sealing requires high-quality primer and moisture-resistant finishes like semi-gloss or high-gloss paint. Caulk all seams and edges to prevent water infiltration, especially around fixtures and corners. In areas with direct water exposure, consider using waterproof materials or additional protective coatings for maximum durability.
What tools do I need for DIY beadboard installation?
Essential tools include a measuring tape, level, miter saw or circular saw, nail gun or hammer, drill, stud finder, and caulk gun. You’ll also need beadboard panels, construction adhesive, finishing nails, wood filler, primer, paint, and caulk. Proper measuring and planning are crucial for professional-looking results.
How do I maintain beadboard in high-moisture bathrooms?
Regular maintenance includes cleaning with mild soap solutions, quickly addressing any paint chips or damage, and ensuring proper ventilation. Inspect seams, edges, and areas around fixtures regularly for signs of moisture damage. Touch up paint as needed and re-caulk joints annually to maintain water resistance.
Can beadboard work with modern bathroom designs?
Absolutely! Modern beadboard applications include sleek black finishes for industrial chic looks and horizontal installation for contemporary clean lines. These styles move beyond traditional white finishes while maintaining beadboard’s classic charm, making it suitable for minimalist and modern bathroom aesthetics.