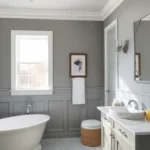
Transforming your unused attic space into a stunning bathroom isn’t just a dream – it’s one of the smartest home improvement investments you can make. We’ve seen countless homeowners unlock hidden potential in their homes by converting cramped storage areas into luxurious retreats that add both value and functionality.
Your attic offers unique architectural features that standard bathrooms simply can’t match. Those slanted ceilings and cozy nooks create character and charm that’ll make your new bathroom a true sanctuary. Whether you’re dealing with a spacious attic or working with tighter quarters we’ll show you how to maximize every square inch.
From clever storage answers to creative lighting ideas we’re about to explore innovative attic bathroom designs that prove limitations can spark the most creative answers. You’ll discover how to work with challenging angles turn obstacles into design features and create a bathroom that’s both practical and breathtaking.
Maximize Space With Sloped Ceiling Solutions
Sloped ceilings present unique opportunities to create efficient storage and functional layouts in your attic bathroom design. We’ll explore strategic answers that work with your ceiling angles rather than against them.
Install Custom Built-In Storage
Built-in storage maximizes every inch of available space under your sloped ceiling areas. We recommend installing custom shelving units that follow the exact angle of your roofline, creating seamless storage for towels, toiletries, and bathroom essentials. Recessed medicine cabinets fit perfectly into the knee wall areas where standard furniture won’t work effectively.
Drawers built into the floor space beneath sloped sections provide hidden storage without compromising headroom. We suggest incorporating pull-out organizers, sliding baskets, and tiered drawer systems to keep items easily accessible. Custom vanity designs can include angled storage compartments that mirror your ceiling’s slope while maintaining a clean aesthetic.
Floating shelves mounted at varying heights create visual interest while providing practical storage answers. We position these shelves to accommodate the ceiling’s natural flow, ensuring they’re both functional and visually appealing throughout your attic bathroom space.
Use Vertical Wall Mounted Fixtures
Wall mounted fixtures save precious floor space in areas where sloped ceilings limit movement and functionality. We install floating vanities that create an open feeling while providing necessary counter space and storage underneath. These fixtures work particularly well in areas where the ceiling height is most restricted.
Towel bars and hooks mounted vertically along the higher wall sections maximize storage without interfering with the sloped areas. We recommend installing multiple mounting points at different heights to accommodate various towel sizes and family members’ needs.
Sconces and lighting fixtures attached directly to walls eliminate the need for floor or table lamps that compete for limited space. We position these fixtures strategically to provide adequate illumination while avoiding conflict with the angled ceiling lines.
Choose Compact Corner Installations
Corner installations use typically wasted triangular spaces created where sloped ceilings meet vertical walls. We suggest installing corner sinks, compact toilets, or triangular shower units that fit perfectly into these awkward angles. These answers transform challenging spaces into functional bathroom elements.
Curved shower enclosures designed for corner placement make efficient use of limited floor space while accommodating the ceiling slope. We recommend neo-angle or curved glass doors that open outward to maximize interior shower space without requiring extensive clearance.
Corner storage towers and rotating organizers provide substantial storage capacity in minimal footprint areas. We install these units to reach maximum ceiling height while maintaining easy access to stored items throughout your attic bathroom renovation.
Create Visual Height With Strategic Lighting

Attic bathrooms with limited headroom benefit tremendously from strategic lighting that draws the eye upward and creates the illusion of expanded space. We can transform even the most cramped attic bathroom into an airy retreat by carefully selecting and positioning lighting fixtures that enhance vertical perception.
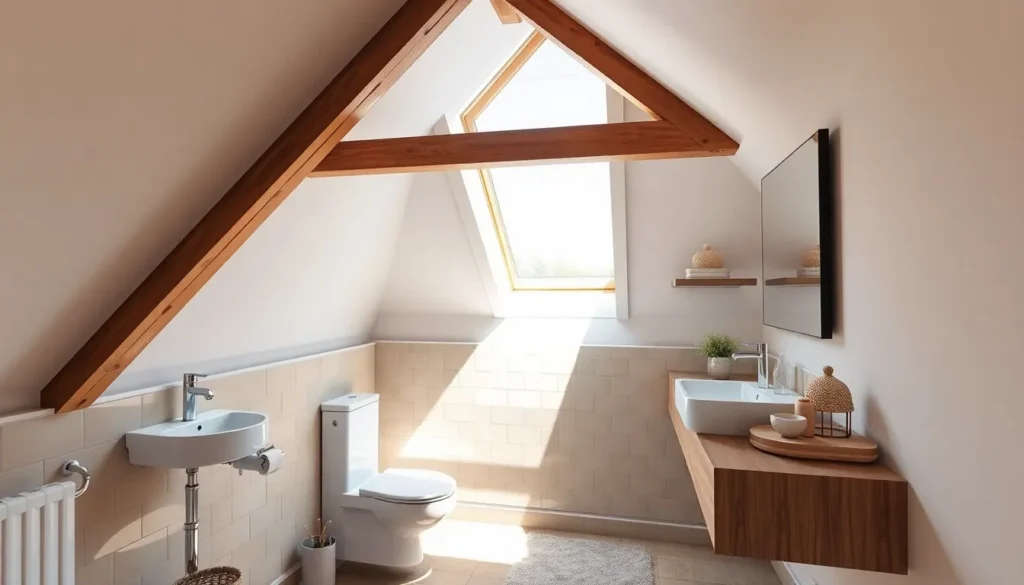
Add Skylights for Natural Illumination
Skylights serve as the ultimate lighting solution for attic bathrooms, bringing natural illumination directly from above while making spaces feel significantly brighter and larger. We recommend positioning skylights over key areas like the vanity or bathtub to maximize their impact throughout the day. Natural light streaming down from overhead creates an immediate sense of openness that artificial lighting simply can’t replicate.
Installing skylights also provides ventilation benefits, helping to reduce moisture and humidity that commonly plague enclosed attic spaces. We suggest choosing operable skylights that can open for fresh air circulation, particularly important in bathroom environments where steam and condensation occur regularly.
Install Recessed Ceiling Lights
Recessed ceiling lights eliminate visual clutter by embedding directly into the ceiling surface, creating a cleaner appearance that makes ceilings appear higher than they actually are. We position these fixtures strategically along the sloped roofline to wash walls with light, further improving the perception of vertical space.
Multiple recessed lights distributed evenly across the ceiling provide comprehensive illumination without the bulk of hanging fixtures that would further reduce precious headroom. We often combine warm and cool LED options on separate switches, allowing homeowners to adjust the lighting mood while maintaining the space improving benefits.
Dimmable recessed lights offer additional flexibility, letting us create ambient lighting for relaxing baths or bright task lighting for grooming activities.
Use Mirror Placement to Reflect Light
Mirrors multiply both natural and artificial light sources by reflecting illumination throughout the space, creating depth and brightness that makes attic bathrooms feel dramatically larger. We position large mirrors opposite skylights or windows to capture and bounce natural light deeper into the room.
Strategic mirror placement on slanted walls helps reflect light upward, drawing attention to the ceiling and creating the illusion of greater height. We recommend using multiple mirrors at different angles to maximize light reflection from various sources throughout the day.
Mirrored surfaces also serve double duty by providing essential vanity functions while simultaneously expanding the visual boundaries of confined attic spaces.
Choose Space-Saving Fixtures and Fittings

Smart fixture selection transforms cramped attic bathrooms into efficient retreats. We’ll explore three essential categories that maximize every square inch while maintaining style and functionality.
Select Wall-Mounted Toilets
Wall-mounted toilets deliver the perfect solution for small attic bathrooms by freeing up valuable floor space. These sleek fixtures create clean lines that make your bathroom appear larger while offering easier cleaning access underneath. Installation involves mounting the toilet directly to the wall with the tank concealed behind it, which eliminates the traditional floor footprint entirely.
Benefits extend beyond space savings to include a modern aesthetic that complements sloped ceiling designs. We recommend choosing models with dual flush options to enhance water efficiency. Professional installation ensures proper wall reinforcement to support the fixture’s weight and plumbing connections.
Install Pedestal or Floating Vanities
Pedestal vanities provide classic elegance while maintaining that crucial open floor space beneath. These fixtures work exceptionally well in attic bathrooms where every inch matters, creating visual breathing room that makes compact spaces feel more expansive. Floating vanities take this concept further by mounting directly to the wall without any floor contact.
Storage considerations become important when selecting these space-efficient options. Built-in drawers or shelving within floating vanities maximize utility without compromising the space-saving benefits. Pedestal sinks paired with wall-mounted storage cabinets offer flexible answers for varying attic layouts and storage needs.
Choose Compact Shower Stalls
Compact shower stalls fit perfectly into tight attic corners while providing full functionality for daily use. These efficient units typically measure 32 to 36 inches square, making them ideal for bathrooms with limited floor space and unique angles. Corner installations work particularly well with sloped ceilings, utilizing otherwise awkward triangular spaces.
Glass doors enhance the feeling of openness compared to curtains, while frameless options create seamless transitions that don’t interrupt sight lines. We suggest selecting stalls with built-in shelving or corner caddies to eliminate the need for additional storage fixtures. Neo-angle designs offer another smart option for maximizing shower space while fitting naturally into angled attic layouts.
Work With Unique Architectural Features

Attic bathrooms offer distinctive architectural elements that can become stunning design focal points. We’ll show you how to transform these unique features into impressive design statements.
Embrace Exposed Beams as Design Elements
Exposed beams transform into striking design centerpieces when we treat them as architectural highlights rather than obstacles. Paint them in contrasting colors to make these structural elements pop against your bathroom walls and ceiling.
Create visual interest by choosing bold paint colors that complement your overall design scheme. Dark beams against light walls create dramatic contrast, while painted beams in soft hues offer subtle elegance.
Rustic charm emerges when we leave natural wood beams untreated, adding warmth and texture to modern bathroom fixtures. Industrial appeal develops when we paint beams in metallic tones like charcoal or steel gray.
Lighting integration becomes seamless when we mount fixtures directly onto exposed beams, creating functional illumination while highlighting these architectural features.
Use Dormer Windows for Natural Light
Dormer windows maximize natural illumination in attic bathrooms where traditional windows might not fit. These architectural features bring essential daylight into spaces that would otherwise rely heavily on artificial lighting.
Skylights complement dormer windows to create a bright, airy atmosphere throughout your attic bathroom. Position skylights strategically over key areas like vanities and bathtubs for optimal lighting benefits.
Privacy answers include frosted glass, window films, or strategically placed shutters that maintain natural light while ensuring bathroom privacy. These treatments allow light penetration without compromising comfort.
Ventilation benefits occur naturally when we incorporate operable dormer windows and skylights, reducing humidity and improving air circulation in enclosed attic spaces.
Transform Awkward Angles Into Storage
Built-in storage answers maximize every inch of awkward attic angles by creating custom niches and shelving units that fit perfectly into slanted spaces. These installations provide essential storage without wasting valuable floor space.
Customized storage spaces use the unique geometry of attic bathrooms to create functional storage areas for toiletries, towels, and bathroom essentials. Design these spaces to complement your bathroom’s style while maximizing efficiency.
Corner utilization becomes strategic when we install triangular shelving units or built-in cabinets that follow the natural angles of your attic space. These answers turn challenging corners into valuable storage real estate.
Recessed installations work particularly well in angled walls, creating seamless storage that doesn’t protrude into your limited headroom areas. These built-ins maintain clean lines while providing necessary functionality.
Select Appropriate Flooring and Materials

Material selection forms the foundation of a successful attic bathroom renovation. We’ll explore options that combine durability with style while addressing the unique challenges of elevated bathroom spaces.
Choose Moisture-Resistant Options
Ceramic and porcelain tiles deliver unmatched moisture protection for attic bathroom floors. These materials resist water damage effectively and maintain their appearance even though constant humidity exposure. Natural stone options like marble or granite provide luxury appeal while offering excellent water resistance when properly sealed.
Waterproof vinyl flooring offers a budget-friendly alternative that mimics wood or stone textures without compromising protection. This material installs easily over existing subfloors and provides cushioning underfoot. Luxury vinyl planks specifically designed for bathrooms include enhanced waterproof cores that prevent moisture penetration.
Sheet vinyl creates seamless surfaces with fewer joints where water can seep through. We recommend choosing products with antimicrobial properties to prevent mold and mildew growth in humid attic environments.
Consider Slip-Resistant Surfaces
Textured tile finishes reduce slip hazards significantly compared to smooth surfaces. These options include sandblasted stone, brushed ceramic, and naturally textured materials that provide traction when wet. Matte finish tiles offer subtle texture while maintaining easy cleaning properties.
Shower floor treatments require extra attention to slip resistance due to constant water exposure. Mosaic tiles with grout lines create natural grip surfaces, while textured porcelain specifically rated for wet areas ensures safety.
Non-slip coatings can be applied to existing smooth surfaces to improve traction without complete floor replacement. These treatments work particularly well on natural stone that may become slippery when wet.
Use Light Colors to Brighten Space
Light-colored flooring materials create the illusion of larger space in confined attic bathrooms. White, cream, and pale gray tiles reflect available light effectively and make cramped quarters feel more open. Neutral tones provide versatile backdrops that complement any decor style while maintaining brightness.
Large format tiles in light shades minimize grout lines and create continuous visual flow across floor surfaces. This technique makes small attic bathrooms appear more spacious than they actually are. Glossy finishes on light-colored materials amplify natural and artificial light sources throughout the space.
Consistent color schemes between floors, walls, and ceilings eliminate visual breaks that can make spaces feel choppy. We suggest using varying shades of the same light color family to add depth without sacrificing brightness.
Optimize Ventilation and Climate Control

Creating comfortable attic bathrooms requires strategic airflow management and temperature regulation. We’ll explore essential systems that prevent moisture buildup and maintain year-round comfort in these unique spaces.
Install Proper Exhaust Fans
Select appropriately sized exhaust fans that can handle the moisture load of your attic bathroom. We recommend choosing units with a CFM rating that matches or exceeds the square footage of your space, ensuring rapid moisture removal after showers and baths.
Route exhaust ducts directly to the outdoors rather than venting into the attic space or under soffits. This prevents condensation from accumulating in hidden areas where it can cause mold growth and structural damage over time.
Install metal ducts with proper slope toward the outlet in cold climates to minimize condensation buildup inside the ductwork. We suggest maintaining a slight downward angle throughout the entire duct run to allow any moisture to drain naturally.
Position fans strategically near shower areas and other high moisture zones for maximum effectiveness. Timer switches or humidity sensors can automate operation, ensuring the fan runs long enough to clear moisture completely.
Ensure Adequate Insulation
Choose high R-value materials like loose-fill cellulose that provide superior thermal protection in attic environments. We recommend installing insulation thick enough to prevent heat loss while maintaining comfortable temperatures year-round.
Seal gaps around ventilation ducts and plumbing fixtures to prevent drafts and thermal bridging. Expanding foam or specialized sealants work well for small openings, while larger gaps may require cut-to-fit insulation pieces.
Insulate walls and ceiling cavities thoroughly to create a complete thermal envelope around your bathroom space. Pay special attention to areas where the roof meets exterior walls, as these junctions often allow important heat transfer.
Install vapor barriers on the warm side of insulation in cold climates to prevent moisture from reaching condensation points. We suggest using plastic sheeting or foil-faced insulation products for effective moisture control.
Address Humidity Control Systems
Install whole-house or localized dehumidifiers when persistent moisture remains a concern even though proper ventilation. These systems work alongside exhaust fans to maintain optimal humidity levels throughout the year.
Apply water-resistant finishes to walls and ceilings using moisture-blocking primers and bathroom-exact paints. We recommend products designed for high-humidity environments that resist mold and mildew growth.
Seal around plumbing fixtures carefully using silicone caulk or specialized sealants to prevent water infiltration behind walls. Regular maintenance of these seals prevents moisture from reaching structural elements.
Monitor humidity levels with digital hygrometers to ensure your control systems maintain levels between 40-50% relative humidity. This range prevents both mold growth and overly dry conditions that can damage materials.
Design for Accessibility and Safety

Creating an accessible attic bathroom requires thoughtful planning that prioritizes user safety and comfort for all family members. We’ll explore essential design elements that transform challenging attic spaces into universally functional retreats.
Plan Safe Stair Access
Wider staircases accommodate mobility aids and create safer navigation paths to your attic bathroom. We recommend installing stair lifts or compact elevators for family members who struggle with traditional stairs. Clear landing areas prevent clutter accumulation and eliminate tripping hazards that commonly develop in transitional spaces.
Strategic lighting placement along stairways improves visibility during nighttime bathroom visits. We suggest motion-activated LED strips along each step to guide users safely without disturbing others. Sturdy construction ensures that your stair access can support various mobility devices and emergency situations.
Install Proper Handrails and Grab Bars
Handrails positioned on both sides of stairs provide essential support during ascent and descent movements. We install grab bars near toilets and shower areas using reinforced mounting systems that support up to 300 pounds. Strategic placement near key bathroom fixtures creates multiple support points throughout the space.
Rolling shower seats and removable shower heads enhance accessibility for users with varying mobility needs. We recommend ADA-compliant grab bar positioning that allows for both seated and standing shower use. Textured surfaces on handrails and grab bars improve grip security even when hands are wet.
Ensure Adequate Headroom Clearance
Minimum clearance of 80 inches provides comfortable movement space while accommodating users of different heights. We design custom answers for sloping ceilings that maximize usable space without compromising safety standards. Walk-in showers with curbless entry eliminate step-over barriers that can cause falls.
Built-in shower seats or benches create resting spots that accommodate extended bathing routines safely. We position these fixtures at appropriate heights to serve both seated and standing users effectively. Creative ceiling treatments can visually expand spaces with limited headroom while maintaining required clearances.
| Safety Feature | Recommended Specification | Benefit |
|---|---|---|
| Stair Width | 42+ inches | Accommodates mobility aids |
| Grab Bar Support | 300+ pounds | Ensures structural safety |
| Headroom Clearance | 80+ inches | Comfortable movement space |
| Shower Seat Height | 17-19 inches | Universal accessibility |
Incorporate Smart Storage Solutions

Smart storage transforms cramped attic bathrooms into organized sanctuaries where every square inch serves a purpose. We’ll explore ingenious answers that maximize your space while maintaining the cozy charm that makes attic bathrooms so appealing.
Build Under-Eave Storage Compartments
Custom compartments use the awkward spaces beneath sloping eaves that typically go unused. We recommend designing fitted storage units that follow your roofline’s natural curve, creating seamless integration with your bathroom’s architecture. Built in shelving can accommodate everything from towels to toiletries while maintaining easy access.
Maximize these triangular spaces by installing pull-out drawers or sliding panels. Hidden compartments work exceptionally well for storing seasonal items, extra linens, or cleaning supplies. We suggest adding interior lighting to these storage areas to improve visibility and functionality.
Create designated zones within your under-eave storage for different bathroom essentials. Partition larger compartments using adjustable dividers to organize items like hair care products, medications, and spare toiletries. This approach prevents items from shifting and makes retrieval effortless.
Use Multi-Functional Furniture Pieces
Space saving furniture maximizes functionality without overwhelming your attic bathroom’s limited footprint. Wall mounted sinks free up precious floor space while creating an airy, modern aesthetic that works perfectly in compact areas. We recommend choosing vanities with integrated storage to combine style with practicality.
Floating vanities offer storage answers while maintaining visual flow throughout your bathroom. These pieces create the illusion of more space by allowing light to pass underneath. Storage ottomans or benches with hidden compartments provide seating while concealing bathroom essentials.
Sliding barn doors replace traditional swing doors that consume valuable floor space. We suggest installing these space efficient alternatives to enhance accessibility while adding rustic charm to your attic bathroom design. Mirror backed sliding panels can double as full length mirrors when closed.
Install Recessed Medicine Cabinets
Concealed storage through recessed medicine cabinets eliminates visual clutter while maintaining easy access to daily essentials. We recommend installing these units between wall studs to create seamless integration that doesn’t protrude into your limited headroom space. Multiple recessed cabinets can accommodate different family members’ needs.
Built in medicine cabinets with interior lighting improve functionality during morning and evening routines. LED strips inside these compartments illuminate contents while adding ambient lighting to your attic bathroom. We suggest choosing models with adjustable shelving to accommodate various bottle heights and containers.
Strategic placement of recessed storage maximizes accessibility without compromising safety. Install these units at appropriate heights for all family members, ensuring they don’t interfere with sloped ceiling areas. Mirror fronted cabinets serve dual purposes by reflecting light and creating the illusion of expanded space.
Conclusion
We’ve explored the incredible potential that lies within your attic space and how thoughtful design can transform it into a stunning bathroom retreat. From clever storage answers that follow your roofline to strategic lighting that creates the illusion of expanded space your attic bathroom can become one of your home’s most impressive features.
The key to success lies in embracing your attic’s unique architectural elements rather than fighting against them. Those sloped ceilings and cozy nooks aren’t obstacles – they’re opportunities to create something truly special. With the right fixtures ventilation and accessibility features your attic bathroom will serve your family beautifully for years to come.
Remember that every attic presents different challenges and we’re confident that with these strategies you’ll create a space that’s both functional and breathtaking. Your investment in an attic bathroom transformation will reward you with added home value and a luxurious retreat that maximizes every square foot of your home.
Frequently Asked Questions
What makes an attic bathroom a good investment?
Converting an unused attic into a bathroom adds significant value to your home while maximizing space efficiency. Attics offer unique architectural features like slanted ceilings and cozy nooks that create charm and character. This investment provides practical benefits by adding an extra bathroom to your home while utilizing otherwise wasted space.
How can I maximize space in an attic bathroom with sloped ceilings?
Install custom built-in storage that follows the roofline, use recessed medicine cabinets, and add floor drawers for hidden storage. Choose vertical wall-mounted fixtures like floating vanities and strategically placed sconces. Utilize compact corner installations such as corner sinks and curved shower enclosures to make efficient use of triangular spaces.
What lighting solutions work best for low-ceiling attic bathrooms?
Install skylights over key areas like vanities and bathtubs for natural illumination and ventilation. Use recessed ceiling lights to eliminate visual clutter and enhance height perception. Position mirrors strategically to reflect light and create depth. Choose fixtures that draw the eye upward to create an illusion of expanded space.
What are the best space-saving fixtures for attic bathrooms?
Wall-mounted toilets free up floor space and create a modern look. Pedestal and floating vanities maintain openness while providing storage. Compact shower stalls fit snugly into corners and utilize unique angles. Glass doors and built-in shelving maximize functionality without compromising style in tight spaces.
How should I work with exposed beams and dormer windows?
Transform exposed beams into design elements using contrasting paint colors or natural finishes. Utilize dormer windows to maximize natural light and improve ventilation. Add privacy solutions like frosted glass when needed. Create built-in storage that works with these architectural features rather than against them.
What materials are best for attic bathroom renovations?
Choose moisture-resistant options like ceramic and porcelain tiles for flooring, or waterproof vinyl for budget-friendly alternatives. Use slip-resistant surfaces in shower areas and light-colored materials to create illusion of larger space. Large format tiles and consistent color schemes enhance brightness and visual flow.
How do I handle ventilation and climate control in an attic bathroom?
Install appropriately sized exhaust fans routed directly outdoors to manage moisture and prevent mold. Use high R-value insulation materials and seal gaps to maintain comfortable temperatures. Consider humidity control systems including dehumidifiers and moisture-resistant finishes. Monitor humidity levels with digital hygrometers for optimal conditions.
How can I make an attic bathroom accessible and safe?
Install wider staircases with stair lifts or compact elevators if needed. Add strategic lighting along stairways and install sturdy handrails and grab bars. Ensure minimum 80-inch headroom clearance for comfortable movement. Include built-in shower seats and benches for universal accessibility and safety.
What smart storage solutions work best in small attic bathrooms?
Build under-eave storage compartments following the roofline with pull-out drawers and sliding panels. Choose multi-functional furniture like wall-mounted sinks and floating vanities. Install recessed medicine cabinets to eliminate visual clutter while providing easy access. These solutions maximize functionality without overwhelming the space.