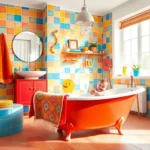
Green tiles are making a stunning comeback in bathroom design and we’re absolutely here for it. From sage and emerald to forest green and mint these versatile tiles add natural elegance and timeless appeal to any bathroom space. Whether you’re planning a complete renovation or looking for simple updates green tiles offer endless possibilities to transform your bathroom into a spa-like retreat.
We’ve discovered that green bathroom tiles work beautifully in both modern and traditional settings. They pair perfectly with natural materials like wood and stone while also complementing contemporary fixtures and finishes. The best part? Green tiles create a calming atmosphere that makes your daily routines feel more luxurious.
Ready to explore the most inspiring green tile bathroom ideas that’ll elevate your space? We’ve gathered stunning design concepts ranging from bold statement walls to subtle accent pieces that prove green tiles are the perfect choice for creating your dream bathroom.
Embrace Nature With Forest Green Subway Tiles
Forest green subway tiles bring the serene beauty of woodland landscapes directly into your bathroom space. These rich, earthy tones create an immediate connection to nature while maintaining the timeless appeal of subway tile design.
Classic Subway Pattern With Dark Green Glazed Tiles
Traditional brick patterns work beautifully with forest green glazed tiles. We recommend installing these tiles in a standard 3×6 inch format to achieve that classic subway look. The deep green glaze reflects light subtly, creating depth and dimension on your bathroom walls.
White or cream grout lines enhance the forest green tiles’ natural beauty. This contrast makes each tile distinct while preventing the overall design from feeling too dark or overwhelming. Light-colored grout also helps brighten smaller bathroom spaces.
Forest green subway tiles work exceptionally well as accent walls behind vanities or in shower areas. Consider using them on a single feature wall while keeping other surfaces neutral. This approach creates a striking focal point without overpowering the entire room.
Herringbone Layout For Added Visual Interest
Herringbone patterns transform standard forest green subway tiles into sophisticated design statements. This zigzag arrangement adds movement and texture to bathroom walls while showcasing the rich green color beautifully. The pattern creates visual interest that draws the eye upward, making ceilings appear higher.
Installing forest green tiles in herringbone requires precise measurement and cutting. We suggest hiring experienced tile installers for this pattern, as it demands exact angles and careful planning. The investment in professional installation pays off with stunning results.
Herringbone forest green tiles pair wonderfully with brass or gold fixtures. These warm metallic finishes complement the natural undertones in forest green, creating a luxurious bathroom atmosphere. Consider brass faucets, towel bars, and light fixtures to complete the look.
Pairing With Natural Wood Vanities
Reclaimed wood vanities create perfect partnerships with forest green subway tiles. The natural wood grain and earthy green tones establish a harmonious bathroom environment reminiscent of peaceful forest settings. This combination works especially well in rustic or farmhouse style bathrooms.
Walnut and oak vanities complement forest green tiles beautifully. These darker wood species echo the depth of forest green while adding warmth to the overall design. Light woods like pine or maple can also work, creating more contrast against the deep green backdrop.
Natural wood vanities with forest green tile backsplashes establish stunning focal points. We recommend extending the green tiles from the countertop to the ceiling for maximum impact. This creates a cohesive design that ties the vanity and wall treatment together seamlessly.
Create Depth With Emerald Green Mosaic Accents

Emerald green mosaic tiles transform bathrooms into luxurious retreats by adding dimensional visual interest and rich color depth. We’ll explore how these stunning tiles create sophisticated focal points throughout your bathroom space.
Glass Mosaic Feature Walls Behind Vanities
Glass mosaic feature walls behind vanities become instant conversation starters in any bathroom design. Emerald green glass tiles reflect light beautifully, creating shimmer and movement that standard ceramic tiles can’t match. We recommend installing these mosaics from the countertop to the ceiling for maximum impact and visual continuity.
Light bounces off the glass surface differently throughout the day, making your vanity area feel alive and ever-changing. Consider using varying shades of emerald within the same mosaic sheet to add subtle tonal variation. These feature walls work particularly well in powder rooms where guests will notice and appreciate the dramatic effect.
Installing glass mosaics requires careful attention to adhesive selection since standard cement based products can show through transparent tiles. We suggest using white or clear adhesives specifically designed for glass tile applications.
Waterfall Shower Niches In Emerald Tones
Waterfall shower niches in emerald green create the illusion of cascading water even when the shower isn’t running. These niches become sculptural elements that add luxury and visual depth to your shower space. We love how emerald mosaics in niches catch and reflect shower lighting, creating an almost jewel like effect.
Positioning these niches at varying heights creates a more ever-changing waterfall appearance than traditional single level installations. Curved or rounded niche edges enhance the flowing water aesthetic while preventing sharp corners that can collect soap buildup. Consider extending the emerald mosaic treatment beyond just the niche interior to create stronger visual continuity.
Proper waterproofing becomes critical in these applications since water exposure is constant. We recommend using high quality waterproof membranes behind the tile and selecting grout specifically rated for wet environments.
Coordinating With Brass Fixtures And Hardware
Brass fixtures and hardware create the perfect complement to emerald green mosaics, establishing a sophisticated color palette reminiscent of fine jewelry. We’ve seen this combination work beautifully in both traditional and contemporary bathroom designs. Warm brass tones enhance the richness of emerald green while adding metallic glamour to the overall aesthetic.
Faucets, towel bars, light fixtures, and cabinet hardware should all coordinate in the same brass finish for maximum impact. Brushed brass or antique brass finishes work particularly well with deeper emerald tones, while polished brass pairs beautifully with lighter mint or sage variations.
This color combination works especially well when you incorporate natural materials like marble countertops or wooden vanities. The brass bridges the gap between the cool green tiles and warmer natural elements, creating a balanced and harmonious design scheme.
Go Bold With Sage Green Floor-To-Ceiling Coverage

Sage green tiles create immersive bathroom spaces that envelope you in natural tranquility. Floor-to-ceiling coverage with this versatile shade transforms ordinary bathrooms into striking sanctuaries that feel both bold and serene.
Large Format Sage Green Porcelain Tiles
Large format sage green porcelain tiles deliver maximum visual impact when installed from floor to ceiling. These expansive tiles create seamless surfaces that make small bathrooms appear larger while reducing grout lines for a cleaner aesthetic. Porcelain’s durability makes it ideal for high-moisture environments, offering easy maintenance alongside its stunning appearance.
We recommend choosing tiles measuring 12×24 inches or larger to achieve the most dramatic effect. Large format installations showcase sage green’s natural depth and character without interruption. The continuous color flow creates a cohesive look that works beautifully in both modern minimalist designs and classic bathroom styles.
Complementary White Grout For Clean Lines
White grout transforms sage green tile installations by emphasizing geometric clarity and clean lines. This contrast brightens the space significantly while preventing the green from feeling overwhelming or too dark. White grout lines create a grid pattern that adds structure to the bold color statement.
Selecting bright white grout over cream or gray options maximizes the visual contrast we’re seeking. The crisp white lines frame each tile perfectly, creating definition that enhances the overall design. This grout choice also reflects more light throughout the bathroom, making the space feel larger and more open.
Balancing With Neutral Accessories
Neutral accessories keep sage green bathrooms feeling inviting rather than overpowering. White towels, gray storage answers, and simple fixtures create visual breathing room against the bold tile coverage. Matte metal fixtures in brushed nickel or stainless steel complement sage green’s natural undertones beautifully.
We suggest incorporating natural wood elements like floating shelves or vanity accents to reinforce the connection to nature. These neutral touches prevent the space from feeling too monochromatic while maintaining the serene atmosphere. Simple white or beige bath mats, shower curtains, and storage baskets complete the balanced look without competing with the stunning tile installation.
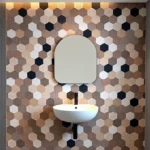
Add Sophistication With Hunter Green Hexagon Tiles

Hunter green hexagon tiles transform bathrooms into sophisticated retreats with their unique geometric appeal. These tiles offer versatility in pattern creation while maintaining a refined aesthetic that complements both traditional and contemporary design schemes.
Honeycomb Patterns For Shower Floors
Honeycomb patterns using small hexagonal tiles create textured and captivating shower floor designs that enhance both safety and visual appeal. This design approach provides essential traction underfoot while adding a distinctive geometric element to your green tile bathroom. We recommend installing these patterns with darker green hex tiles to create depth and visual interest beneath your feet.
Small hexagonal tiles arranged in honeycomb configurations offer superior slip resistance compared to larger format tiles. The increased grout lines create natural texture that improves safety during daily use. We’ve found that hunter green penny round tiles work exceptionally well for this application, creating seamless transitions between floor and wall surfaces.
Mixed Size Hexagons For Ever-changing Wall Designs
Mixed size hexagonal tiles create ever-changing wall designs that add depth and visual intrigue to hunter green bathroom spaces. This approach combines various hexagon dimensions to establish focal points while maintaining geometric harmony throughout the room. We suggest using larger hexagons as anchor pieces with smaller tiles filling transitional areas for balanced composition.
Varying hexagon sizes allows for creative pattern development that showcases the sophisticated nature of hunter green tiles. Large format hexagons can serve as primary design elements while medium and small versions create supporting visual layers. This technique works particularly well on accent walls behind vanities or within shower enclosures where the geometric interplay becomes a striking focal point.
Incorporating Metallic Grout For Luxury Appeal
Metallic grout between hunter green hexagon tiles significantly enhances the luxury feel of bathroom spaces by adding glamour and sophistication. This finishing technique creates upscale visual impact that transforms standard tile installations into premium design statements. We recommend bronze or brass toned metallic grout to complement the rich depths of hunter green coloring.
Metallic grout lines catch and reflect light throughout the bathroom, creating ever-changing visual interest that changes with different lighting conditions. The contrast between matte hunter green tiles and reflective metallic grout emphasizes the hexagonal geometry while adding dimensional richness. This combination works exceptionally well in bathrooms with brass fixtures and warm lighting schemes, creating cohesive luxury aesthetics that feel both modern and timeless.
Incorporate Vintage Charm With Mint Green Subway Tiles

Mint green subway tiles offer a perfect balance between fresh modernity and nostalgic charm, making them central to recreating classic mid-century bathroom style. Their soft pastel hue creates a light, airy effect that makes bathrooms feel visually spacious and inviting.
Retro-Inspired Beveled Edge Tiles
Beveled edge tiles paired with green glazes add texture and depth that enhances vintage character throughout your bathroom space. These dimensional tiles create subtle shadows along their edges, giving walls a sophisticated three-dimensional appearance that flat tiles simply can’t achieve.
Glossy finishes reflect more light and brighten smaller bathrooms, while matte options provide a subdued, elegant appearance that feels more authentic to mid-century design. We recommend choosing your finish based on your bathroom’s natural light levels and desired atmosphere.
Installing beveled mint green tiles in a traditional running bond pattern maximizes their textural impact. The raised edges catch light differently throughout the day, creating visual interest that changes with your bathroom’s lighting conditions.
Combining With Checkerboard Floor Patterns
Checkerboard floor patterns visually ground the room while balancing the vertical lines of subway tile walls and improving the overall vintage aesthetic. Black and white hexagonal or square tiles create classic contrast, but pairing green with cream or pale gray creates a softer, more cohesive look.
Traditional square tiles in alternating colors work beautifully beneath mint green walls, creating a timeless foundation that anchors your design. The geometric pattern draws the eye downward, making tall ceilings feel more proportionate and intimate.
Hexagonal checkerboard patterns offer a more unique approach while maintaining vintage authenticity. We suggest using 2-inch hexagonal tiles for optimal visual impact without overwhelming smaller bathroom spaces.
Vintage Brass Faucets And Light Fixtures
Vintage brass faucets, light fixtures, and hardware introduce warmth and authenticity that perfectly complements mint green tiles. Polished brass, with its soft golden glow, is a period-accurate choice for green-tiled bathrooms that maintains historical design integrity.
Wall sconces and cross-handle faucets are particularly effective in reinforcing mid-century or Art Deco style throughout your bathroom. These fixtures serve as functional art pieces that enhance your vintage theme while providing essential lighting and water control.
Satin or unlacquered brass develops a natural patina over time, deepening the retro feel and creating an authentic aged appearance. This natural aging process adds character that can’t be replicated with newer finishes, making your bathroom feel genuinely vintage rather than simply vintage-inspired.
Design Statement Walls With Textured Green Tiles

Textured green tiles transform ordinary bathroom walls into captivating focal points that showcase both artistry and functionality. We’re seeing statement walls emerge as the defining trend in 2025 bathroom design, where distinctive patterns and contrasting finishes create visual interest and depth throughout the space.
Three-Dimensional Wave Patterns
Wave-like contours bring sculptural elegance to green tile installations, creating movement that transforms static walls into ever-changing features. We recommend positioning these undulating three-dimensional tiles on accent walls behind vanities or within shower alcoves where natural light can highlight their dimensional qualities. The interplay of light and shadow across these surfaces adds depth while maintaining the calming essence that green tiles naturally provide.
Installing wave pattern tiles in vertical arrangements amplifies the room’s height, while horizontal layouts expand visual width in smaller bathroom spaces. We’ve found that emerald and sage green waves work particularly well in contemporary settings, where their organic forms contrast beautifully with clean geometric fixtures.
Raised Geometric Designs
Geometric green tiles with raised patterns introduce artful rhythm through chevrons, penny tiles, and custom mosaics that cast subtle shadows throughout the day. We suggest varying the scale of these patterns from subtle micro-geometry for minimalist bathrooms to bold large-scale designs that make maximalist statements.
Chevron patterns in forest green create sophisticated accent walls that complement both modern and traditional design schemes. Penny tile arrangements work exceptionally well in shower niches, where their smaller scale provides textural interest without overwhelming the space. Custom mosaic designs allow for personalized geometric expressions that can incorporate multiple green tones within a single installation.
These raised motifs serve dual purposes by adding visual texture while creating tactile surfaces that enhance the sensory experience of the bathroom environment.
Mixing Matte And Glossy Finishes
Combining matte and glossy green tiles within the same installation creates striking contrast while establishing clear focal points throughout the bathroom. We recommend using glossy finishes strategically to reflect light and make smaller bathrooms feel more spacious, while incorporating matte surfaces to provide sophisticated grounding elements.
This finishing technique works particularly well when applied to accent walls where different tile sizes create layered contemporary effects. Glossy subway tiles paired with matte geometric accents establish visual hierarchy while maintaining cohesive green color schemes.
We often see this combination used in shower surrounds where glossy tiles on primary surfaces reflect available light, while matte border tiles or decorative bands provide textural contrast. The interplay between these finishes enhances the natural depth that textured green tiles bring to modern bathroom designs.
Blend Modern And Natural With Olive Green Stone Tiles

Olive green stone tiles create an earthly foundation that seamlessly bridges contemporary design with organic beauty. This sophisticated approach transforms bathrooms into serene sanctuaries where modern functionality meets natural tranquility.
Natural Stone Texture And Variations
Stone texture brings authentic character that manufactured tiles simply can’t replicate. Each olive green stone tile showcases unique veining patterns, mineral deposits, and surface variations that tell nature’s story. Natural imperfections become design assets, creating visual depth and tactile interest throughout your bathroom space.
Variations in color intensity add dimensional beauty to olive green stone installations. Lighter tones catch and reflect bathroom lighting, while darker areas create intimate shadows that enhance the stone’s natural drama. We recommend selecting stone tiles with subtle gradations to achieve a cohesive yet ever-changing visual flow.
Surface finishes offer multiple texture options for olive green stone tiles. Honed finishes provide smooth, matte surfaces that feel luxurious underfoot, while tumbled edges create rustic charm with their worn, weathered appearance. Brushed textures add subtle grip for safety in wet areas without compromising the stone’s elegant aesthetic.
Seamless Integration With Spa-Like Elements
Freestanding tubs paired with olive green stone create resort-style luxury in residential bathrooms. The stone’s earthy tones complement white or cream colored tubs beautifully, establishing a focal point that feels both grounding and sophisticated. Position stone tiles as a backdrop wall to frame your tub area with natural elegance.
Rainfall showerheads enhance the stone’s connection to nature’s elements. Water cascading over olive green stone surfaces mimics natural waterfalls, creating a multisensory spa experience. Install stone tiles from floor to ceiling in shower areas to maximize this immersive effect.
Built-in shower niches carved from matching olive green stone provide functional storage while maintaining design continuity. These recessed shelving areas keep bath products organized without disrupting the stone’s flowing visual narrative. Custom stone benches extend the spa experience, offering comfortable seating for relaxation.
Coordinating With Live Plants And Greenery
Living plants amplify olive green stone’s natural energy while purifying bathroom air. Snake plants, pothos, and peace lilies thrive in bathroom humidity, their varied green tones creating beautiful color harmonies with stone surfaces. Position plants on floating shelves or in floor planters to establish organic focal points.
Preserved moss walls complement olive green stone with texture and color continuity. These low maintenance installations bring forest-like tranquility to bathroom spaces without requiring ongoing plant care. Install moss features opposite stone accent walls to create balanced natural elements throughout the room.
Dried botanicals and natural fiber accessories reinforce the organic design theme. Bamboo bath accessories, jute baskets, and wooden plant stands echo the stone’s earthy character while providing practical storage answers. These coordinating elements create a cohesive natural aesthetic that feels intentional and refined.
Create Visual Flow With Green Tile Gradients

Green tile gradients transform bathrooms from simple functional spaces into ever-changing, visually stunning environments that guide the eye while maintaining sophisticated elegance.
Ombre Effects From Light To Dark Green
Ombre installations create compelling visual movement by positioning the lightest green tiles at strategic focal points and gradually transitioning to darker shades throughout the space. We recommend starting with pale sage or mint tones at eye level and progressing to deeper forest or hunter greens toward the floor or surrounding walls. This technique produces depth and dimension that makes bathrooms feel larger and more ever-changing.
The most effective ombre arrangements begin with subtle shade variations rather than dramatic color jumps. Selecting tiles within the same tonal family ensures smooth transitions that appear natural rather than forced. Modern designers often apply this gradient approach to shower walls, creating a waterfall effect that draws attention upward while maintaining visual harmony throughout the entire bathroom space.
Transitioning Between Different Green Shades
Strategic shade transitions allow us to highlight exact architectural features while maintaining connection to the broader color palette. Shower niches benefit from slightly lighter or darker green tiles than surrounding walls, creating definition without breaking visual continuity. Vanity backsplashes can feature graduated tones that complement the main wall color while establishing their own distinct presence.
The key lies in selecting green tiles that share undertones, whether they lean toward blue-green, yellow-green, or gray-green families. This approach prevents competing colors from disrupting the flow while allowing each area to maintain its unique character. Accent areas like built-in shelving or window surrounds can incorporate intermediate shades that bridge the lightest and darkest tones used elsewhere.
Maintaining Cohesion Throughout The Space
Cohesive green tile gradients require consistent sizing, shape, and finish selections across all bathroom surfaces. We achieve unity by limiting ourselves to tiles within the same tonal family and introducing neutral accents like whites, creams, or soft grays to tie the space together visually. Competing colors can disrupt the gradient effect and create visual chaos rather than the intended serene flow.
Consistency in grout color throughout the installation prevents the gradient from appearing disjointed or patchwork. White or light gray grout works best with most green tile gradients, providing subtle contrast that enhances the color progression without overwhelming it. The finish should remain constant across all tiles in the gradient, whether glossy, matte, or textured, to ensure the eye reads the installation as one seamless design element rather than separate sections.
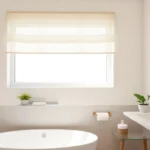
Maximize Small Spaces With Light Green Tile Strategies

Light green tiles unlock the potential of compact bathrooms by creating an illusion of expanded space. We’ve found that pale sage, mint, and seafoam hues work exceptionally well for walls, floors, and accent features without overwhelming smaller areas.
Reflecting Light With Glossy Finishes
Glossy ceramic tiles amplify both natural and artificial light sources throughout your bathroom space. We recommend selecting glossy porcelain or ceramic green tiles to enhance brightness levels, particularly in bathrooms with limited window access. These reflective surfaces create a clean, modern aesthetic while making rooms appear larger and more luminous.
Light bounces effectively off glossy green tile surfaces, doubling the impact of your existing lighting fixtures. The reflective quality becomes especially valuable during morning routines when natural light remains minimal. We’ve observed that glossy finishes work best on accent walls or backsplash areas where they can catch and distribute light efficiently.
Vertical Installation To Increase Height Perception
Vertical tile installation draws attention upward, creating the impression of taller ceilings in compact spaces. We suggest using elongated rectangular tiles or subway tiles in vertical patterns to maximize this height improving effect. This technique proves particularly effective with light green tiles, as the upward eye movement combines with the space expanding color properties.
Bathroom walls appear significantly taller when tiles run from floor to ceiling in vertical arrangements. The continuous vertical lines create an unbroken visual path that tricks the eye into perceiving greater height. We recommend maintaining consistent grout lines to strengthen this illusion and avoid interrupting the upward flow.
Strategic Placement For Optimal Impact
Accent walls behind vanities provide focal points without cluttering your bathroom’s visual space. We’ve discovered that single green feature walls create anchoring effects while maintaining an open, airy atmosphere throughout the room. This approach allows you to introduce bold green elements without overwhelming compact dimensions.
Border treatments and backsplash applications offer controlled ways to incorporate light green tiles into small bathrooms. These strategic placements add visual interest at eye level while preserving wall space for other design elements. We suggest mixing light green tiles with neutral tones on adjacent surfaces to create balanced, harmonious environments that emphasize the green accents without competing for attention.
Complete The Look With Green Tile Coordination Tips

Creating a cohesive green tile bathroom requires careful attention to every design element. We’ll guide you through essential coordination strategies that ensure your green tiles work harmoniously with paint colors, lighting, and accessories.
Selecting Complementary Paint Colors
Neutral paint colors serve as the perfect backdrop for green tile installations. Soft whites, warm grays, and creamy beiges allow your green tiles to shine without creating visual competition throughout the space. We recommend choosing colors that enhance rather than fight with your tile selection.
Dramatic contrast emerges when you pair green tiles with deep charcoal or rich black paint colors. This bold approach works particularly well with emerald or hunter green tiles, creating sophisticated depth that transforms ordinary bathrooms into luxury retreats. Dark paint colors also help smaller green tiles appear more vibrant and defined.
Monochromatic schemes using various green paint shades create stunning cohesion with your tile work. We suggest selecting wall colors that are either two shades lighter or darker than your tiles to maintain visual interest while preserving the unified color story. This technique works exceptionally well with sage and olive green tile installations.
Soft pastels and muted blues complement green tiles beautifully for nature inspired bathroom designs. These gentle hues create soothing palettes that feel fresh and spa like, particularly when combined with mint or seafoam green tiles. Consider these color combinations for bathrooms where relaxation is the primary goal.
Choosing The Right Lighting Temperature
Warm white lighting between 2700K and 3000K creates the most flattering environment for earthy green tiles. This temperature range enhances the natural warmth in sage, olive, and forest green installations while creating a cozy atmosphere that feels inviting throughout the day. We particularly recommend this lighting for bathrooms with matte finish tiles.
Cool white lighting at 4000K brings out the vibrancy in jewel toned green tiles like emerald and hunter green. This crisp lighting temperature highlights the richness and depth of glossy tile finishes while maintaining excellent color accuracy for daily grooming tasks. Bright green tiles appear more saturated and luxurious under cool lighting conditions.
Layered lighting systems provide the most flexibility for showcasing your green tile work effectively. Combine overhead fixtures with vanity lighting and accent lights to create depth and eliminate shadows that might dull your tile colors. We recommend installing dimmer switches to adjust lighting intensity based on different activities and times of day.
Natural light interaction with artificial lighting requires careful consideration when planning your green tile bathroom. Position mirrors strategically to reflect both natural and artificial light onto your tile surfaces, amplifying their color and texture. This technique works particularly well with textured or three dimensional green tiles that benefit from multiple light angles.
Incorporating Matching Accessories And Textiles
White and cream towels provide the cleanest contrast against all shades of green tiles. These neutral textiles prevent color clashing while adding freshness that keeps your bathroom feeling bright and clean. We suggest choosing plush cotton or bamboo materials that feel luxurious against the sophisticated backdrop of your green tile work.
Metallic fixtures in brass, gold, or bronze create elegant warmth that complements green tiles beautifully. These finishes bridge the gap between cool green tones and warm natural materials, particularly when you’ve incorporated wood vanities or natural stone elements. Black fixtures offer modern contrast that works exceptionally well with darker green tile installations.
Natural material accessories like wooden soap dispensers, stone planters, and woven baskets reinforce the organic appeal of green tile bathrooms. These elements create textural variety while maintaining the nature inspired theme that makes green tiles so appealing in bathroom environments. Choose accessories in neutral tones to avoid overwhelming your carefully coordinated color scheme.
Artwork and decorative elements should echo your green tile colors without exactly matching them. Select pieces with subtle green accents, complementary earth tones, or monochromatic themes that enhance your overall design story. We recommend limiting decorative colors to three main hues to maintain visual harmony throughout your completed green tile bathroom.
Conclusion
Green tiles offer endless possibilities for creating bathrooms that are both stylish and timeless. Whether you’re drawn to the earthy warmth of olive stone or the luxurious appeal of emerald mosaics we’ve shown how each shade brings its own character to your space.
The key to success lies in thoughtful coordination – from selecting the right grout color to choosing complementary fixtures that enhance your tile’s natural beauty. We’ve demonstrated how proper lighting and strategic placement can transform even the smallest bathroom into a stunning retreat.
Your green tile bathroom doesn’t have to follow one exact style. Mix textures create gradients or keep it simple with classic subway patterns. The versatility we’ve explored means you can adapt these ideas to match your personal taste while creating a space that feels fresh and inviting for years to come.
Frequently Asked Questions
What makes green tiles a good choice for bathroom design?
Green tiles offer versatility and natural elegance that work well in both modern and traditional bathrooms. They create a calming atmosphere and pair beautifully with natural materials like wood and contemporary fixtures. Green tiles come in various shades from sage to emerald, allowing you to customize the look to match your design style.
Which green tile shades work best for different bathroom styles?
Sage and mint green work well for modern minimalist designs, while forest green suits traditional styles. Emerald green adds luxury to contemporary spaces, and hunter green creates sophisticated retreats. Olive green stone tiles bridge contemporary and organic design. Choose shades based on your desired atmosphere and existing decor.
How should I install forest green subway tiles for maximum impact?
Use traditional brick patterns with white or cream grout to create contrast and brightness. Install tiles as accent walls behind vanities or in shower areas. Consider herringbone patterns for added visual interest. Extend tiles from countertop to ceiling for a cohesive look and pair with natural wood vanities.
What’s the best way to use emerald green mosaic tiles?
Install glass mosaic feature walls behind vanities from countertop to ceiling for maximum visual continuity. Create waterfall shower niches for sculptural effects. Coordinate with brass fixtures and hardware to create sophisticated color palettes that bridge cool green tones with warm natural materials.
How can sage green tiles make small bathrooms appear larger?
Use large format sage green porcelain tiles for seamless surfaces that reduce grout lines. Choose glossy finishes to reflect light and enhance brightness. Install tiles vertically to create the perception of taller ceilings. Use complementary white grout to enhance geometric clarity and brighten the space.
What patterns work best with hunter green hexagon tiles?
Create honeycomb patterns with small hexagonal tiles for shower floors to enhance safety and visual appeal. Use mixed-size hexagonal tiles for dynamic wall designs, with larger hexagons as anchors and smaller tiles in transitional areas. Apply metallic grout in bronze or brass tones for added luxury.
How do I achieve a vintage look with mint green subway tiles?
Use beveled edge tiles in traditional running bond patterns. Choose glossy finishes for brightness or matte options for authenticity. Combine with checkerboard floor patterns and vintage brass fixtures to enhance the retro aesthetic while maintaining functional elegance and nostalgic appeal.
What lighting works best with green tile bathrooms?
Use warm white lighting for earthy greens like sage and olive, and cool white for jewel tones like emerald. Install layered lighting systems with ambient, task, and accent lighting for flexibility. Consider how natural light interacts with your chosen green shade throughout the day.
How can I create visual flow with green tile gradients?
Select tiles within the same tonal family for smooth ombre transitions from light to dark. Maintain consistency in tile size, shape, and finish. Use strategic shade transitions to highlight architectural features while maintaining cohesion throughout the space for a visually stunning environment.
What accessories complement green tile bathrooms?
Choose neutral towels in white, cream, or natural tones. Use metallic fixtures in brass, bronze, or brushed gold. Incorporate natural materials like wood vanities and live plants. Select artwork that echoes green tones without overwhelming the design, maintaining a harmonious and inviting atmosphere.