The bathroom ceiling often gets overlooked during renovation projects but it’s one of the most important design elements that can completely transform your space. We’ve all been in bathrooms where the ceiling feels like an afterthought – plain white paint that’s already starting to peel or worse yet showing signs of water damage.
Your bathroom ceiling doesn’t have to be boring or problematic. With the right materials and design choices we can create a stunning focal point that’s both functional and beautiful. From moisture-resistant tiles to dramatic coffered designs there are countless ways to elevate this often-neglected surface.
We’ll explore creative ceiling ideas that not only withstand bathroom humidity but also add character and visual interest to your space. Whether you’re working with a small powder room or a luxurious master bath these ceiling answers will help you create the bathroom of your dreams.
Painted Drywall Ceilings for Budget-Friendly Bathroom Updates
Transforming your bathroom ceiling doesn’t require a complete renovation or expensive materials. We’ve discovered that painted drywall remains one of the most cost-effective ways to create dramatic ceiling updates that complement your overall bathroom design.
Semi-Gloss Paint for Moisture Resistance
Semi-gloss paint provides superior moisture protection compared to flat or eggshell finishes in bathroom environments. We recommend choosing paints with a sheen level between 35-70% gloss measurement for optimal humidity resistance and easy cleaning capabilities.
Quality matters significantly when selecting moisture-resistant paints for bathroom ceilings. Premium brands like Benjamin Moore Aura Bath & Spa or Sherwin-Williams ProClassic offer mildew-resistant formulations that prevent peeling and bubbling in high-steam conditions. These specialized paints typically cost $15-25 more per gallon than standard options but deliver long-lasting results.
Application techniques affect the durability of semi-gloss ceiling paint dramatically. We suggest using a high-quality synthetic brush for cutting edges and a 3/8-inch nap roller for smooth coverage across the ceiling surface. Two thin coats provide better adhesion and coverage than one thick application.
Bold Color Choices to Create Visual Interest
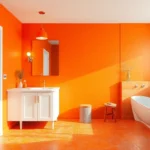
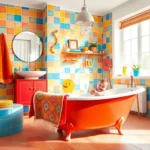
Bold ceiling colors transform ordinary bathrooms into striking design statements that reflect personal style. We’ve seen dramatic results with deep navy blues, rich emerald greens, and warm terracotta shades that create cozy, spa-like atmospheres.
Dark colors work exceptionally well in bathrooms with adequate lighting and white or light-colored walls. Charcoal gray ceilings paired with white subway tiles create sophisticated contrast, while deep burgundy adds warmth to traditional bathroom designs. These bold choices make standard 8-foot ceilings appear higher through visual weight distribution.
Color psychology plays an important role in bathroom ceiling selection for daily comfort. Cool blues and greens promote relaxation during bath time, while warm oranges and yellows energize morning routines. We recommend testing paint samples in different lighting conditions before committing to bold color choices.
Textured Paint Techniques for Added Dimension
Textured paint techniques add architectural interest to flat bathroom ceilings without expensive structural modifications. We favor techniques like sponge painting, stippling, and color washing that create subtle depth while maintaining moisture resistance.
Sponge painting involves applying base color followed by lighter or darker accent colors using natural sea sponges. This technique works particularly well with neutral color palettes like beige, taupe, and soft gray combinations. The organic patterns created by sponging complement both traditional and contemporary bathroom styles.
Stippling creates uniform texture through dabbing motions with specialized brushes or rollers. We achieve best results by applying base coat completely, then adding texture using semi-dry brushes in circular motions. This method produces consistent patterns that hide minor ceiling imperfections while adding visual dimension to small bathroom spaces.
Wood Planks and Beams for Rustic Bathroom Charm

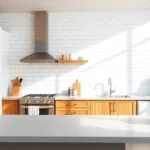
Natural wood elements bring warmth and texture to bathroom ceilings while creating that coveted farmhouse aesthetic. Cedar, cypress, and pine stand out as top choices for humid bathroom environments due to their natural moisture resistance properties.
Reclaimed Wood Installation Methods
Direct mounting offers the simplest approach for installing reclaimed wood planks directly onto your existing ceiling structure. Planks attach securely to ceiling joists using construction adhesive and finishing nails for a streamlined installation process.
Grid installation creates dramatic visual depth by incorporating exposed wood beams in geometric patterns across the ceiling surface. This method works particularly well in larger bathrooms where the grid structure won’t overwhelm the space.
Panel systems provide uniformity for homeowners seeking a more polished appearance without sacrificing the rustic charm. Pre-made reclaimed wood panels install quickly and ensure consistent spacing between individual boards.
Tongue and groove planking delivers seamless coverage with interlocking edges that eliminate visible gaps. Installation starts from one wall and progresses across the ceiling, creating clean lines that enhance the overall design flow.
Proper Sealing Techniques for Humid Environments
Waterproof sealants form the first line of defense against moisture infiltration at all wood joints and edges. Apply marine-grade sealants specifically designed for high-humidity environments to prevent water damage and wood rot.
Polyurethane coatings create a protective barrier that repels water while allowing the wood to breathe naturally. Three thin coats provide optimal protection, with light sanding between applications for proper adhesion.
Edge sealing requires special attention since these areas experience the most moisture exposure. Use a high-quality wood conditioner before applying polyurethane to ensure even penetration and maximum protection.
Ventilation considerations become crucial when sealing wood ceilings in bathrooms. Proper exhaust fan placement prevents moisture buildup that could compromise even the best sealing efforts.
Stain and Finish Options for Different Styles
Natural stains enhance the wood’s inherent grain patterns and color variations for an authentic rustic appearance. Clear stains work best on cedar and cypress, allowing their natural beauty to shine through.
Dark stains transform lighter woods into rich, sophisticated focal points that complement modern farmhouse designs. Ebony and walnut stains create dramatic contrast against white fixtures and vanities.
Matte finishes reduce glare and reflections while maintaining the wood’s natural texture and appearance. This option works exceptionally well in bathrooms with multiple light sources or large windows.
Gloss finishes provide maximum moisture protection and easy cleaning capabilities for high-traffic bathrooms. Semi-gloss options offer a compromise between protection and the desired rustic aesthetic.
Whitewash techniques preserve wood grain visibility while lightening the overall color for brighter bathroom spaces. This finish style pairs beautifully with coastal and shabby chic design themes.
Coffered Ceilings for Elegant Bathroom Design

Coffered ceilings transform ordinary bathrooms into sophisticated retreats through their distinctive recessed panel design. We’ll explore three key approaches that maximize both aesthetic appeal and practical functionality in moisture rich environments.
Traditional Square Grid Patterns
Traditional square grid patterns create structured elegance through systematic geometric arrangements across your bathroom ceiling. We recommend using moisture resistant materials like PVC or treated wood to form clean intersecting lines that frame each recessed section. Standard grid dimensions typically measure 24 by 24 inches for optimal visual proportion in most bathroom spaces.
Installation begins with careful measurement and marking to ensure perfect alignment throughout the entire ceiling surface. We suggest starting from the center point and working outward to maintain symmetry in your grid layout. Premium molding strips create the raised borders while recessed panels can feature matching or contrasting finishes to enhance depth perception.
Maintenance remains minimal when you select appropriate materials that resist humidity and temperature fluctuations. We’ve found that regular dusting and occasional cleaning with mild soap answers keep traditional grid patterns looking pristine for years. Quality construction prevents warping or separation at joint connections even in high moisture conditions.
Custom Molding and Trim Details
Custom molding elevates coffered ceiling designs through personalized architectural elements that reflect your unique style preferences. We create sophisticated profiles using materials ranging from simple quarter round trim to elaborate crown molding configurations. Ornate Victorian inspired details contrast beautifully with sleek contemporary lines depending on your overall bathroom aesthetic.
Professional installation techniques ensure seamless integration between molding components and existing ceiling structures. We recommend pre finishing all trim pieces before installation to achieve consistent color and sheen across the entire surface. Corner joints require precise miter cuts and quality wood glue for permanent connections that won’t separate over time.
Design flexibility allows us to incorporate multiple trim styles within a single coffered ceiling for added visual complexity. We often combine different profile heights and widths to create layered effects that draw attention upward. Painted finishes offer unlimited color options while natural wood stains highlight material textures and grain patterns.
Lighting Integration Within Coffers
Lighting integration transforms functional illumination into dramatic design elements within each coffered section. We install LED strip lights along the perimeter edges to create soft ambient lighting that highlights the recessed panel geometry. Recessed fixtures positioned in panel centers provide task lighting while maintaining clean architectural lines.
| Lighting Type | Placement | Light Output | Installation Difficulty |
|---|---|---|---|
| LED Strips | Perimeter edges | 800-1200 lumens | Moderate |
| Recessed fixtures | Panel centers | 600-900 lumens | Professional |
| Decorative pendants | Selected panels | 400-800 lumens | Moderate |
Dimmer controls allow us to adjust lighting intensity for different activities from relaxing baths to detailed grooming tasks. We recommend installing waterproof fixtures rated for bathroom environments to ensure safety and longevity. Smart lighting systems enable color temperature adjustments that complement natural daylight cycles throughout your daily routine.
Strategic placement creates layered illumination that eliminates harsh shadows while providing adequate brightness for all bathroom functions. We position accent lights to graze textured surfaces and highlight architectural details within each coffer. Emergency lighting integration ensures safety during power outages while maintaining the elegant aesthetic you’ve carefully designed.
Tray Ceilings to Add Architectural Drama

Tray ceilings offer an elegant solution for transforming plain bathroom ceilings into stunning architectural features. We’ve found these raised center designs create the perfect balance of sophistication and visual interest while maintaining the functionality your bathroom needs.
Single-Level Tray Designs
Single-level tray ceilings deliver instant sophistication without overwhelming smaller bathroom spaces. We recommend incorporating a skylight within the raised center section to flood your bathroom with natural light while creating an open, airy atmosphere. Paint treatments become particularly effective with this design, allowing you to match your room’s existing color scheme or create dramatic contrast with darker accent tones.
This straightforward approach works exceptionally well in master bathrooms where you want architectural interest without complex installation requirements. Finishing options include matching the tray interior to your wall color or selecting a complementary shade that enhances your overall design theme. We’ve seen remarkable transformations where simple paint applications create the illusion of higher ceilings and more spacious interiors.
Multi-Level Stepped Configurations
Multi-level tray ceilings provide dramatic layered effects that emphasize exact bathroom zones with striking visual impact. These stepped configurations allow you to create distinct areas within your bathroom, such as highlighting a luxurious soaking tub or defining a separate shower space. We recommend using different lighting levels within each step to enhance the architectural drama and create functional task lighting.
Design flexibility becomes a major advantage with multi-level systems, enabling you to incorporate varying heights and widths to suit your bathroom’s proportions. Installation involves creating multiple recessed levels that step progressively upward from the perimeter toward the center. This configuration works particularly well in larger bathrooms where you have adequate ceiling height to accommodate the stepped design without compromising headroom.
Crown Molding and Accent Lighting Options
Crown molding transforms basic tray ceilings into refined architectural statements that rival high-end spa environments. We suggest installing decorative molding around the tray’s perimeter to create clean, finished edges while adding classical elegance to your bathroom design. Traditional profiles work beautifully with vintage bathroom styles, while sleek, minimal molding complements contemporary aesthetics.
Accent lighting integration within tray ceilings creates stunning ambient effects that enhance both functionality and atmosphere. Recessed fixtures positioned within the tray provide excellent general lighting while LED strip installations along the molding create dramatic indirect illumination. We recommend dimmable systems that allow you to adjust lighting intensity based on different bathroom activities, from bright task lighting for grooming to soft ambient lighting for relaxing baths.
Strategic placement of decorative fixtures within the tray center can serve as focal points while providing essential illumination. Consider installing moisture-rated chandeliers or pendant lights that complement your bathroom’s overall design theme while ensuring safety in humid environments.
Suspended Drop Ceilings for Practical Solutions

Suspended drop ceilings represent the ultimate functional upgrade for bathroom spaces, offering unmatched versatility and maintenance advantages. We recommend these systems when access to utilities remains a priority.
Moisture-Resistant Tile Options
Ceramic tiles excel in bathroom drop ceiling applications due to their exceptional water resistance and cleaning simplicity. We favor porcelain options for high humidity areas since they’re denser and less porous than standard ceramic varieties.
Glass tiles create stunning visual effects while providing superior moisture protection in suspended ceiling systems. We recommend frosted glass panels for privacy or clear options to maximize light transmission from above.
PVC and vinyl tiles offer budget friendly alternatives that resist moisture damage while maintaining easy installation properties. We suggest textured vinyl options that mimic natural materials like wood or stone for enhanced aesthetic appeal.
| Tile Material | Moisture Resistance | Maintenance Level | Cost Range |
|---|---|---|---|
| Ceramic | High | Low | $2-8 per sq ft |
| Porcelain | Very High | Very Low | $3-12 per sq ft |
| Glass | Excellent | Low | $5-15 per sq ft |
| PVC/Vinyl | Good | Very Low | $1-5 per sq ft |
Easy Access to Plumbing and Electrical
Removable panels provide instant access to plumbing connections and electrical components without demolition requirements. We install these systems to help routine maintenance and emergency repairs in bathroom environments.
Grid suspension systems allow individual tile removal for targeted access to exact utility areas. We recommend marking panel locations that correspond to shut off valves and junction boxes for quick identification during maintenance.
Professional installation ensures proper spacing and support for heavy fixtures while maintaining accessibility features. We suggest consulting with plumbers and electricians during planning phases to optimize panel placement for future service needs.
Integrated Ventilation System Benefits
Proper air circulation eliminates moisture buildup that leads to mold growth and structural damage in bathroom spaces. We integrate exhaust fans directly into suspended ceiling designs for seamless ventilation answers.
Energy efficiency improves when ventilation systems work along with suspended ceiling insulation properties. We calculate that properly ventilated drop ceilings can reduce heating and cooling costs by 15 to 20 percent in bathroom areas.
Air quality enhancement occurs through continuous moisture removal and improved circulation patterns created by suspended ceiling configurations. We recommend timer controlled ventilation systems that operate automatically after shower use to maintain optimal humidity levels.
Tin and Metal Ceilings for Vintage Appeal

Metal ceilings bring timeless character to bathroom spaces while offering practical benefits that complement modern living. We can transform ordinary bathrooms into sophisticated retreats using various tin and metal ceiling answers.
Authentic Pressed Tin Installation
Pressed tin ceilings offer a classic vintage look that adds unique charm to bathroom environments. Various patterns are available, from intricate Victorian designs to simpler geometric styles that suit different aesthetic preferences. Painting these surfaces allows us to match any décor scheme while preserving the distinctive textural elements.
Installation involves securing panels directly to ceiling joists or existing drywall using appropriate fasteners. We recommend professional installation for best results, particularly in bathrooms where moisture considerations require extra attention to sealing and ventilation.
Modern Metal Tile Alternatives
Aluminum and steel tiles provide durable, moisture resistant options that excel in bathroom environments. These materials come in polished, matte, brushed, and textured finishes that create contemporary aesthetic appeal. Steel offers superior strength while aluminum provides lightweight installation advantages.
Copper and brass accents introduce warmth and elegance to metal ceiling designs. These materials develop natural patinas over time, creating evolving visual interest that enhances the bathroom’s character. Contemporary metal tiles often feature snap together installation systems that simplify the process compared to traditional pressed tin methods.
Maintenance and Cleaning Considerations
Regular dusting maintains the appearance of metal ceilings and prevents buildup that can dull their shine. Cleaning should be done with soft cloths and mild soap answers to prevent scratching or damage to decorative surfaces. Abrasive cleaners can permanently mar metal finishes and should be avoided.
Moisture protection requires proper sealing or coating to withstand bathroom humidity levels effectively. Regular inspections help identify potential issues like loose panels or damaged seals before they become serious problems. We recommend checking seams and edges quarterly to ensure long term performance in high moisture environments.
Exposed Structural Elements for Industrial Style

Raw architectural elements create authentic industrial charm that transforms ordinary bathroom ceilings into striking design statements. We’ll explore how leaving structural components exposed adds character while maintaining the practical benefits your bathroom needs.
Painted Beam and Joist Treatments
Painting exposed beams in neutral colors maintains cohesive industrial aesthetics while preventing overwhelming visual clutter. We recommend selecting colors that complement your existing fixtures and wall treatments for seamless integration.
Contrasting color schemes create dramatic visual depth that draws the eye upward and expands perceived space. Dark beams against light ceilings or vice versa establish strong architectural definition that works especially well in smaller bathrooms.
Preparation techniques ensure long lasting results in humid environments. We suggest using high quality primer specifically designed for wood surfaces, followed by moisture resistant paint formulations that prevent peeling and deterioration.
Application methods require careful attention to detail for professional looking results. Brush painting provides better coverage in beam crevices compared to roller application, while spray painting offers smooth finishes on larger exposed areas.
Ductwork and Pipe Integration
Exposed ductwork systems emphasize authentic industrial themes when incorporated thoughtfully into ceiling designs. We find that leaving ductwork unpainted creates raw appeal, while strategic color choices can make these elements focal points rather than eyesores.
Pipe framed lighting fixtures serve dual purposes by supporting illumination while reinforcing industrial aesthetics. Metal conduit, copper pipes, and galvanized steel create unique lighting answers that blend functionality with distinctive style.
Strategic placement considerations ensure exposed utilities don’t interfere with bathroom activities or create safety hazards. We recommend maintaining adequate clearance around plumbing fixtures and ensuring all electrical components meet bathroom safety codes.
Maintenance accessibility becomes crucial when integrating exposed systems into ceiling designs. Removable panels or hinged sections allow easy access for repairs without disrupting the overall aesthetic appeal.
Balancing Function with Aesthetic Appeal
Minimalist fixture selection prevents industrial elements from overwhelming bathroom spaces. We pair exposed structural components with clean lined vanities, simple mirrors, and streamlined hardware for balanced visual harmony.
Strategic lighting design highlights industrial features while ensuring adequate illumination for daily tasks. Pendant lights suspended from exposed beams, track lighting along ductwork, and recessed fixtures in structural cavities create layered lighting effects.
Neutral color palettes allow industrial elements to shine without competing with other design components. Whites, grays, and earth tones provide sophisticated backdrops that showcase raw materials effectively.
Ventilation considerations become especially important when exposing structural elements that may trap moisture. We recommend installing powerful exhaust fans and ensuring proper air circulation around exposed wood and metal components to prevent deterioration.
Wallpaper and Fabric Treatments for Decorative Flair

Moving beyond traditional painted surfaces, wallpaper and fabric treatments offer sophisticated design opportunities that can transform your bathroom ceiling into a stunning focal point.
Moisture-Resistant Wallpaper Selection
Waterproof vinyl wallpapers provide the most reliable protection against humidity and water splashes while maintaining their decorative appeal. These specialized materials resist peeling, bubbling, and mold growth that plague standard wallpapers in bathroom environments.
Vinyl-coated papers offer excellent moisture resistance at a lower price point than pure vinyl options. We recommend selecting products specifically labeled as “bathroom safe” or “moisture resistant” to ensure optimal performance in high-humidity conditions.
Prepasted wallpapers simplify installation by eliminating the need for separate adhesive application. Look for products with strong adhesive backing that won’t fail when exposed to steam and temperature fluctuations.
Non-woven wallpapers allow better air circulation behind the material, reducing moisture trapped between the wall and wallpaper. These breathable options help prevent mold and mildew formation while maintaining their structural integrity.
Fabric Panel Installation Techniques
Secure mounting systems prevent fabric panels from sagging or falling due to moisture exposure and gravity. Install sturdy brackets or tracks that can support the weight of fabric plus any accumulated moisture.
Tension rod installation works well for lightweight fabrics stretched across smaller ceiling sections. Position rods at regular intervals to maintain proper fabric tension and prevent drooping between support points.
Adhesive backing systems provide seamless installation for fabric panels designed specifically for ceiling application. Choose marine-grade adhesives that maintain their bonding strength in humid conditions.
Frame mounting techniques allow easy removal and cleaning of fabric panels when needed. Build lightweight frames that can be easily lifted and replaced, making maintenance more manageable over time.
Pattern and Color Coordination Tips
Complementary patterns should echo existing design elements in your bathroom without overwhelming the space. Select ceiling patterns that work harmoniously with wall tiles, flooring, and fixture finishes to create visual cohesion.
Color matching strategies ensure your ceiling treatment enhances rather than competes with your bathroom’s existing color palette. We suggest using ceiling colors that are either lighter versions of wall colors or accent colors already present in the space.
Scale considerations matter significantly when selecting patterns for ceiling application. Larger patterns work better on higher ceilings, while smaller, more intricate designs suit lower ceiling heights without creating visual congestion.
Themed coordination creates intentional design statements that reflect your bathroom’s overall style direction. Nautical patterns complement coastal themes, while geometric designs enhance modern minimalist aesthetics, and floral motifs support traditional or vintage-inspired spaces.
Mirrored Ceilings for Space Enhancement

Mirrored ceilings transform small bathroom spaces by creating the illusion of expanded height and floor area through strategic light reflection. These reflective surfaces draw the eye upward while doubling the visual impact of your existing lighting fixtures.
Safety Glass Requirements
Tempered glass becomes essential for bathroom ceiling mirrors due to its impact resistance and safety features. We recommend using only certified safety glass that meets building codes for overhead installations, as standard mirrors can shatter dangerously if they fall.
Building regulations require safety glass in all ceiling applications to protect occupants from potential injury. Professional installers should verify that your mirror specifications include tempered glass certification before beginning the project.
Installation Best Practices
Professional installation ensures proper weight distribution across your ceiling’s structural framework. We strongly advise hiring experienced contractors who specialize in mirror installations, as ceiling mounting requires precise techniques to prevent accidents.
Structural assessment becomes crucial before installation since mirrors add important weight to ceiling joists. Your contractor should evaluate load bearing capacity and may need to reinforce the ceiling framework with additional support beams.
Secure fastening systems must withstand both the mirror’s weight and potential vibrations from household activities. Quality mounting hardware includes corrosion resistant brackets and anchors specifically designed for bathroom environments.
Cleaning and Maintenance Guidelines
Regular cleaning with soft microfiber cloths prevents water spots and soap residue from dulling the reflective surface. We recommend using mild detergent answers rather than harsh chemicals that can damage the mirror’s protective backing.
Weekly dusting prevents moisture and particles from building up on the mirror surface. Gentle circular motions with lint free cloths maintain the mirror’s clarity without creating scratches or streaks.
Moisture control through proper ventilation extends the mirror’s lifespan by preventing edge deterioration. Your bathroom’s exhaust fan should run during and after showers to minimize condensation on the ceiling mirror surface.
Conclusion
Transforming your bathroom ceiling doesn’t have to be a challenging job. We’ve explored many options that cater to every budget style preference and skill level. From simple painted treatments to sophisticated coffered designs each approach offers unique benefits for your space.
The key to success lies in choosing materials that can withstand bathroom humidity while reflecting your personal aesthetic. Whether you’re drawn to the warmth of natural wood the drama of tray ceilings or the practicality of suspended systems there’s a perfect solution waiting for your bathroom.
Remember that proper installation and moisture management are crucial regardless of which option you select. With careful planning and attention to detail your new ceiling will become a stunning focal point that elevates your entire bathroom experience for years to come.
Frequently Asked Questions
What are the most budget-friendly bathroom ceiling renovation options?
Painted drywall ceilings offer the most cost-effective transformation. Use semi-gloss paint with mildew-resistant formulations from premium brands. Apply two thin coats with a high-quality synthetic brush for durability. Bold colors and textured paint techniques like sponge painting or stippling add visual interest without expensive modifications while maintaining moisture resistance.
How do I protect wood ceiling materials from bathroom humidity?
Proper sealing is crucial for wood ceiling longevity in humid environments. Use marine-grade sealants and polyurethane coatings for optimal moisture resistance. Choose naturally moisture-resistant woods like cedar, cypress, or pine. Apply sealant to all surfaces, including cut edges, and reapply periodically to maintain protection against humidity damage.
What are coffered ceilings and how do they work in bathrooms?
Coffered ceilings feature recessed square or rectangular panels that add architectural sophistication to bathrooms. They transform ordinary spaces into elegant retreats through traditional grid patterns and custom molding details. Use moisture-resistant materials and integrate LED lighting within the coffers for enhanced functionality and visual appeal.
Are tray ceilings suitable for small bathrooms?
Yes, single-level tray ceiling designs work well in smaller bathrooms without overwhelming the space. They add architectural drama while maintaining proportion. Consider skylights for natural light, strategic paint treatments for visual impact, and crown molding details to create refined architectural statements that enhance the room’s perceived height.
What maintenance do metal and tin ceilings require in bathrooms?
Metal ceilings need regular dusting and proper sealing to perform well in humid conditions. Clean with mild soap solutions and dry thoroughly to prevent water spots. Inspect seals periodically and reapply as needed. Pressed tin, aluminum, steel, copper, and brass options each have specific care requirements but generally offer excellent durability when properly maintained.
Can I install wallpaper on bathroom ceilings?
Yes, but use moisture-resistant options like waterproof vinyl or vinyl-coated papers specifically designed for humid environments. These materials provide reliable protection against bathroom humidity while offering sophisticated design opportunities. Ensure proper pattern and color coordination with existing bathroom elements for visual cohesion and thematic consistency.
Are mirrored ceilings safe for bathroom installations?
Mirrored ceilings can be safe when properly installed using tempered safety glass to prevent hazards. Professional installation is essential to ensure proper weight distribution, structural integrity, and secure fastening systems. Regular maintenance includes dusting and moisture control through adequate ventilation to preserve mirror clarity and prevent condensation issues.
What lighting options work best with decorative ceiling treatments?
LED strips and recessed fixtures offer versatile lighting solutions for most ceiling treatments. Dimmable systems provide flexibility for different bathroom activities. For coffered and tray ceilings, integrate lighting within architectural features for layered illumination. Ensure all fixtures are rated for bathroom humidity levels and positioned safely away from water sources.